Stamp of Approval: The Perfect Reason – Release Day

The Perfect Reason Collection - Stamp of Approval

It’s release day over at Catherine Pooler Designs! Stamp of Approval – The Perfect Reason Collection is now available to the public! Yup – you’ve probably already hopped along on our three day Blog Hop – if not, I have links for you at the end.

We had a Midnight Release PJ Party last night over on StampNation – boy was that fun. Many of the Design Team members jumped on live to create (including me!) with the collection, there was tons of chat, a newly released challenge and just an overall fun time.

Stamp of Approval

I have a few more projects for you today! I thought I’d channel my inner DT Clean and Simple gurus – Maureen Merritt and Kristie Goulet. These gals have clean and simple down, and I always just smile at all their creations. So this one is for you Maureen and Kristie!

White space is the key to Clean & Simple design – evident in these three projects:

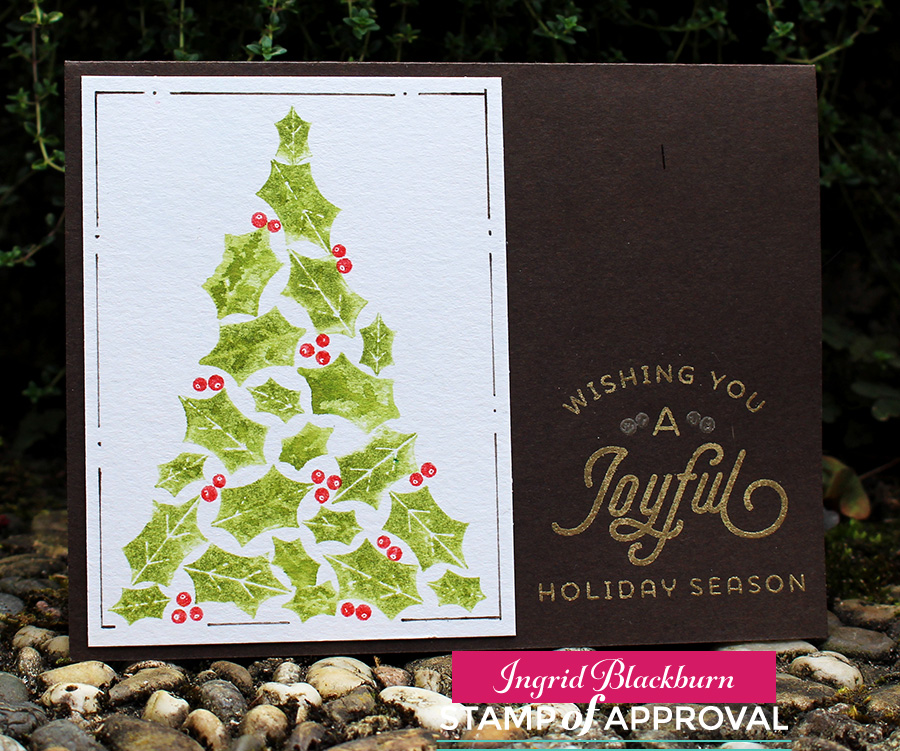
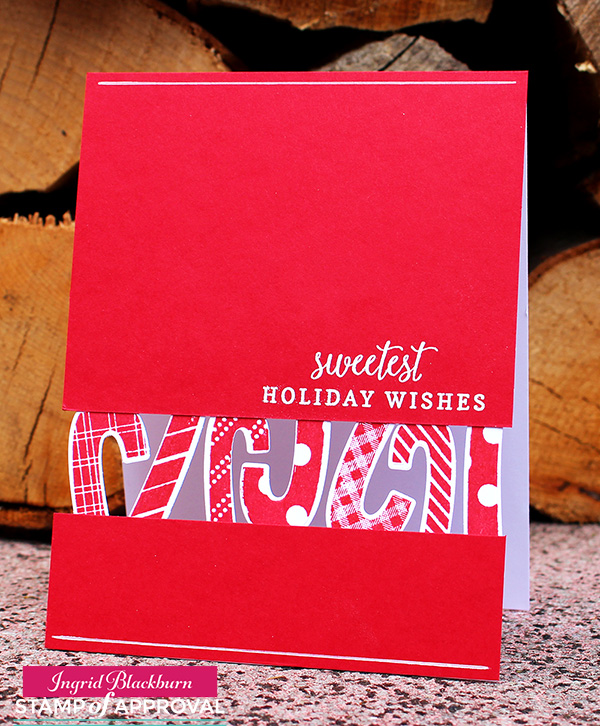
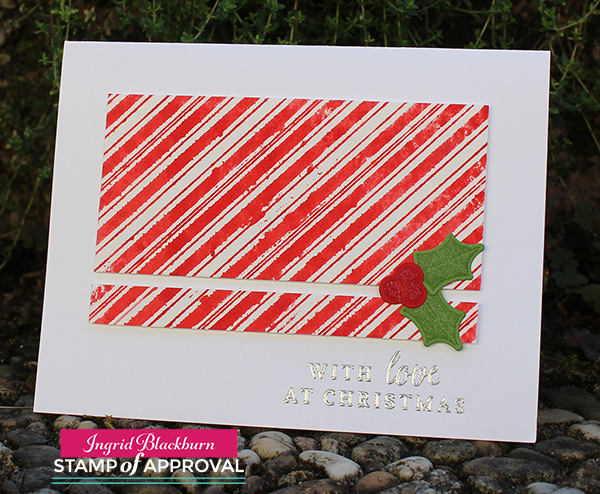
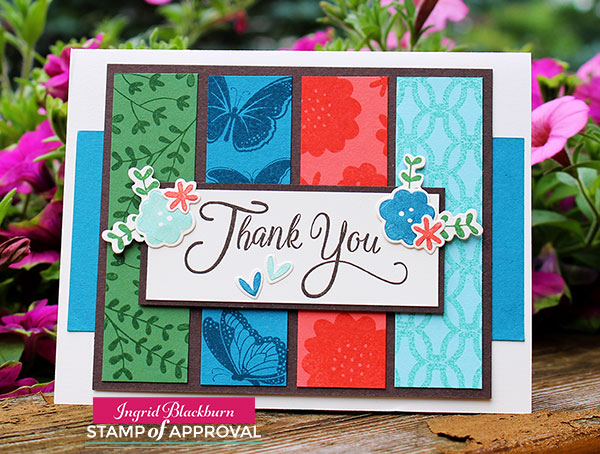
Project One: CAS Pop

You can always pop up a panel like this and stamp under and on top – easily match them up for a cool look. This card uses the Perfect Reason & the You Did It stamp sets.

Perfect Reason Stamp Set

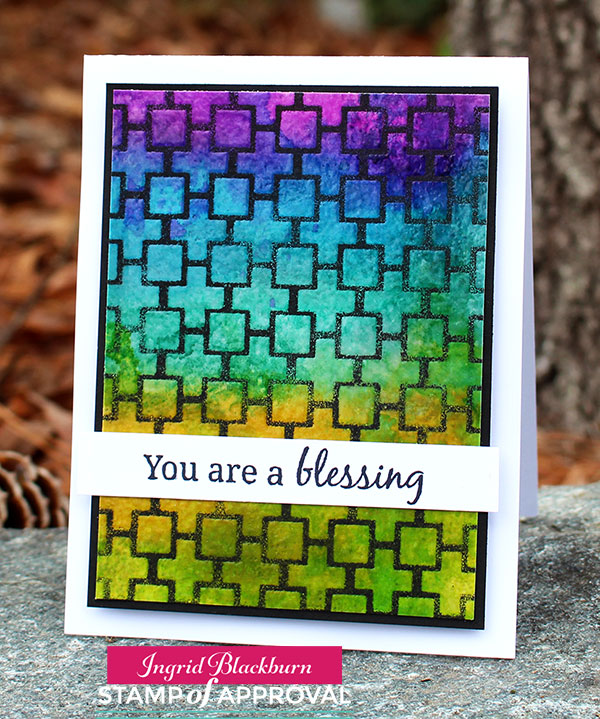
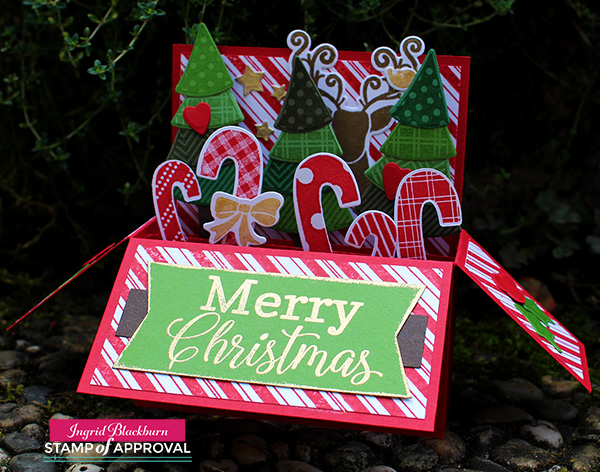
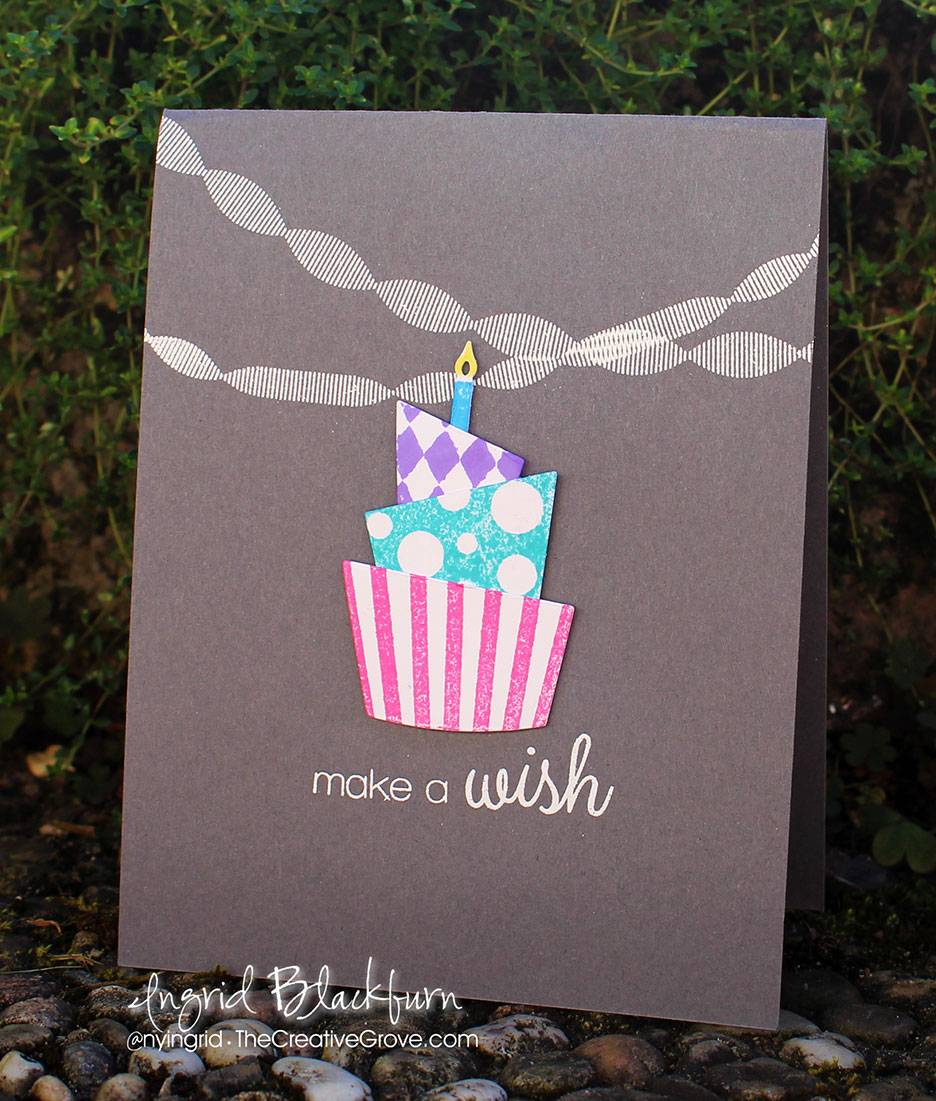
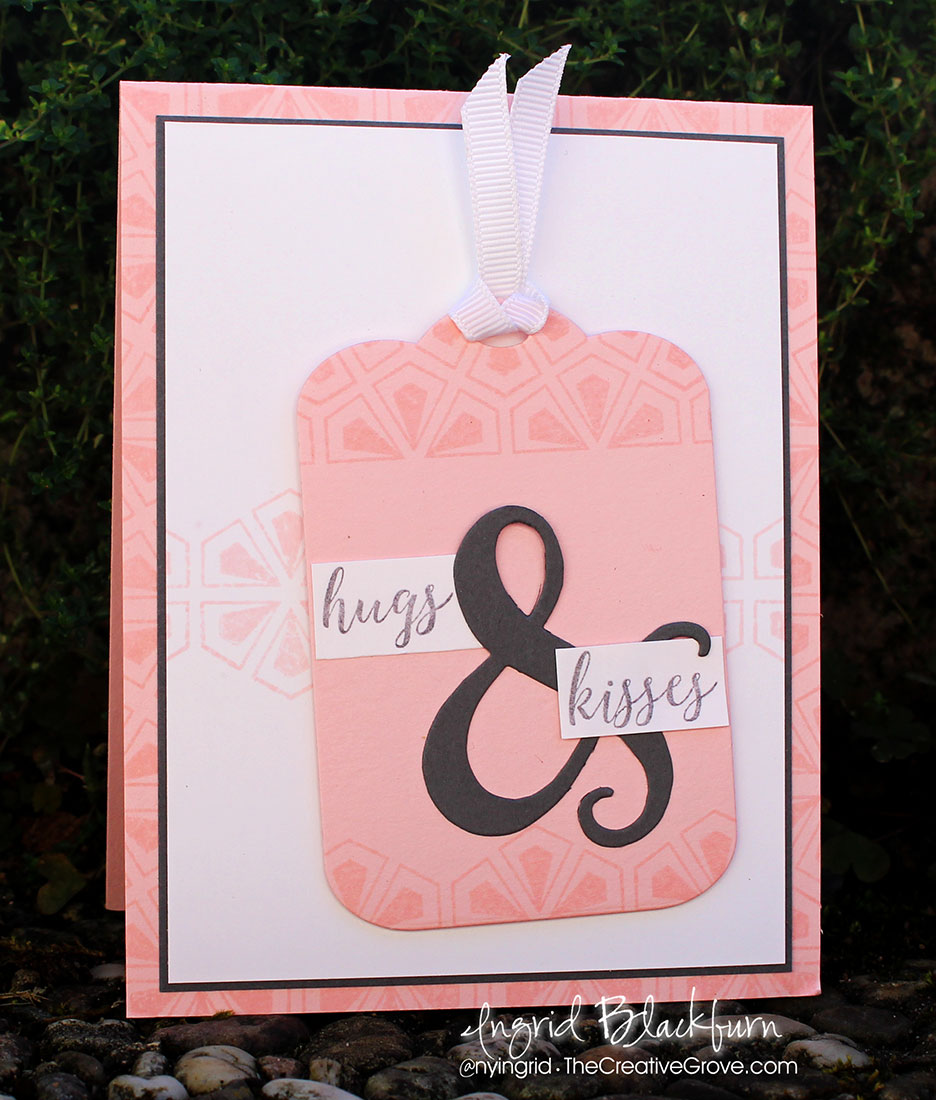
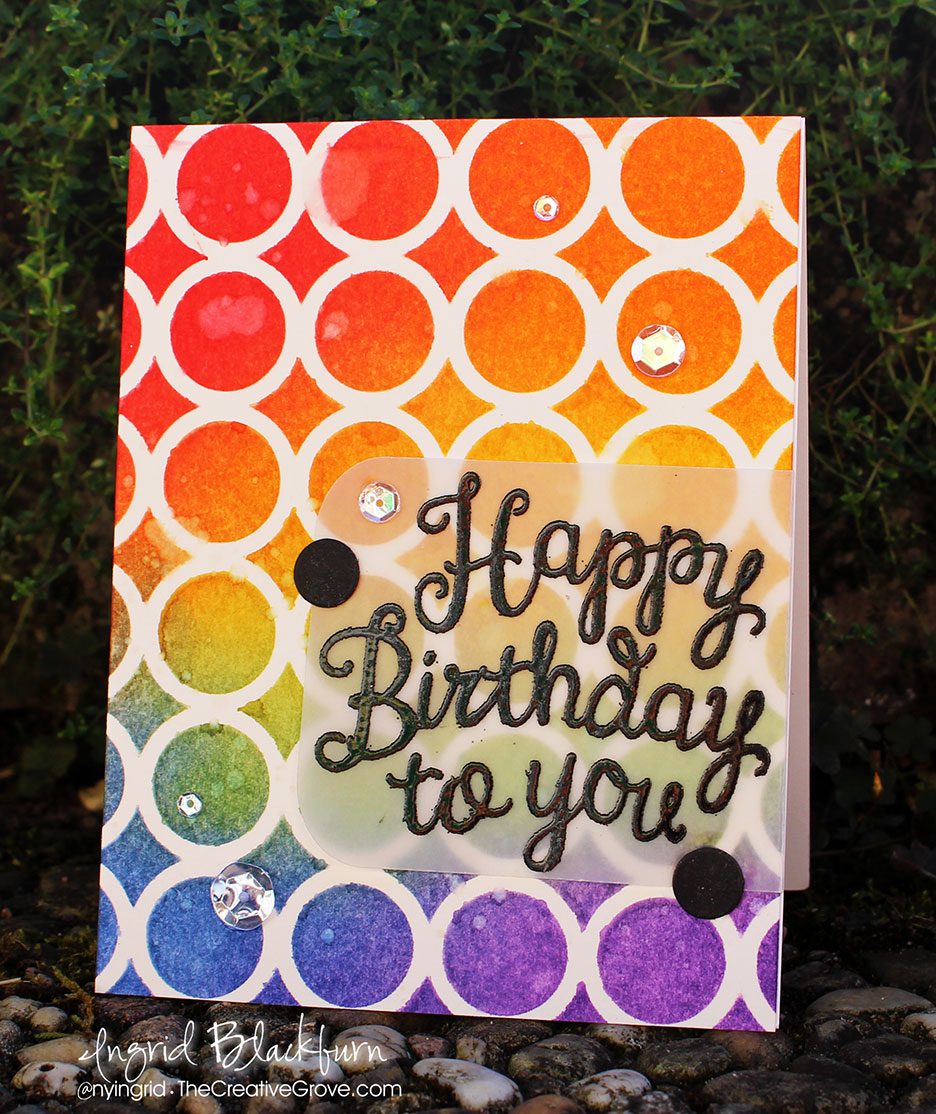
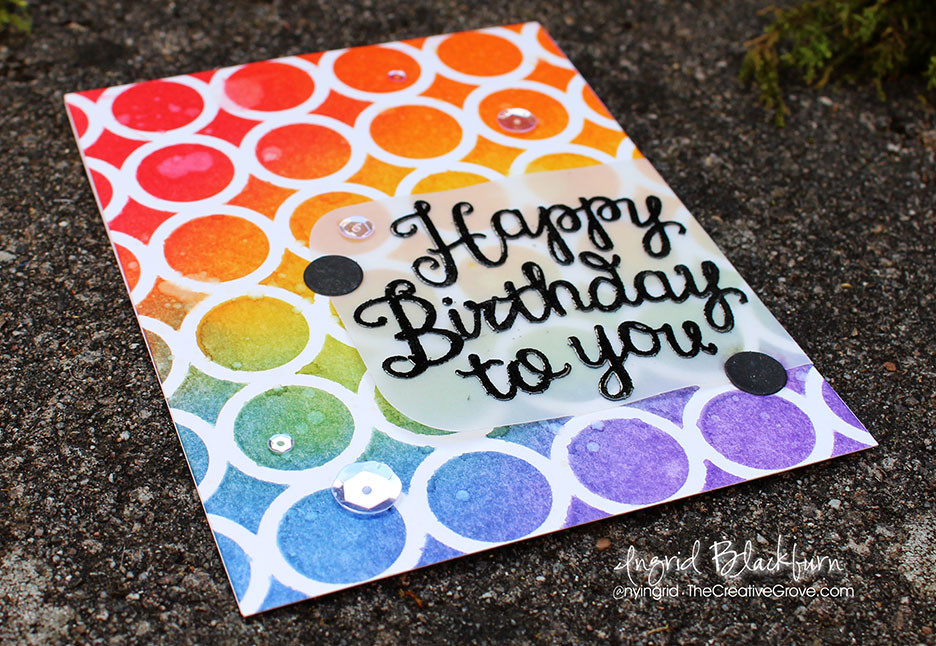
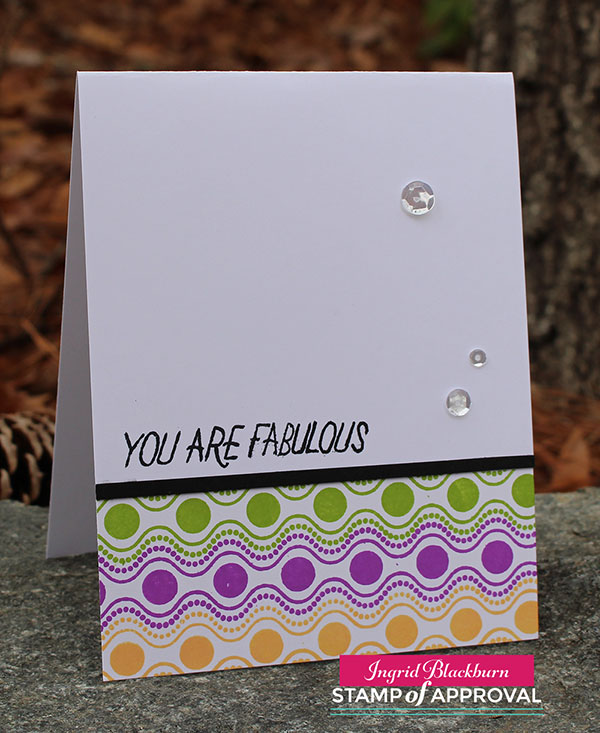
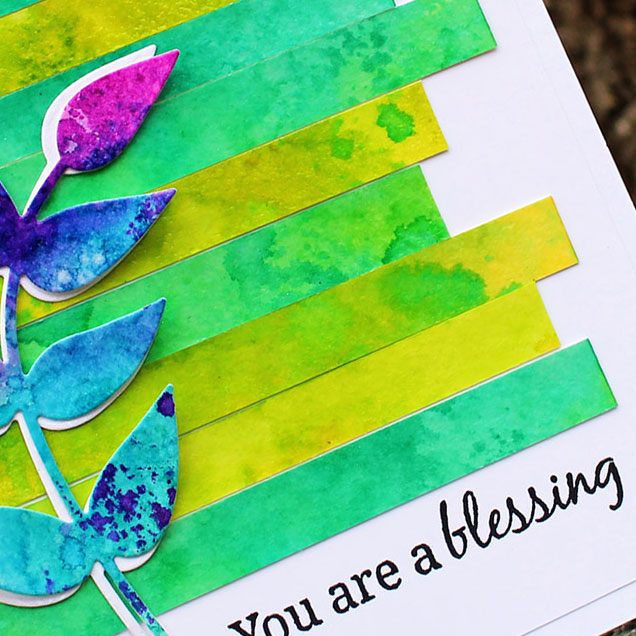
Project Two: CAS Mod

Complimentary colors (from the color wheel) are the name of the game for the project above and below. I’m in love with these combinations. You can not go wrong if you stick to complimentary colors (opposites on the color wheel). This project uses the Everyday Mod & You Did It stamp sets – I’m in LOVE with the Everyday Mod set – it has great geometric shapes and greetings.

Everyday Mod Stamp Set

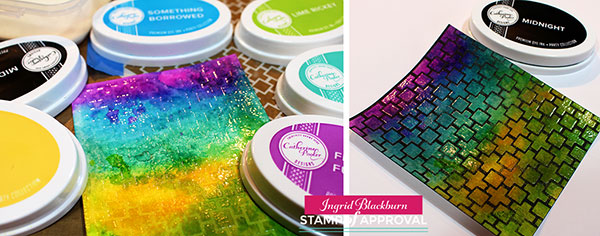
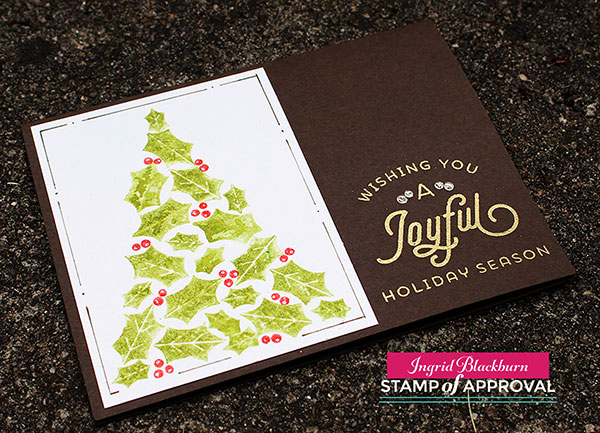
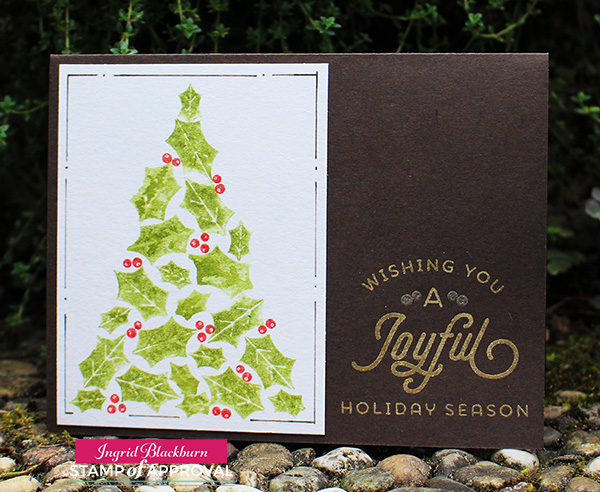
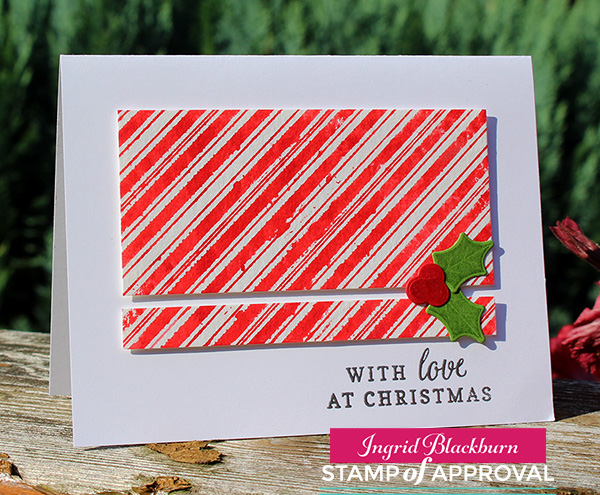
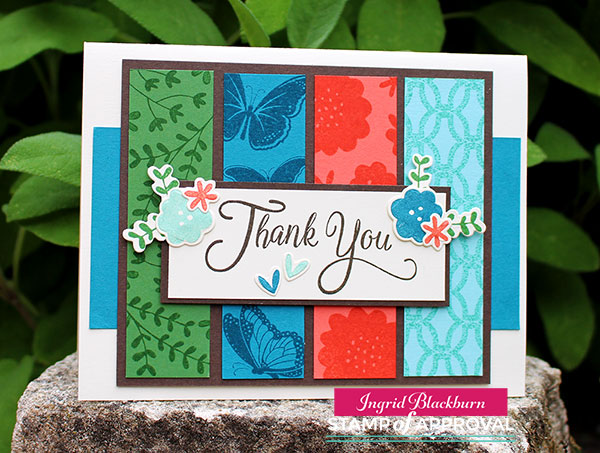
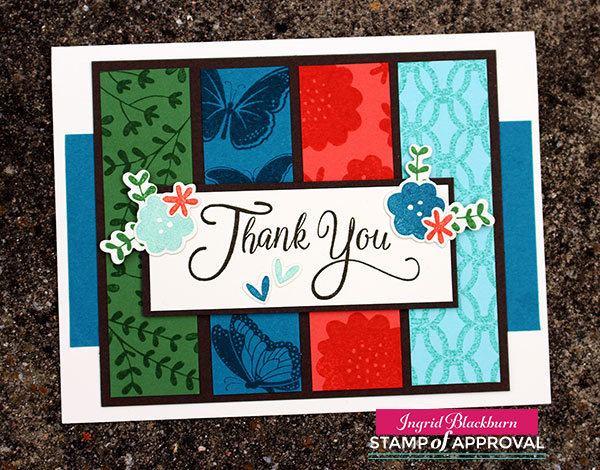
Project Three: Midnight Paisleys

And finally – I thought I’d show you one of the three projects I made last night at our Midnight Release Party. Details on the card are over at StampNation here. That was such a great time – to be online with 1000+ of our closest sistahs from StampNation was FUN!

Paisley Peacock Stamp Set

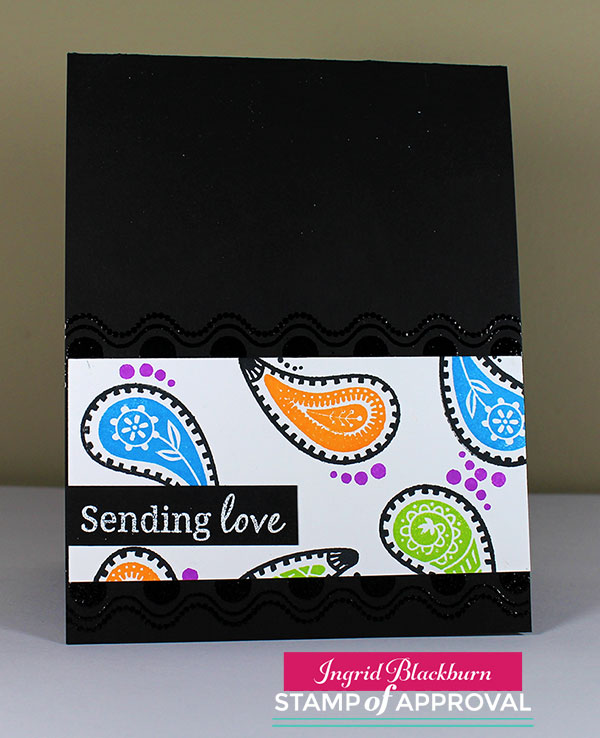
I stamped the black outlines for the paisleys, and they told me what colors to use. I cut my panel down and my other card is over at StampNation, along with my version of a case of DT Member Melissa Miller’s Blog Hop card here.

PLUS, the StampNation weekly challenge was released during the party too – here’s a peek at what I created for it – inspired by the challenge mood board. SO much fun.

The Perfect Reason Stamp of Approval Collection

So if you haven’t gotten your hands on The Perfect Reason collection yet – don’t wait. It’s going to go fast! To see all the products in this new Stamp of Approval Collection – check out Catherine’s blog/video post right here.

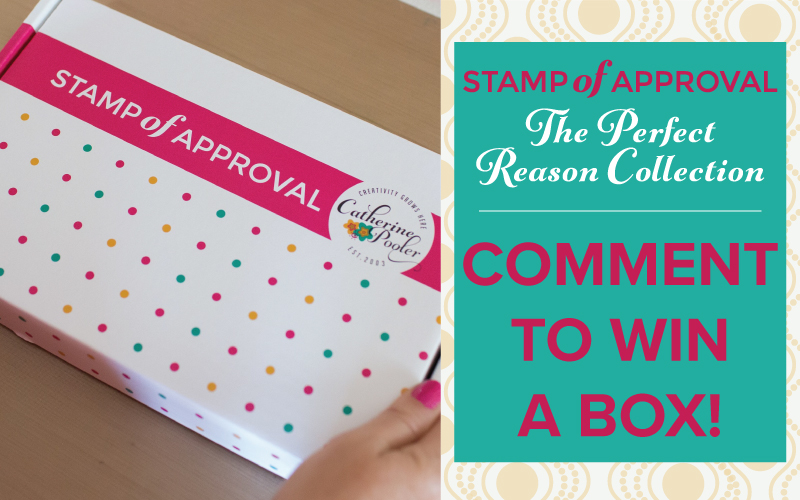
And hop along the three days of Blog Hops. Comment along the way – Catherine is giving away three Perfect Reason Collections! You’ll LOVE creating with it. Click here to see the hops:

Day One                      Day Two                       Day Three

Thanks for stopping by today!

[optin_box style=”27″ alignment=”center” email_field=”email” email_default=”Enter your email address” email_order=”0″ integration_type=”aweber” double_optin=”Y” list=”3846012″ name_field=”name” name_default=”Enter your first name” name_order=”0″ name_required=”Y” opm_packages=””][optin_box_field name=”headline”]Learn more with our exclusive FREE video series:[/optin_box_field][optin_box_field name=”paragraph”]PHA+UGx1cyB5b3XigJlsbCBiZSBhZGRlZCB0byBteTxzdHJvbmc+IEZSRUU8L3N0cm9uZz4gQ3JlYXRpdmUgVGlwcyBFLWxldHRlciB3aGVyZSBJIHNoYXJlIGV4Y2x1c2l2ZSBwcm9qZWN0cywgdmlkZW9zICZhbXA7IHRoZSAxMiBEYXlzIG9mIENocmlzdG1hczwvcD4K[/optin_box_field][optin_box_field name=”privacy”][/optin_box_field][optin_box_field name=”top_color”]undefined[/optin_box_field][optin_box_button type=”0″ button_below=”Y”]Get Instant Access![/optin_box_button] [/optin_box]


The Perfect Reason: Stamp of Approval Blog Hop – Day 3

Welcome to Day 3 of The Perfect Reason Stamp of Approval Blog Hop! You probably hopped on over from the crazy talented blog of Chrissie Tobas . I’m always amazed at what she creates. The whole hop list is at the end, but first here are a few projects to showcase just how amazing this curated collection inspired me.

If you’re new to Stamp of Approval – click here to check out everything you need to know about this amazing collection of Stamps, Dies and Stencils.

And make sure you are on the wait list so you get access to the collection at 10:00 am tomorrow. If any are still left at 3 pm, it will be released to the public.

Of course, If you are a StampNation member – you not only get to order a whole 10 hours early…but I’ll see you at the exclusive Midnight release party tonight – I’ll be participating live! We’re going to have FUN! 🙂

This collection has some incredible products in it that were a dream to create with. Let me show you just a few!

Project One: The Perfect Wreath

I love funky fun flowers and the Perfect Reason stamp set doesn’t disappoint. The flowers, foliage and greetings are not only easy to stamp with, but quirky & fun to work with. Oh, and it has a matching die set too!

Don’t you just love these shapes?!! And I LOVE little stamps like the teeny circle stamps – look at the Rockin Red ones – love that little detail in the middle. The greeting on this card is from the Everyday Mod stamp set.

The Perfect Reason Wreath

Be sure to check out The Perfect Reason Collection for detailed instructions on how to recreate this project.

Inks: Tutti Frutti, Tiki Torch, Aquatini, Lime Rickey, Rockin Red, Midnight, Fiesta Blue

Project Two: Clean & Simple Mod

You will be able to create several Clean & Simple projects with this collection too. Here is one of my favorite stamps from the Everyday Mod stamp set – an AWESOME geometric set with great greetings. Seriously – I can’t STOP creating with it!

The greeting is from the You Did It stamp set – it’s a fun one, right? I love the range in this sentiment stamp set – to see all the products in detail…be sure to check out Catherine’s blog right here.

CAS The Perfect Reason - Everyday Mod

TIP – If you want coordinating paper to go with your inks, just swipe the edge with your ink pad for a perfect look.

Colors: Aquatini, Tiara, Tiki Torch, Midnight (Catherine Pooler Designs)

Project Three: Stained Glass Blessing

If you’ve ever stopped by my blog, taken a class with me or seen one of my tutorials on YouTube – you KNOW I’m a stencil girl. And I LOVE to watercolor with vibrant colors – hello – Catherine Pooler Designs inks!!

I took all that goodness and wanted to make the Mod Squared Stencil shine – literally.

Josephs Coat Technique

Aren’t these colors just fabulous? We have a little stained Glass Josephs Coat Technique action going on here. Isn’t it amazing how the Midnight just transforms this piece into something really special?

My goal was to have my earth colors at the bottom going skyward to a celestial heaven. I hope that translates! The greetings are from the Everyday Mod Stamp Set.

The Perfect Reason - Stained Glass Technique

Step by step instructions can be found in the PDF that comes with The Perfect Reason Stamp of Approval Collection.

Colors: Tiara, Lime Rickey, Aquatini, Something Borrowed, Flirty Fushia & Midnight – all Catherine Pooler Design inks + Versamark (Tsukeniko).

Stamp of Approval - The Perfect Reason

So now it’s your turn. Hop along to Taheerah’s blog – I’m SUCH a huge fan of hers, I just know you will be too. And if you haven’t seen the first two days of hops yet…what are you waiting for? Check them out – you can start right from Catherine’s Blog here. Leave a comment along the way for your chance to win one of three collections!

1. Catherine Pooler
2. Lisa Harrolle
3. Lydia Evans
4. Chrissie Tobas
5. Ingrid Blackburn You are here now
6. Taheerah Atchia – Hop on here next!

Have fun hopping, and I hope to see you at the live release party at StampNation tonight or right back here tomorrow for more inspiration!

[optin_box style=”27″ alignment=”center” email_field=”email” email_default=”Enter your email address” integration_type=”aweber” double_optin=”Y” list=”3846012″ name_field=”name” name_default=”Enter your first name” name_required=”Y” opm_packages=””][optin_box_field name=”headline”]Learn more with our exclusive FREE video series:[/optin_box_field][optin_box_field name=”paragraph”]PHA+UGx1cyB5b3UnbGwgYmUgYWRkZWQgdG8gbXk8c3Ryb25nPiBGUkVFPC9zdHJvbmc+IENyZWF0aXZlIFRpcHMgRS1sZXR0ZXIgd2hlcmUgSSBzaGFyZSBleGNsdXNpdmUgcHJvamVjdHMsIHZpZGVvcyAmYW1wOyB0aGUgMTIgRGF5cyBvZiBDaHJpc3RtYXM8L3A+Cg==[/optin_box_field][optin_box_field name=”privacy”][/optin_box_field][optin_box_field name=”top_color”]undefined[/optin_box_field][optin_box_button type=”0″ button_below=”Y”]Get Instant Access![/optin_box_button] [/optin_box]

The Perfect Christmas Tree

Are you always on the lookout for the perfect Christmas Tree? I am always striving for the perfect Christmas tree on my cards, and I think I’ve finally found it. After all, what’s more Christmas than a tree made of holly leaves and berries?

Today the Stamp of Approval Candy Cane Lane Collection is available to the public (while supplies last). We had three days of blog hops, and many of my fellow dream team members have been posting projects all week long. Click HERE to check mine out from a few days ago. I’ll have links to all three below.

Today everyone – including the guest designers all have another project on their blogs – so be sure to stop by all 16 blogs for more ideas! There was some serious inspiration going on, wasn’t there?

The perfect Christmas Tree - Ingrid Blackburn

Here’s a tutorial for a card that works for anyone – male or female. One of my favorite parts is the two toned embossing in the greeting.

Be sure to click the link to watch it on YouTube in High Definition. And be sure to subscribe to my YouTube channel so you see more in the future!

The Perfect Christmas Tree Video Tutorial

Click HERE to view in HD on YouTube

To get this look, use the watercolor stamping technique. But for a slight difference, I used Distress stain rather than ink pads – at least for the leaves. The result is so cool, the photos and video just don’t do it justice. Because every leaf has its own nuances, it looks like you hand painted it – and that’s really something for a stamped image!

Watercolor Stamping the perfect Christmas tree

The greetings are from the Merry & Bright Boughs stamp set, but for an added little something, use the double holly berries to give it an added touch with pewter embossing powder. That’s a great combination with the gilded gold.

As much as you want to add sequins and something else to complete the card – with a real watercolor, I encourage you to refrain. Allow the watercolor to shine. But the project did need something – that’s where the simple border of dots and lines comes in. It adds to it without taking away from it.

holly-tree-watercolor-ingrid-blackburn-003

I hope you love this one as much as I do. Have you tried watercolor stamping before? I think over the past week you can see I LOVE the technique. Let me know in the comments if you’ve tried it!

DIY Christmas Cards - Ingrid Blackburn

And if you missed my other two videos and four projects, here are some links for you to catch up:

CAS Peppermint Bark Watercolor            Peek-a-Boo & Christmas in a Box          Masculine Christmas Cards

Stamp of Approval - Catherine Pooler

And if you missed all the inspiration, go through all the Blog Hops for some great ideas. Each day features new designers and starts on Catherine’s Blog:

Blog Hop – Day One          Blog Hop – Day Two          Blog Hop – Day Three

Have a great time checking out all the other blogs for creative inspiration. It’s time now for you to get your fingers inky!

Signature

[optin_box style=”12″ alignment=”center” email_field=”email” email_default=”Enter your email address” integration_type=”aweber” double_optin=”Y” list=”3846012″ name_field=”name” name_default=”Enter your first name” name_required=”Y” opm_packages=””][optin_box_field name=”headline”]Learn more with our exclusive FREE video series:[/optin_box_field][optin_box_field name=”paragraph”]PHA+UGx1cyB5b3XigJlsbCBiZSBhZGRlZCB0byBteSBGUkVFIENyZWF0aXZlIFRpcHMgRS1sZXR0ZXIgd2hlcmUgSSBzaGFyZSBleGNsdXNpdmUgcHJvamVjdHMsIHZpZGVvcyAmYW1wOyB0aGUgPHN0cm9uZz4xMiBEYXlzIG9mIENocmlzdG1hczwvc3Ryb25nPiBQcm9qZWN0IFNlcmllczwvcD4K[/optin_box_field][optin_box_field name=”privacy”][/optin_box_field][optin_box_field name=”top_color”]undefined[/optin_box_field][optin_box_button type=”0″ button_below=”Y”]Get Instant Access![/optin_box_button] [/optin_box]


Forest Stag – Masculine Christmas Cards

We all need a few different types of Christmas cards – especially Masculine Cards. So what makes a Masculine Christmas card? Well, color mostly! When I think masculine, I think neutral colors – earthy, and not too overly cutesy.

forest-stag-ingrid-blackburn-001

Today’s project is just that – and my first to really feature the rockin’ Stag from the Hip Holiday stamp set in the Candy Cane Lane Collection by Stamp of Approval. I’ve shared a few projects this past week already from this great collection – that goes on sale if you’re on the Wish List or a StampNation member this morning.

Tomorrow – if there are any left, it will go live to the public. There’s still time to get on the Wish List – so don’t wait if you like any piece of the collection. We also had three great Blog Hops loaded with Holiday card ideas for you. I have links to everything you may have missed below – not to worry!

candy-cane-lane-collection

Now back to our Masculine Christmas Stag….Here’s a quick tutorial for this great clean and simple card – another great mass producible one:

Masculine Christmas Cards: Forest Stag Tutorial

To keep with a masculine look – use neutral or muted colors. I chose to use Kraft card stock for the frame & card base. For the panel I used a dusky green – Always Artichoke by Stampin Up. For red accents – Cherry Cobbler and the Stag in White so that he really pops.

Once you’ve die cut your frame with the Merry Label Dies (CAS-ual Fridays for Stamp of Approval), edge it lightly with Tea Dye Distress Ink. This helps to accentuate the edge, give it a rustic look and showcase some of the debossing around the edges.

Masculine Christmas Cards - Ingrid Blackburn

Use the coordinating dies for the Hip Holiday set to cut the stag out in white. Next, stamp the stag in Soft Suede & Early Espresso for the patterned ears & neck. I just love him – isn’t he great! I made one with eyes and a smile, but ended up liking the one without a face better.

Rather than clutter the label die with stamped images – add some tone on tone boughs from the Merry & Bright Bough Stamp set. Keep it minimal so that it doesn’t overtake the card.

TIP – to get the bough placement just right, lightly trace the label die so you have a guide, then erase your lines once done! If you are mass producing cards, create a label out of masking paper, trim it down to the inner debossed line. That way you don’t have to keep tracing it!

Fold your card base in half and stamp the Peppermint Stick background stamp in Cherry Cobbler on the edge. Glue your Artichoke card front on.

Masculine Christmas Cards - Candy Cane Lane

Glue your stag to the label, emboss a greeting in gold onto Cherry Cobbler. I used the lower part of Sweetest Holiday Wishes from the Candy Cane Lane stamp set. TIP – I actually cut that one apart – there is a bit of space between the sweetest and Holiday Wishes – it easily lines back up if desired – but I’ll get so much more use from it this way without having to constantly mask it off!

Glue your greeting over the stag and label – trim the edges and pop it all up with foam tape. Add a few gold sequins by Pretty Pink Posh (that large one is by Rico Designs) and you’re all set!

It’s cute, right? I’m in love with this color combo.

More Christmas Project Ideas

If you didn’t get a chance to see my two videos for this collection, here are the links to those pages. There’s a video on each!

CAS Peppermint Bark      Peek-a-Boo Candy Canes & Christmas in a Box

I also have a great Christmas in a Box project on there too. Tomorrow, you’ll get to see another video tutorial with a technique project right here, so stop on by.

If you would like to get even more Christmas ideas from me, check out my YouTube channel, plus subscribe to my Creative Tips E-letter below or to the right. In about a month, I will be starting my yearly 12 Days of Christmas series. You’ll only see those projects free in your inbox through Creative Tips.

[optin_box style=”12″ alignment=”center” email_field=”email” email_default=”Enter your email address” integration_type=”aweber” double_optin=”Y” list=”3846012″ name_field=”name” name_default=”Enter your first name” name_required=”Y” opm_packages=””][optin_box_field name=”headline”]Learn more with our exclusive FREE video series:[/optin_box_field][optin_box_field name=”paragraph”]PHA+UGx1cyB5b3XigJlsbCBiZSBhZGRlZCB0byBteSBGUkVFIENyZWF0aXZlIFRpcHMgRS1sZXR0ZXIgd2hlcmUgSSBzaGFyZSBleGNsdXNpdmUgcHJvamVjdHMsIHZpZGVvcyAmYW1wOyB0aGUgPHN0cm9uZz4xMiBEYXlzIG9mIENocmlzdG1hczwvc3Ryb25nPiBQcm9qZWN0IFNlcmllczwvcD4K[/optin_box_field][optin_box_field name=”privacy”][/optin_box_field][optin_box_field name=”top_color”]undefined[/optin_box_field][optin_box_button type=”0″ button_below=”Y”]Get Instant Access![/optin_box_button] [/optin_box]

ccl_commenttowin

To see all the amazing creations from the past few days – don’t miss the blog hops….You can still win a free box! Leave comments along the way. Check them out here:

Blog Hop – Day One          Blog Hop – Day Two          Peppermint Watercolor

StampNationGeneralBlogPost

And finally… if you’re a StampNation member – be sure to check out the Challenge this morning! It’s loaded with Stamp of Approval cards!!! Can you guess which one is mine?!

StampNation - Ingrid Blackburn

Now you have some serious holiday inspiration! See you tomorrow with even more…

Signature

[optin_box style=”12″ alignment=”center” email_field=”email” email_default=”Enter your email address” integration_type=”aweber” double_optin=”Y” list=”3846012″ name_field=”name” name_default=”Enter your first name” name_required=”Y” opm_packages=””][optin_box_field name=”headline”]Learn more with our exclusive FREE video series:[/optin_box_field][optin_box_field name=”paragraph”]PHA+UGx1cyB5b3XigJlsbCBiZSBhZGRlZCB0byBteSBGUkVFIENyZWF0aXZlIFRpcHMgRS1sZXR0ZXIgd2hlcmUgSSBzaGFyZSBleGNsdXNpdmUgcHJvamVjdHMsIHZpZGVvcyAmYW1wOyB0aGUgPHN0cm9uZz4xMiBEYXlzIG9mIENocmlzdG1hczwvc3Ryb25nPiBQcm9qZWN0IFNlcmllczwvcD4K[/optin_box_field][optin_box_field name=”privacy”][/optin_box_field][optin_box_field name=”top_color”]undefined[/optin_box_field][optin_box_button type=”0″ button_below=”Y”]Get Instant Access![/optin_box_button] [/optin_box]

Candy Cane Lane Blog Hop

ccl_bloghop

Candy Cane Lane – Isn’t that name just the best? I loved it the moment I heard the name….I knew cute, versatile stamps were headed my way, and I was right. I seriously sketched project after project when I saw the Candy Cane Lane collection. Many of which I’ve already turned into projects for this release already!

Catherine and her team of designers created stamps & dies that not only work well together just for this collection – but work fabulously with previous Stamp of Approval releases. That’s what I love so much about these collections – they work together. This box was curated to work for you – and let’s be honest – you know I’m about versatility, and that’s what I get each time.

To find out more about Stamp of Approval and how to be the first to get it when it launches on September 21st – you need to be on the waitlist – that way you’ll get an email the moment it’s live! If you’re not already… Click Here to get on the waitlist right now! Otherwise you’ll have to wait till the public sees it the day after – if there are any left!

candy-cane-lane-collection

Today marks the third day of blog hops – and I’m the caboose – yup…the 19th designer with projects for you!!! So if you missed any of the inspiration – I have links to everything at the end.

I’ve already shared a great quick & easy artsy video tutorial with you a few days ago…here is some more Candy Cane Lane goodness to get those creative juices flowing!

Project One – Peek-a-Boo Candy Canes

I love cards that take me by surprise. This was one of my earlier sketches and seeing it come to life was just oh so cool.

Candy Cane Lane - Peek-a-boo card - Ingrid Blackburn

You’ll have so much fun putting it together – but don’t stop at Candy Canes…think Trees, snowflakes, That cool Stag, Flowers, anything will work. Best part – it’s super easy to create. I even filmed it for you so that you could see how I put this fun project together. And if you haven’t already – be sure to subscribe to my YouTube channel when you’re there! 🙂

Click Here to view video on YouTube in HD

How fun is that? You’ll love it because it’s simple, different and absolutely mass producible! Which let’s be honest is just what I’m looking for every year. I don’t make all the same cards – but I love to do little batches (10-20) – especially of cards I love.

Project Two  – Hip Candy Cane Card in a Box

Have you ever made one of these? They were all the rage in card making a few years ago. I’ve always wanted to try one, and when I saw all these super cute Christmas images with matching dies in the Candy Cane Lane & Hip Holiday Stamp sets….I knew I just HAD to make one finally.

candy-cane-lane-christmas-in-a-box-ingrid-blackburn-001

candy-cane-lane-christmas-in-a-box-ingrid-blackburn-002

Isn’t it super cute? You’ll have fun putting all the pieces together. This project really showcases how well these stamp sets work together. It’s the size of a card and folds flat for mailing like this:

candy-cane-lane-christmas-in-a-box-ingrid-blackburn-003

One of my favorite features of each Stamp of Approval collection is that you also get a PDF with many projects just using the collection. That way you can get started right away with detailed instructions, photos & even a few videos too!  Both of these projects are in there – with detailed instructions, measurements and supply lists.

Now it’s time for you to check it all out – especially if you are just starting here today. Each day of the hop, Catherine is giving away one full collection – so if you haven’t commented along the way each day – be sure to do so – yup, tell me what you think! And when you’re done – check out my first project from a few days ago too.

ccl_commenttowin

Plus the day the collection goes live for the public – that’s s on the 22nd (If you’re on the Wait List – you will get a chance to get the collection the day before on the 21st)….all the designers will have more….I seriously love all this inspiration!

Here’s the full blog hop list. Just click on Catherine’s name at the top if you haven’t been there yet. Since I’m the end, we’ll just go back to the beginning!

If you missed any of the creative goodness from before, just click on the following links:

Blog Hop – Day One          Blog Hop – Day Two          Peppermint Watercolor

And if you want even more creative inspiration, be sure to sign up for my Creative Tips E-Letter for a free video series & coming up 12 Days of Christmas series. Have fun will all the great projects, and see you very soon for more!

Signature

[optin_box style=”12″ alignment=”center” email_field=”email” email_default=”Enter your email address” integration_type=”aweber” double_optin=”Y” list=”3846012″ name_field=”name” name_default=”Enter your first name” name_required=”Y” opm_packages=””][optin_box_field name=”headline”]Learn more with our exclusive FREE video series:[/optin_box_field][optin_box_field name=”paragraph”]PHA+UGx1cyB5b3XigJlsbCBiZSBhZGRlZCB0byBteSBGUkVFIENyZWF0aXZlIFRpcHMgRS1sZXR0ZXIgd2hlcmUgSSBzaGFyZSBleGNsdXNpdmUgcHJvamVjdHMsIHZpZGVvcyAmYW1wOyB0aGUgPHNwYW4gc3R5bGU9ImNvbG9yOiAjYzkxYTFhOyI+PHN0cm9uZz4xMiBEYXlzIG9mIENocmlzdG1hczwvc3Ryb25nPjwvc3Bhbj4gUHJvamVjdCBTZXJpZXM8L3A+Cg==[/optin_box_field][optin_box_field name=”privacy”][/optin_box_field][optin_box_field name=”top_color”]undefined[/optin_box_field][optin_box_button type=”0″ button_below=”Y”]Get Instant Access![/optin_box_button] [/optin_box]


Quick & Easy DIY Christmas Card Tutorial

I’m all about the DIY Christmas cards – how about you? As card makers , we probably all make three kinds of cards…all the time – Christmas, Birthday and Thanks. I’ve been creating some amazing cards this past month gearing up for the big Stamp of Approval holiday release – Candy Cane Lane Collection. How cute is that name?!

Well, Catherine and the team did not disappoint with this one. Blog Hops begin today – I’m up the last day…and I have some beauties to share with you that day. But not to fret – I have a card today, tomorrow and knowing me, I just won’t be able to stop past the release….lol!

candy-cane-lane-collection

Stamp of Approval is a curated box of stamps and dies that were designed to work together. Best part about it is that it works with previous collections as well. Those you can get in the store – of course…the don’t get released for a long time – so don’t wait thinking you can just get them in a few months – you’ll be sad you missed out!

The way it works is you want to be on the waitlist – that way you will get notified the moment the shop is open. They sell out quick – sometimes in a matter of hours – and this particular collection is REALLY good. It’s definitely my favorite so far – I can’t stop creating with it – so if you’re not on the waitlist – get on it right here.

In addition to all the great projects you’ll see over the next several days from the Blog Hops – Design Team member blogs….when you decide to get the box on Wednesday Sept 21st….you’ll also get a PDF cram packed with ideas to get you started. Boxes ship right away – so you could be crafting with these stamps by the weekend!

ccl_commenttowin

Oh…and there are three boxes up for grabs too! Be sure to hop along each day and leave comments along the way – last time one of our commenters won a box!!! You can start the hop on Catherine’s Blog – but read this tutorial too…lol!

I’m kicking off my Candy Cane Lane creations with one of my favorite cards – and one of the best to mass produce too! I have it in traditional colors – but what about non-traditional colors? I bet it would look awesome in baby blue/brown, or Pink and Grey….it doesn’t just have to be red/green!

DIY Christmas Card Tutorial

DIY Christmas Card Tutorial

I did a ton of watercolor stamping in my creations this time – this Peppermint Stick background stamp just screams – watercolor stamp me! To mass produce it, you just need to cut several pieces of watercolor paper – twice the height of the final watercolor piece and you will get two cards with each one!

Enjoy the video tutorial:

Click Here to watch in HD on YouTube

So what did you think? I love it – it’s super quick and easy. And the watercolor stamped look is artsy and unique. When you mass produce yours – do all the embossing at once – die cut/stamping at once, etc…. Just throw on a good movie – and you’re set!

Be sure to stop by the blog hop today to see the amazing creations!!! Comment along the way and win yourself a box too. Come back tomorrow, and definitely Tuesday – I’m up then!

DIY Christmas Card Watercolor Tutorial - Ingrid Blackburn

If you like what you see – subscribe to my YouTube channel and definitely get on the Creative Tips E-letter – I have exclusive video tutorials that go out to subscribers and coming up soon – my 12 Days of Christmas series! Don’t miss out!

See you tomorrow – happy hopping!

Signature

[optin_box style=”12″ alignment=”center” email_field=”email” email_default=”Enter your email address” integration_type=”aweber” double_optin=”Y” list=”3846012″ name_field=”name” name_default=”Enter your first name” name_required=”Y” opm_packages=””][optin_box_field name=”headline”]Learn more with our exclusive FREE video series:[/optin_box_field][optin_box_field name=”paragraph”]PHA+UGx1cyB5b3XigJlsbCBiZSBhZGRlZCB0byBteSBGUkVFIENyZWF0aXZlIFRpcHMgRS1sZXR0ZXIgd2hlcmUgSSBzaGFyZSBleGNsdXNpdmUgcHJvamVjdHMsIHZpZGVvcyAmYW1wOyB0aGUgMTIgRGF5cyBvZiBDaHJpc3RtYXMgUHJvamVjdCBTZXJpZXM8L3A+Cg==[/optin_box_field][optin_box_field name=”privacy”][/optin_box_field][optin_box_field name=”top_color”]undefined[/optin_box_field][optin_box_button type=”0″ button_below=”Y”]Get Instant Access![/optin_box_button] [/optin_box]

CP Designs Shop Grand Opening – Blog Hop

Welcome my crafty friends! Today I have three projects & a video that showcase some great things now available in Catherine Pooler’s brand new online shop. How exciting! We always need good quality designs and products, right? And Catherine Pooler Designs does not disappoint.

CP Designs Store

Before we get creative here are a few things you’ll want to know. The shop will open this afternoon. To find out the moment the cyber doors swing open, you’ll want to make sure you’re subscribed to Catherine’s newsletter – she’ll be announcing the moment it goes live! Catherine also has a great video series and some cool PDF’s for new subscribers. So when you’re on Catherine’s site, be sure to subscribe so that you’re in the know.

Prizes – Of course we have some prizes for you too! Leave a comment on the blogs along the hop – there are three $25 gift certificates up for grabs between now and noon (EST) on 9/1.

Now for a little creative mojo for you today. I have three projects, all very different from one another, a little Stamp of Approval mixed in with some fresh Catherine Pooler Designs! Enjoy and be sure to let me know what you think in the comments below!

Contemporary Crooky Cake

Okay – I know the stamp set is called Bring on the Cake…but I just can’t not call it crooky cake…lol! I wanted some bright, bold colors to pop off a neutral dark background. I’m into dark greys at the moment. And I thought this have great masculine look, while still being a little fun and funky.

Those streamer stamps totally rock – they’re embossed in Alabaster by Brutus Monroe, and are the perfect little something in the background. I also left the card as a single layer to keep with a minimal look.

Crooky-Cake---Ingrid-Blackburn

The cake is stamped in Distress Picked Raspberry, Peacock Feathers Wilted Violet, Salty Ocean & Squeezed Lemonade.

Geo Hugs & Kisses

For this project, I kept with my grey and added a little Pale Pink to the mix. Don’t you just love this geometric pattern used throught. It’s on the card base, card front and tag. The Geobuilders Stamp Set is so crazy versatile…it’s easy to see why it’s a favorite.

For this project I paired it up with the And Dies & And Sentiments set – two new sets recently released by Catherine Pooler Designs. They go quite well with the Tag Buddies by CAS-ual Fridays for the first Friendship SOA collection.

I love making cards that can be used for lots of occasions – and Hugs & Kisses covers that!

Geobuilders-And-Sentiments---Ingrid-Blackburn

Ring in the Birthday

And last, but definitely not least – my favorite. I just recently got my hands on this Pattern of Rings stencil by Winnie & Walter for the first SOA Friendship Collection. I have wanted to make this card for FOREVER! It’s no secret that I love water & Distress Inks – so I did a little sponge/direct to paper combo with some really bright and vibrant Distress colors. Here’s a video of the technique:

Watch in HD on YouTube

You’ll want to use Wilted Violet, Chipped Sapphire, Twisted Citron, Mustard Seed, Candied Apple & Carved Pumpkin. Isn’t this combo cool?! Once the colors were added over the stencil, I spritzed it lightly with a mini mister being careful not to add too much water. You’ll want just enough to activate the ink and get that watercolor look, but not too much that it runs under your stencil. If you do find that you’ve added too much, just quickly sop it up with a paper towel.

Pattern-of-Rings-Birthday---Ingrid-Blackburn-001

Dry your project and then flick some water droplets at it. I did this two ways – one with my hands and another with a paint brush for some smaller more purposeful droplets.

Once dry, add your greeting (HB2U by SugarPea Designs for the Young at Heart Collection) by embossing it in black onto vellum card stock. I cut it out using the larges tag from Tag Buddies by CAS-ual Fridays – yup the same one as above!

Pattern-of-Rings-Birthday---Ingrid-Blackburn-002

Add some embellishments and you’re all set. I added two little circles, cut out using Friendly Flowers Fri-Dies by CAS-ual Fridays – both die sets are from the Friendship collection. By adding those black circles and another strategic Sparkling Clear Sequin, you’ll be able to help secure that piece of vellum down. I also wrapped the top of the tag around to the back.

I love bright vibrant Birthday cards – and this stencil really didn’t disappoint.

Don’t miss out on all the crafty goodness!

I hope you enjoyed those three projects! If you liked that, be sure to sign up for my Creative Tips E-letter to get an exclusive video series with more. Up next – have fun hopping along to the talented Chaitali Narla. Be sure to leave comments along the way for a chance to win!

Here’s the list of all the talented designers for today’s hop!

BLOG HOP LIST:

Now go get your fingers inky –

Signature

[optin_box style=”12″ alignment=”center” email_field=”email” email_default=”Enter your email address” integration_type=”aweber” double_optin=”Y” list=”3846012″ name_field=”name” name_default=”Enter your first name” name_required=”Y” opm_packages=””][optin_box_field name=”headline”]Learn more with our exclusive FREE video series:[/optin_box_field][optin_box_field name=”paragraph”]PHA+UGx1cyB5b3XigJlsbCBiZSBhZGRlZCB0byBteSBGUkVFIENyZWF0aXZlIFRpcHMgRS1sZXR0ZXIgd2hlcmUgSSBzaGFyZSBleGNsdXNpdmUgcHJvamVjdHMsIHZpZGVvcyAmYW1wOyB0aGUgMTIgRGF5cyBvZiBDaHJpc3RtYXMgUHJvamVjdCBTZXJpZXM8L3A+Cg==[/optin_box_field][optin_box_field name=”privacy”][/optin_box_field][optin_box_field name=”top_color”]undefined[/optin_box_field][optin_box_button type=”0″ button_below=”Y”]Get Instant Access![/optin_box_button] [/optin_box]

Lovely Thank You

Lovely-Notes-Thank-You---Ingrid-Blackburn-003

I probably make thank you cards more than any other card, how about you? I thought I’d share a fun little color blocked project with you today using the Lovely Notes Stamp of Approval Collection. This collection has been arriving all over the world and it’s about to sell out, so if you’re on the fence, don’t wait! Find out more here.

Lovely Notes SOA Now

Color blocking is something I’ve been doing long before I started making cards – I get that from my scrapbooking days. But I love the look on cards. For today’s Thank You card you’ll want to use 1 inch pieces that are stamped tone on tone for a subtle but great look.

I used the Lovely Flowers, Butterfly Notes and Lovely Lattice Background stamps (Catherine Pooler Designs) from this collection for this card. Don’t they just go together perfectly! That’s what I love about the Stamp of Approval collections – the versatility. They are so well thought out – not just slapped together like other boxes or kits. You can literally interchange any of the stamp sets and they’d work together – I LOVE that!

Lovely-Notes-Thank-You---Ingrid-Blackburn-002

A simple supporting colorful panel behind my color blocked piece is a great way to finish off the card and allow you to use a smaller color blocked area if you can’t quite figure the spacing out. Love those little tricks! The key is to remember that you need the measurement to the left, right and three more times for inbetween the middle panels.

A simple Thank You greeting (Butterfly Notes) popped up and adorned with die cuts from the Lovely Flowers & Banners Dies (co-ordinating) adds the perfect finishing touch. I love this card and wanted to share it with you. So tell me in the comments – what kinds of cards do you make most?

Lovely-Notes-Thank-You---Ingrid-Blackburn-001

The Lovely Notes collection is still available – but don’t wait…it’ll be sold out soon, and then not available again until later in the fall. To find out more about the collections – visit the Stamp of Approval site here.

See you very soon – I have a few videos coming up next!

Signature

[optin_box style=”12″ alignment=”center” email_field=”email” email_default=”Enter your email address” integration_type=”aweber” double_optin=”Y” list=”3846012″ name_field=”name” name_default=”Enter your first name” name_required=”Y” opm_packages=””][optin_box_field name=”headline”]Learn more with our exclusive FREE video series:[/optin_box_field][optin_box_field name=”paragraph”]PHA+UGx1cyB5b3XigJlsbCBiZSBhZGRlZCB0byBteSBGUkVFIENyZWF0aXZlIFRpcHMgRS1sZXR0ZXIgd2hlcmUgSSBzaGFyZSBleGNsdXNpdmUgcHJvamVjdHMsIHZpZGVvcyAmYW1wOyB0aGUgMTIgRGF5cyBvZiBDaHJpc3RtYXMgUHJvamVjdCBTZXJpZXM8L3A+Cg==[/optin_box_field][optin_box_field name=”privacy”][/optin_box_field][optin_box_field name=”top_color”]undefined[/optin_box_field][optin_box_button type=”0″ button_below=”Y”]Get Instant Access![/optin_box_button] [/optin_box]