MWAH – The Kissing Technique

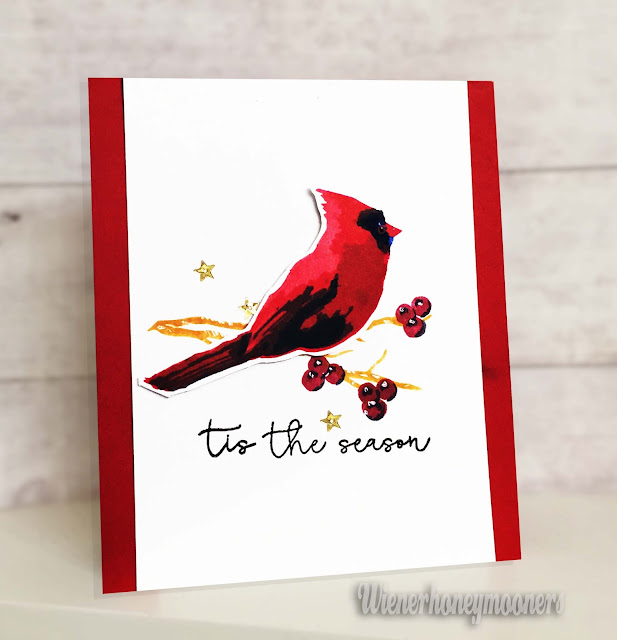
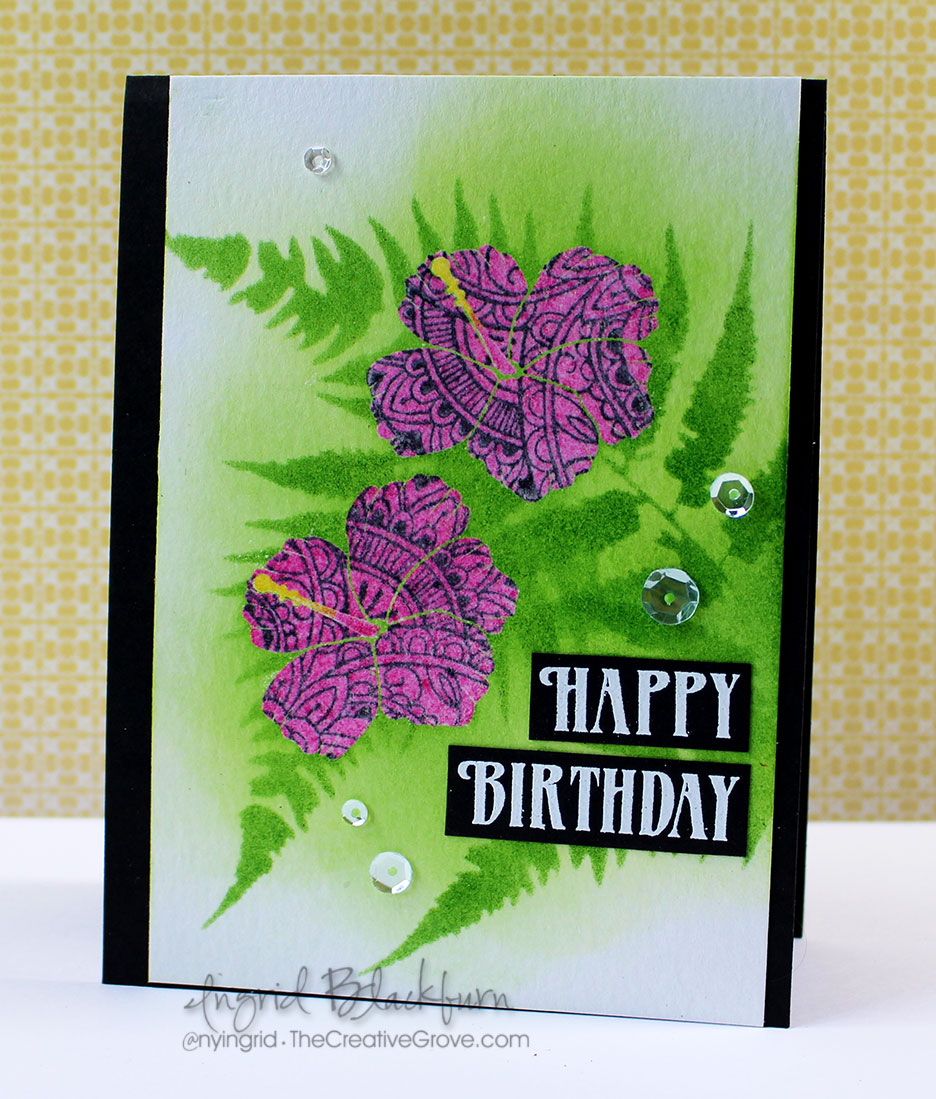
The Kissing Technique has been around for forever, and chances are you already know how to do it. But for today’s card, I thought I’d re-visit an oldie but a goodie – it is the challenge theme over at Happy Little Stampers for the CAS Challenge this month!

July 2016 CAS Badge

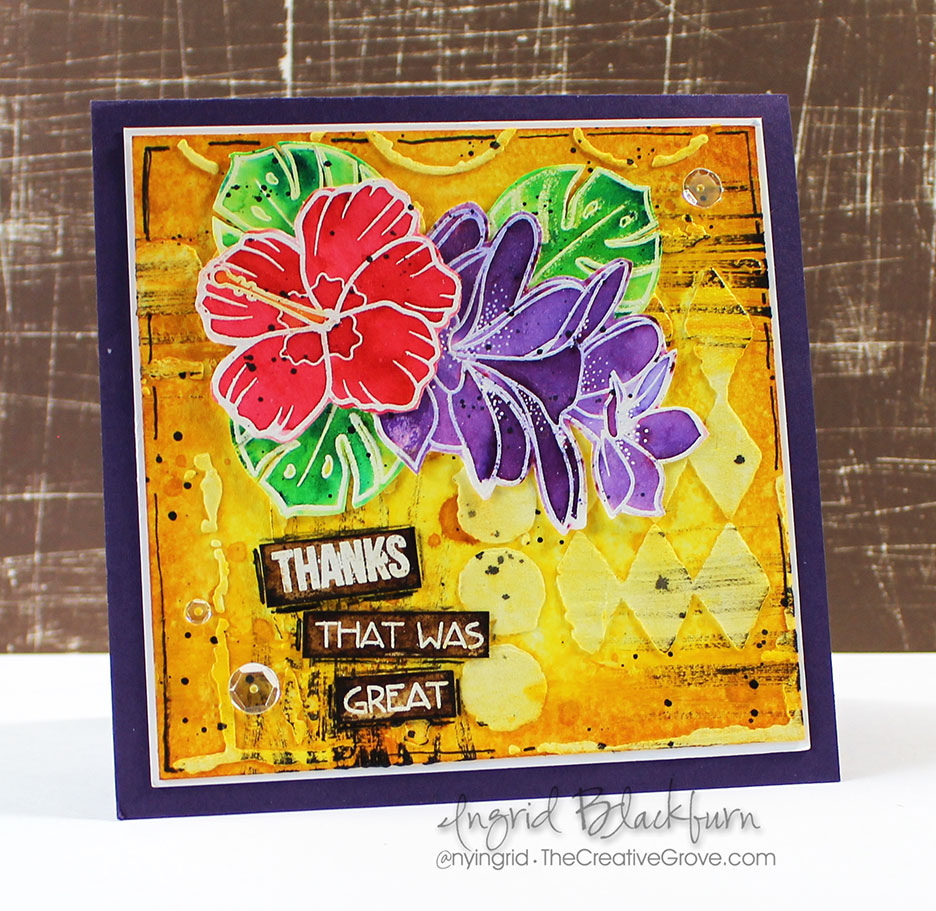
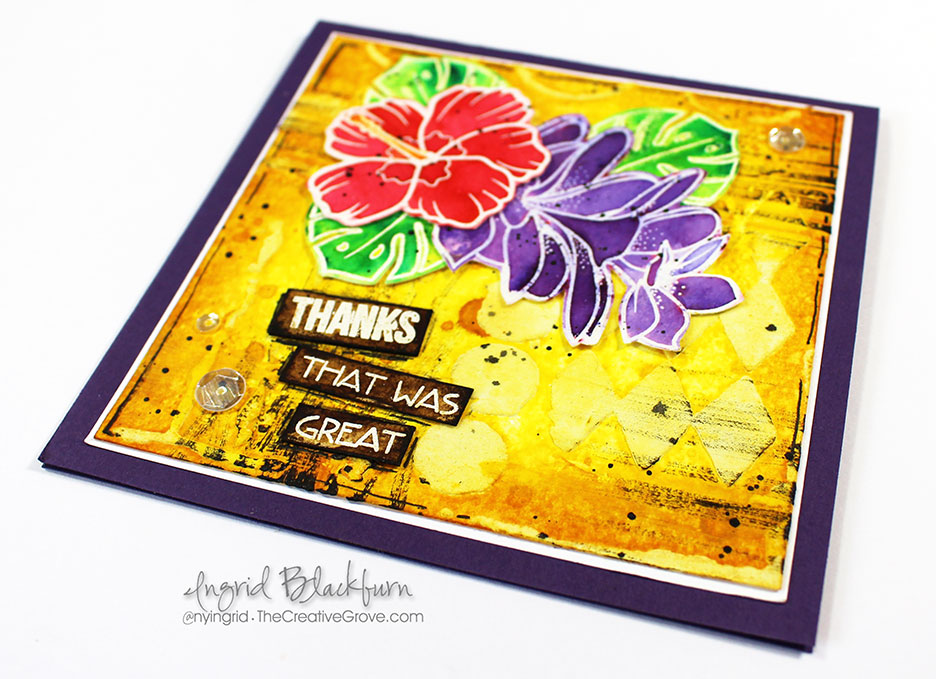
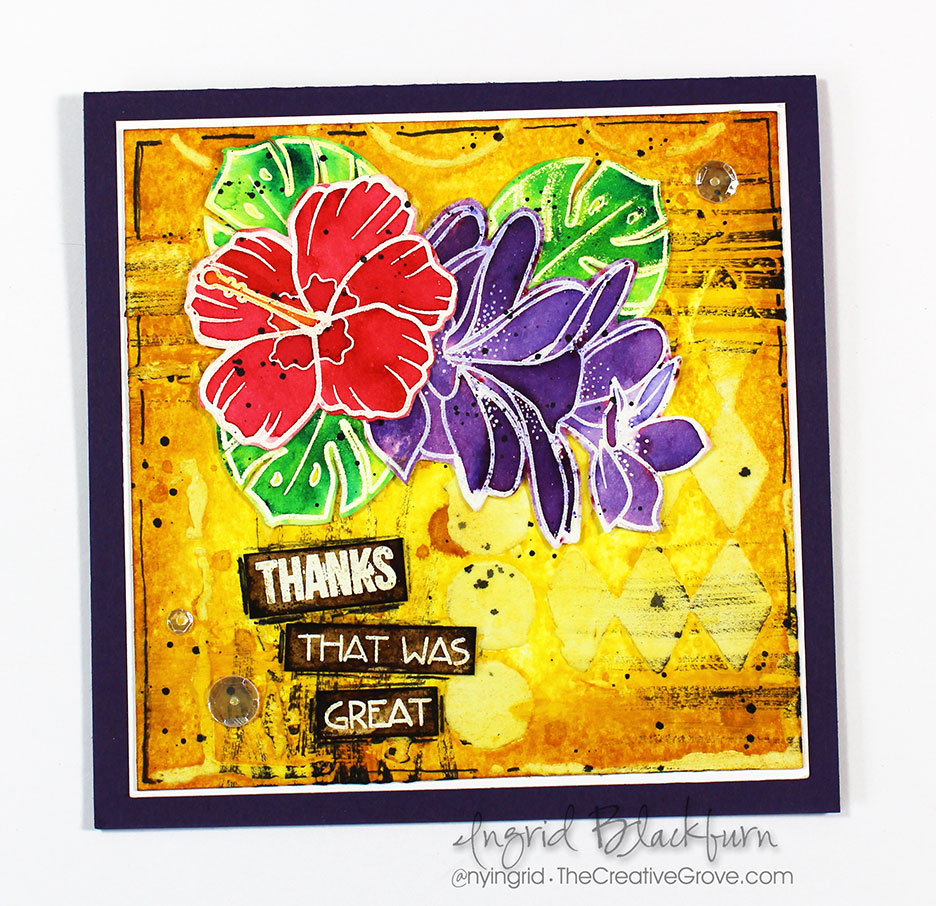
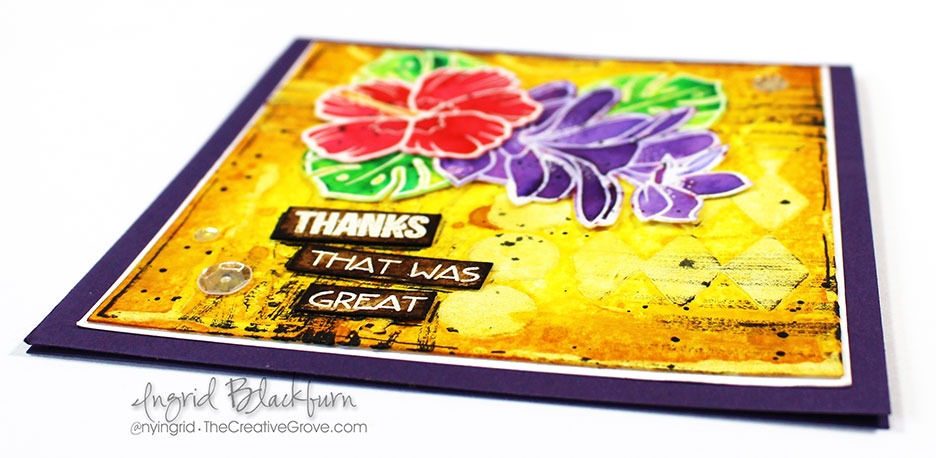
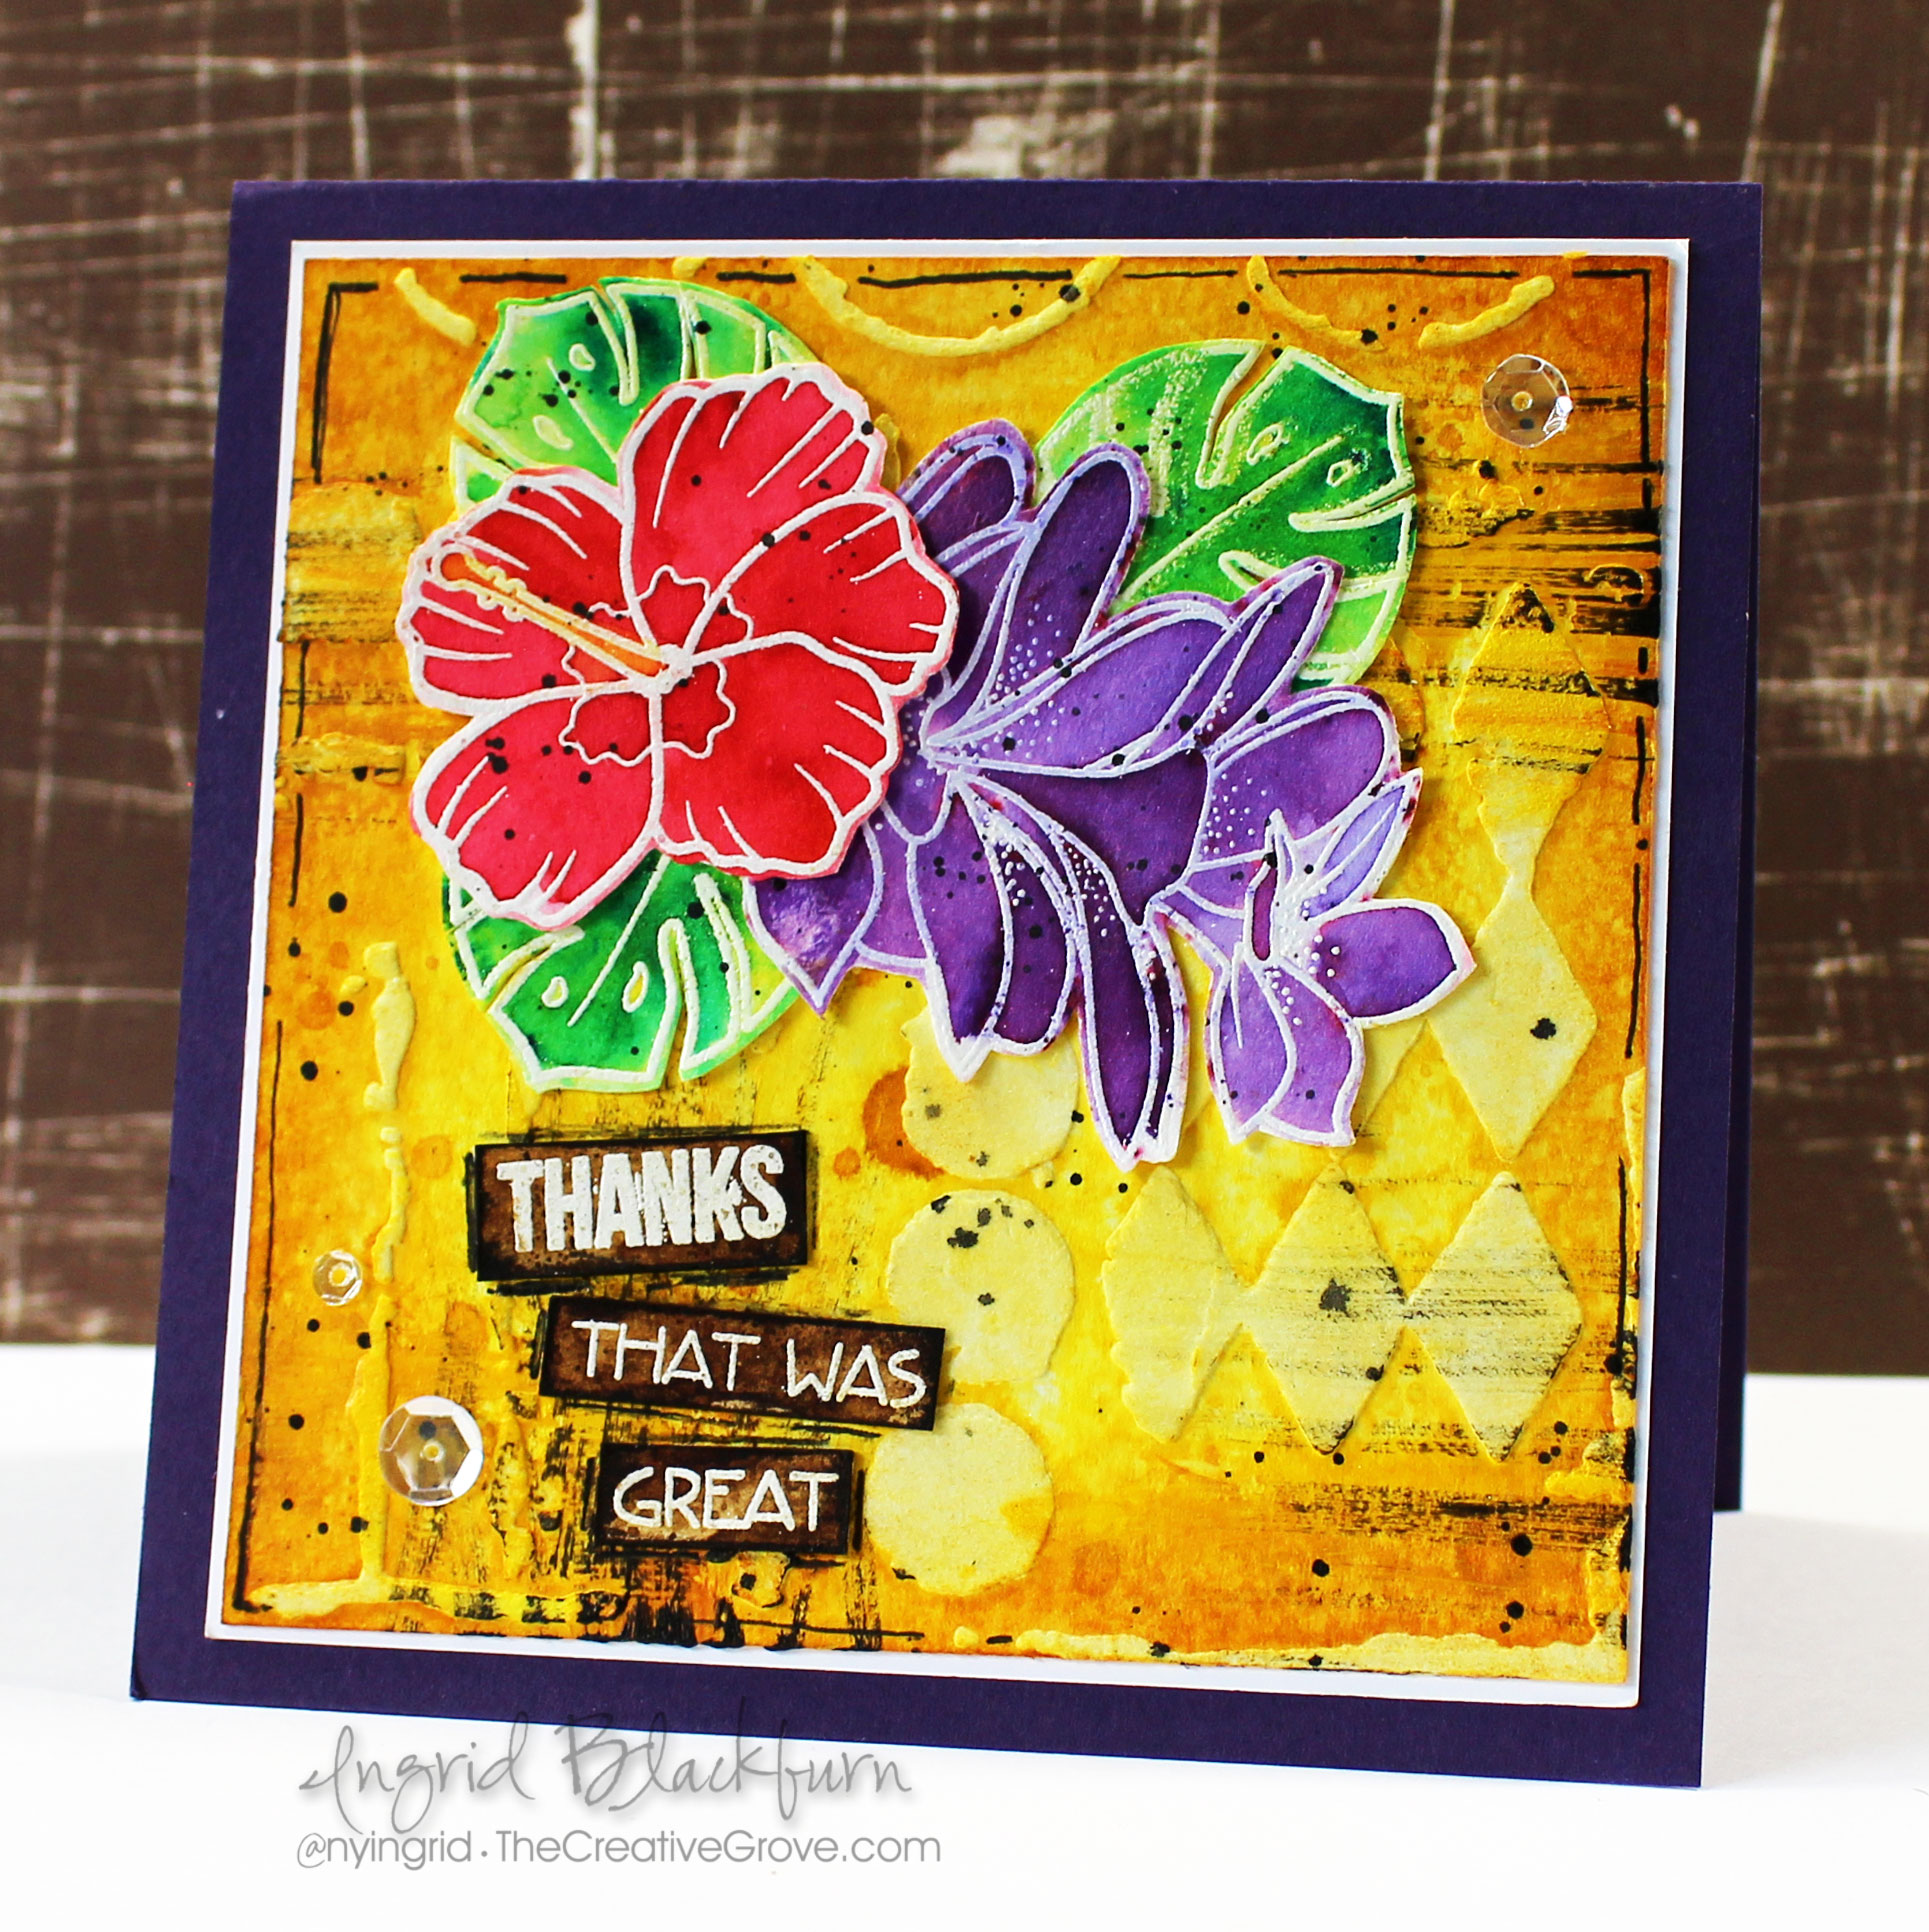
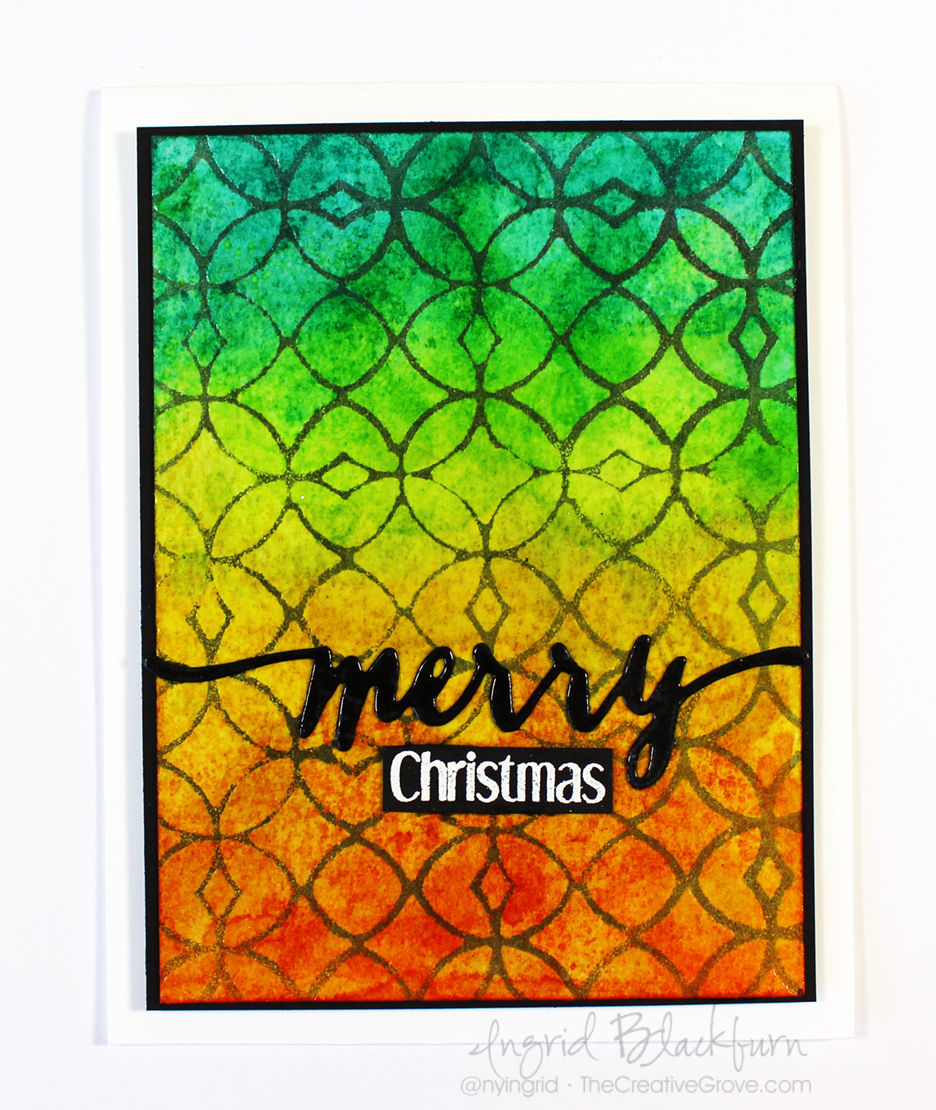
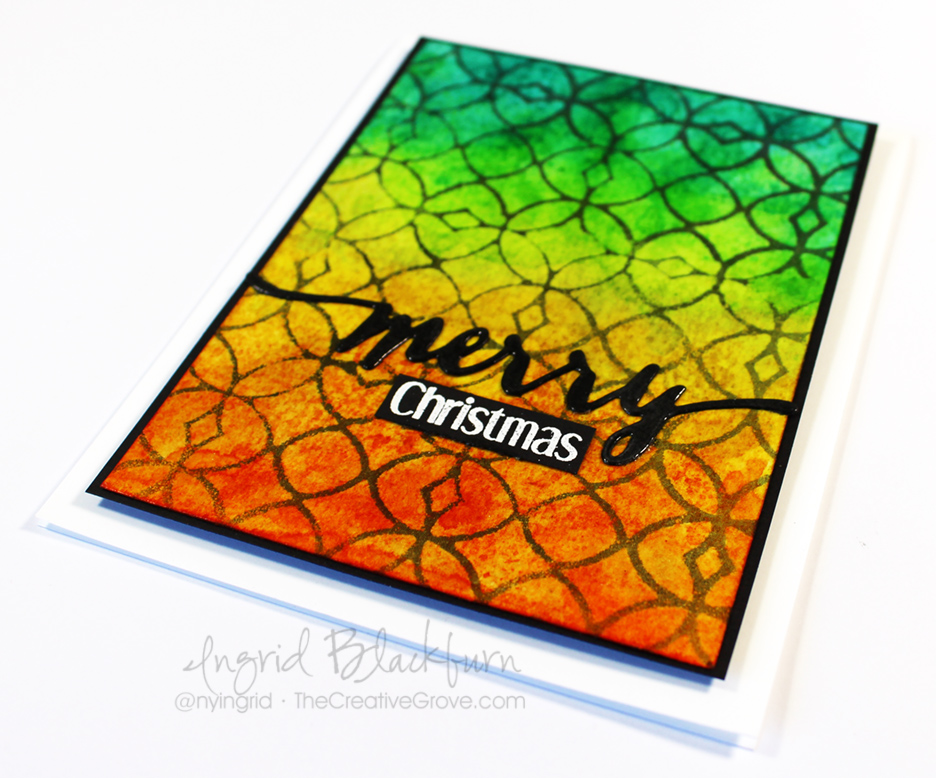
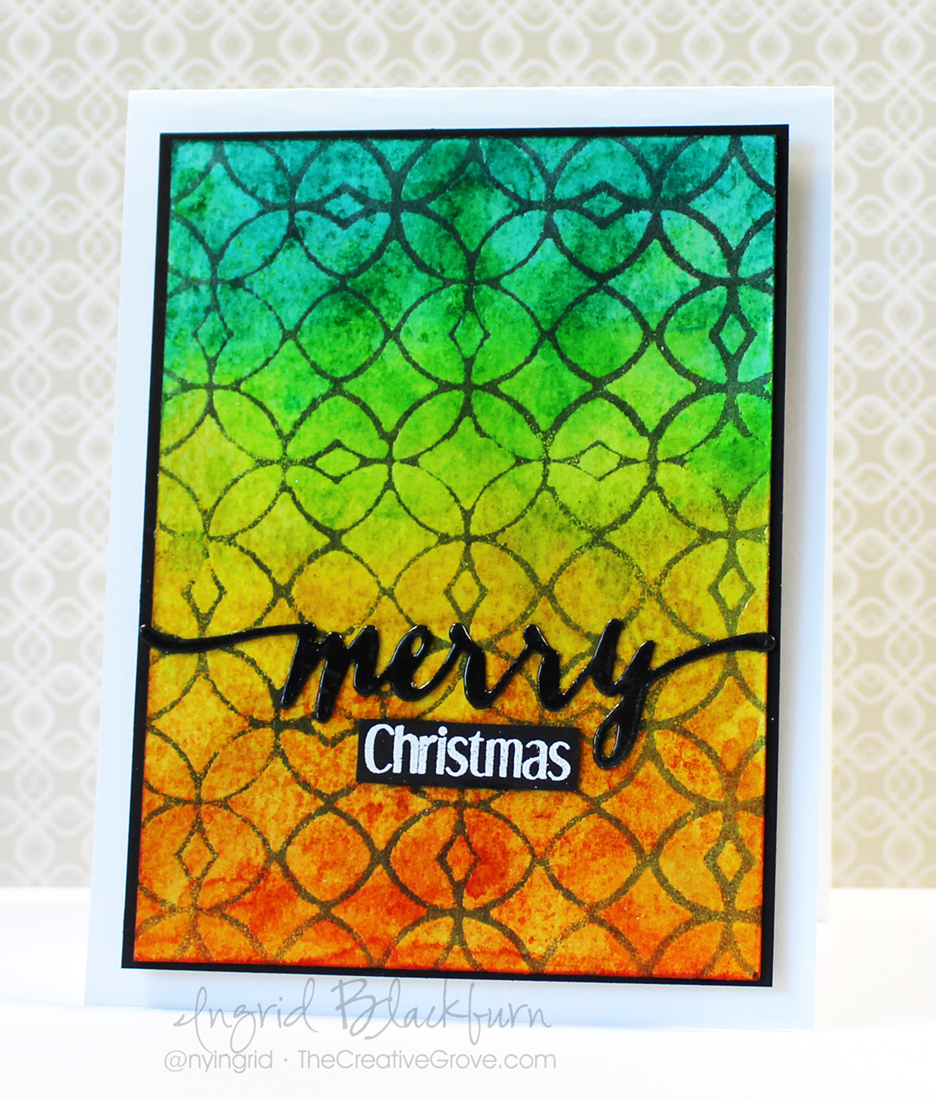
I love this technique, it’s super easy to do, but for best results, use a bold image. I used the Hibiscus flower from the Aloha Spirit set by Create a Smile and kissed it together with the Spice Market background stamp by Hero Arts. It paired perfectly with the fern stencils by The Crafters Workshop & the sentiments from the Mix Mashed set by Happy Little Stampers.

Kissing Technique

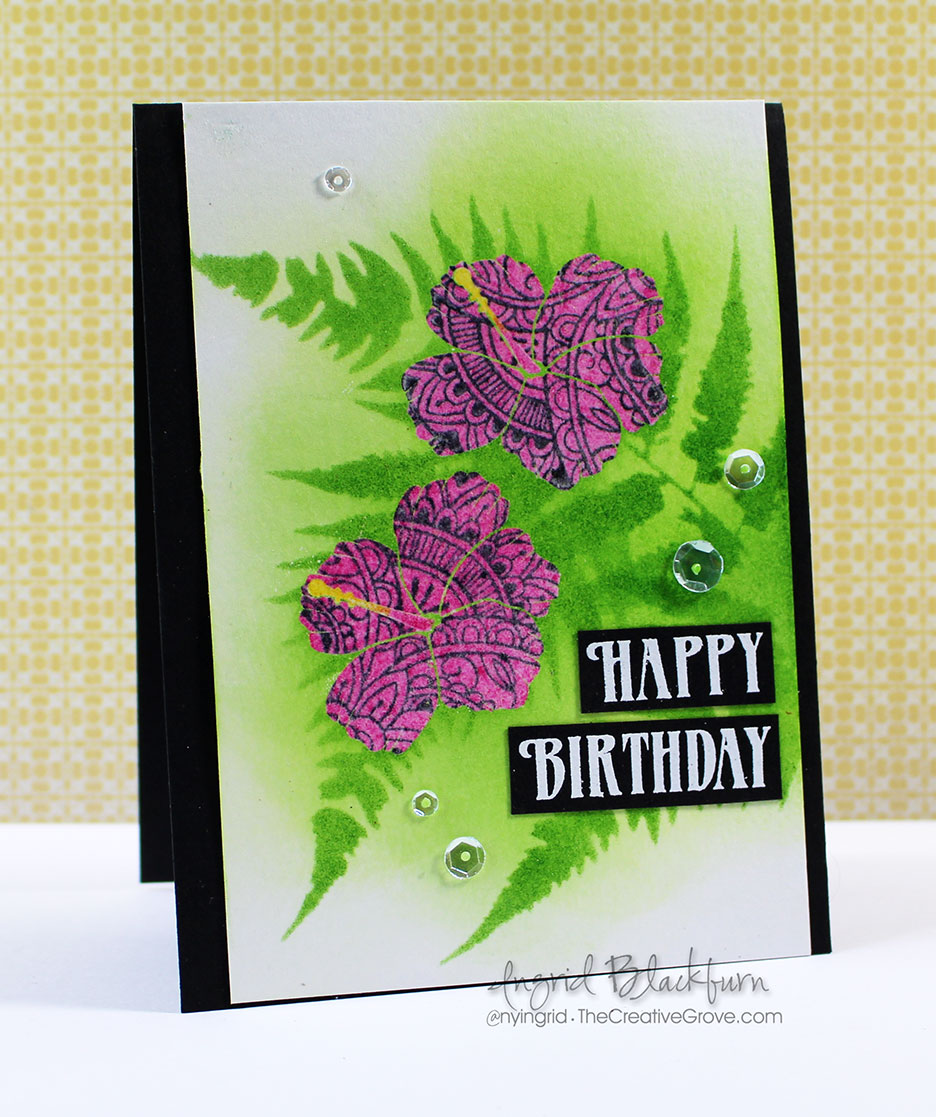
Kissing Technique Tutorial

  • Ink up your flowers in versamark, then Picked Raspberry Distress Ink.
  • Ink up your Spice Market background stamp with Black Soot Distress Ink.
  • Stamp your flower onto the inked up background stamp, in essence kissing them together and then stamp onto your watercolor paper. When you kiss them together, the background image transfers to your inked up stamp giving you a very cool effect.

The Crafters Workshop Stencils

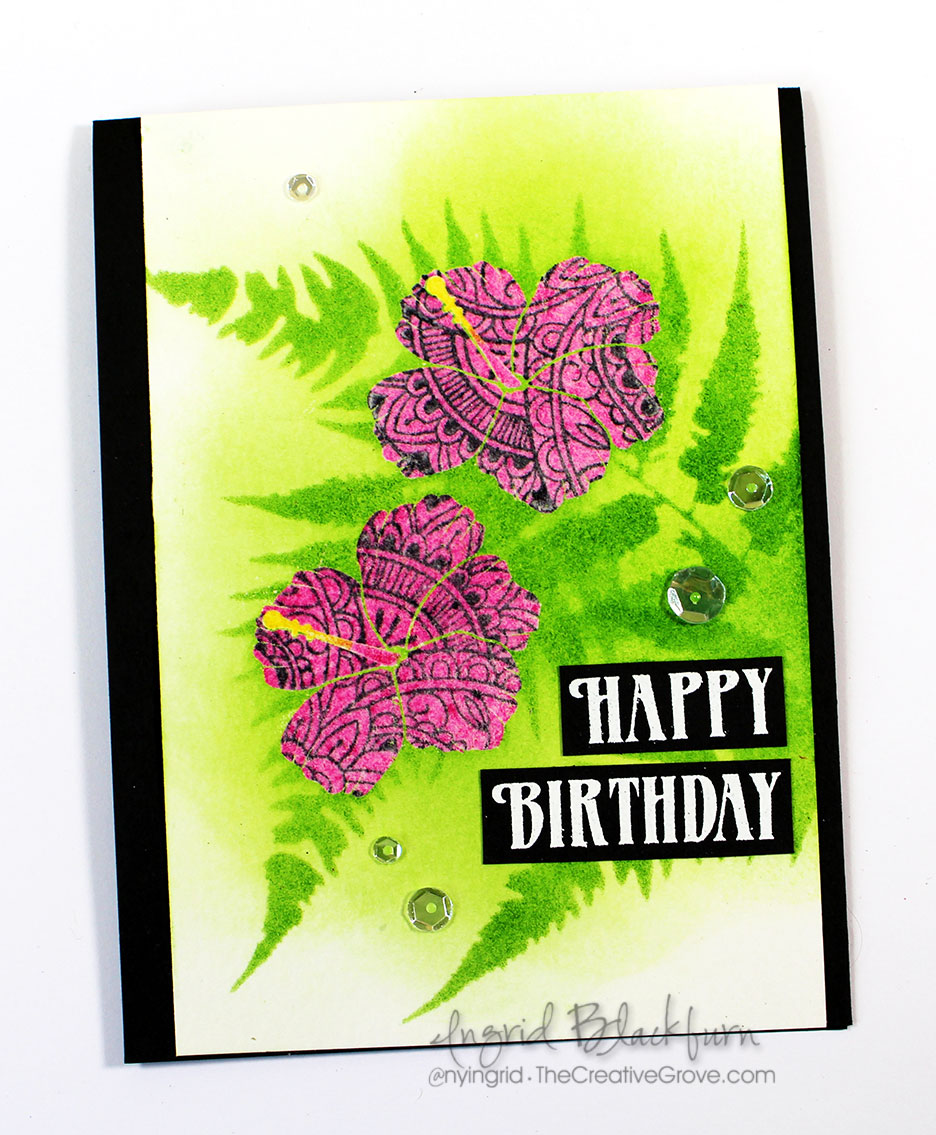
  • Tip – for an extra project, once you’re done kissing your images, place a piece of card stock on your background stamp and rub the back to transfer the images. Where you kissed the two together you’ll have a “missing” lighter design of your flowers!
  • Next, sprinkle clear embossing powder over your kissed images and heat set.
  • Ink up the stamens of the flowers in Picked Raspberry at the bottom and Mustard Seed at the top crossing somewhere in the middle. Stamp and heat set with clear embossing powder.

Kissing Technique - Create a Smile Stamps

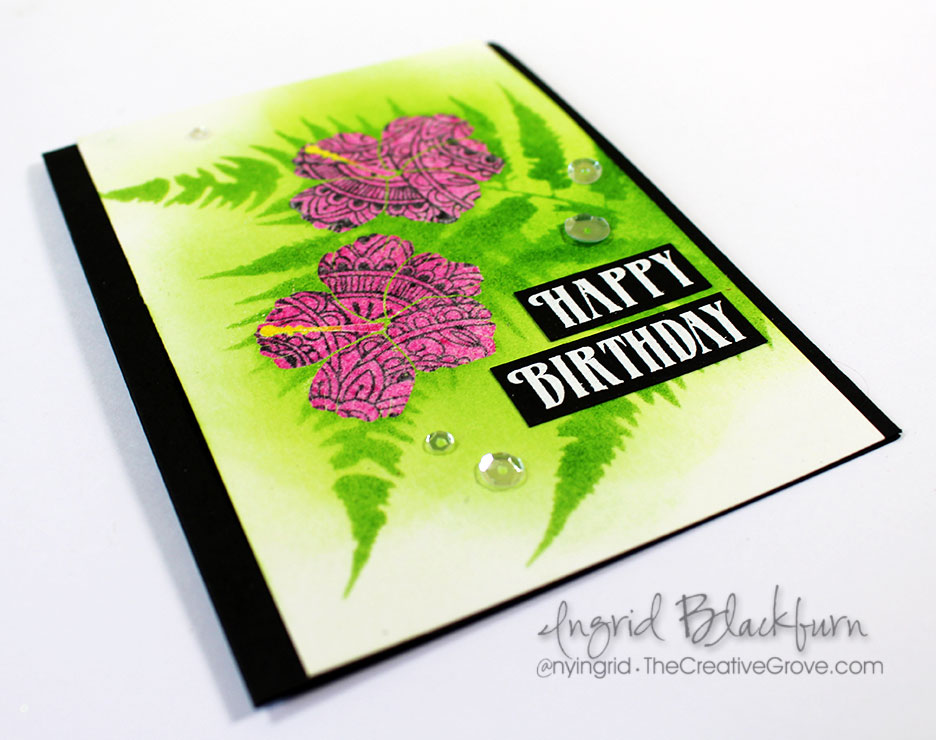
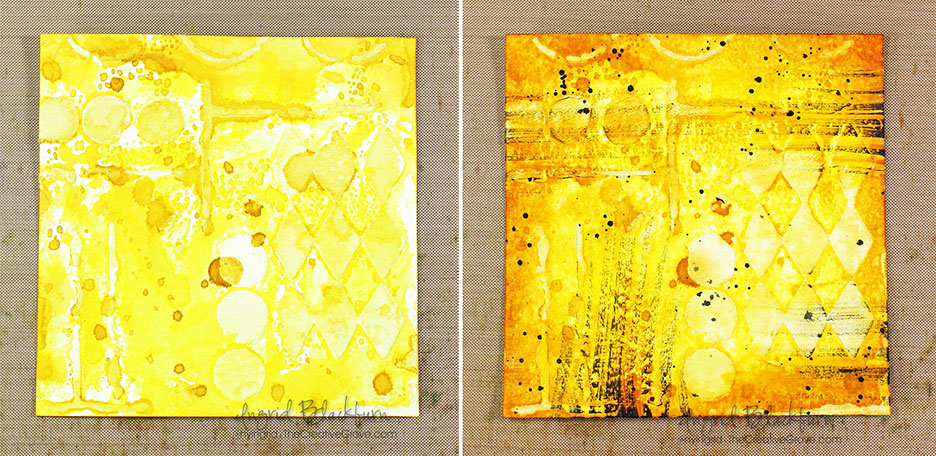
  • Lightly sponge the center area of your watercolor paper in Twisted Citron and Mowed Lawn. I used watercolor paper as it makes sponging super flawless. Tip – your embossed images will resist your ink.
  • Add the fern images by lightly stenciling them in Mowed Lawn Distress Ink and a sponge tool. Since these are quite fine and easily move, I pounce my tool. Shift and repeat until you have a desired effect.
  • Lightly spritz a cloth and rub over your flowers to remove any ink left behind from the background.
  • Emboss your greeting from Happy Little Stampers, white on black card stock, trim down & separate. Attach to your card along with some sparkling clear sequins.
  • Matte onto black card stock, slightly offsetting to the right.

-Kissing-Technique-stamping techniques

It’s a super cute technique that will definitely have everyone say…how did she do that?!! Now it’s your turn – join us this month over at the Happy Little Stampers CAS Challenge and show off your kisses!!!!

Go get those fingers inky!!!

Signature

[optin_box style=”12″ alignment=”center” email_field=”email” email_default=”Enter your email address” integration_type=”aweber” double_optin=”Y” list=”3846012″ name_field=”name” name_default=”Enter your first name” name_required=”Y” opm_packages=””][optin_box_field name=”headline”]Learn more with our exclusive FREE video series:[/optin_box_field][optin_box_field name=”paragraph”]PHA+UGx1cyB5b3XigJlsbCBiZSBhZGRlZCB0byBteSBGUkVFIENyZWF0aXZlIFRpcHMgRS1sZXR0ZXIgd2hlcmUgSSBzaGFyZSBleGNsdXNpdmUgcHJvamVjdHMsIHZpZGVvcyAmYW1wOyB0aGUgMTIgRGF5cyBvZiBDaHJpc3RtYXMgUHJvamVjdCBTZXJpZXM8L3A+Cg==[/optin_box_field][optin_box_field name=”privacy”][/optin_box_field][optin_box_field name=”top_color”]undefined[/optin_box_field][optin_box_button type=”0″ button_below=”Y”]Get Instant Access![/optin_box_button] [/optin_box]

Easy Texture in Mixed Media

Mixed-Media-Tropical-Thanks-001

What would a mixed media piece be without a little texture? Today’s project showcases just how easy it is to add some great texture, both literally, and then with ink too!

For the mixed media challenge over at Happy Little Stampers – we were challenged to use texture in our projects. This project uses embossing paste as a texture base. Once dry, add some color to it. I chose to not go the traditional watercolor route, rather use a wrinkle free distress watercolor technique instead.

Mixed-Media-Tropical-Thanks-002

I love the vibrant colors of Ranger’s Distress Inks, how about you? This base showcases several shades of yellow – Squeezed Lemonade, Mustard Seed, Fossilized Amber and Mustard Seed. Here’s the light version with just a few layers and splotches, and the final version with blending added to it, plus a little acrylic paint brushed over – Lemon Yellow, Cadmium Yellow, Ochre and Raw Umber mixed with Paynes Grey. I love how it turned out – it was hard to cover any of it up!

Mixed-Media-Tropical-base-003

Mixed-Media-Tropical-Thanks-003Mixed-Media-Tropical-Thanks-006

To complete the piece, Add a few embellishments. I chose to add a few fussy cut flowers and leaves watercolored with Brusho from the Aloha Spirit set by Create a  Smile as well as some greetings from the Mini Thanks set – LOVE those stamps!

Add a little doodling around the border and greeting pieces – which, by the way were also colored with Early Espresso and Gathered Twigs after embossing them in White. Some sparkling clear sequins by Pretty Pink Posh and you’re all set!

Mixed-Media-Tropical-Thanks-005

I hope you like it – it was super fun to make, I’m really into adding textures and character to projects.  I can’t wait to see what you do with yours! Till next time –

Signature

[optin_box style=”12″ alignment=”center” email_field=”email” email_default=”Enter your email address” integration_type=”aweber” double_optin=”Y” list=”3846012″ name_field=”name” name_default=”Enter your first name” name_required=”Y” opm_packages=””][optin_box_field name=”headline”]Learn more with our exclusive FREE video series:[/optin_box_field][optin_box_field name=”paragraph”]PHA+UGx1cyB5b3XigJlsbCBiZSBhZGRlZCB0byBteSBGUkVFIENyZWF0aXZlIFRpcHMgRS1sZXR0ZXIgd2hlcmUgSSBzaGFyZSBleGNsdXNpdmUgcHJvamVjdHMsIHZpZGVvcyAmYW1wOyB0aGUgMTIgRGF5cyBvZiBDaHJpc3RtYXMgUHJvamVjdCBTZXJpZXM8L3A+Cg==[/optin_box_field][optin_box_field name=”privacy”][/optin_box_field][optin_box_field name=”top_color”]undefined[/optin_box_field][optin_box_button type=”0″ button_below=”Y”]Get Instant Access![/optin_box_button] [/optin_box]

Creative uses for Twine

How do you use twine on a card? I’ll admit, I mostly criss-cross it on my pieces – it’s one of my signatures. So when I saw the challenge over at Happy Little Stampers this month uses twine – I thought no problem…wrong! I didn’t just want to do a criss-cross – I always do that….so I really racked my brain to come up with a creative use of twine for you.

I looked at my stash, and I’ll be honest – I don’t get crazy with purchases like these – I mostly like neutrals like browns, white and black. But I remembered that I had some red/white bakers twine from back in my Stampin Up days. My first idea didn’t pan out, but it was perfect for a candy cane…so the card came together from there – with a little inspiration from a card online. Mind you, my card looks nothing at all like the muse, It was a giant strip of white with red flanking the sides that cemented the idea in my head.

How to use Twine on Cards

Candy Cane Twine Tutorial:

  • Sponge the Merry Go Round Stencil by ARTplorations in Barn Door and Festive Berries Distress Ink onto White Card Stock – 3 7/8 x 5 1/8″
  • Round the corners of a Real Red rectangle – 2 1/3 x 3 1/2″
  • Wrap some red/white twine around the top being sure to criss-cross it at the edges and tie a bow with some long tails. Tip – to get my loops to stay to the top and tails downward, I tie like a kindergartner would with bunny ears and upside down, so the top is toward me. I over-exaggerate the loops and make them smaller after by pulling on the tails.

Candy Cane Christmas Cards with Twine

  • Emboss a greeting at the opposite end in white. I used White EP by Brutus Monroe and the stamp set Mixed Christmas Sentiments by Happy Little Stampers
  • In the middle, stamp some lines in Barn Door using my favorite stamp from the Gorgeous Grunge stamp set by Stampin Up. It’s that little something that really helps to make this piece – I stamped it twice and left lots of space top and bottom.
  • Die cut or hand cut a candy cane image. Mine came from a retired SU die cut set. If you don’t have a die like this, stamp a candy cane on scrap paper, cut out and use that as a guide on the back of your card stock.

Peppermint Christmas Cards - Bakers Twine

  • Wrap the red/white twine spaced out to reflect the red parts of the candy cane. TIP – I never cut my twine. On the back, it connects to the upper pieces. I secured them down with glue and double sided tabs before popping it up on mini foam squares.
  • Attach the tag to your card front with fun foam or foam strips. The height helps to add drama to your card.

Creative Bakers Twine Uses Bakers Twine Tutorial - Ingrid Blackburn

  • Adhere your peppermint background to a real red matte that is 1/16″ larger – 4 x 5 1/4″
  • Attach to a white A2 card base – 4 1/4 x 5 1/2 for a 1/8″ matte and you’re done!

It’s a fun, cute card, right?!!! Now it’s your turn – grab some Twine and jump on into the Twine Challenge over at Happy Little Stampers. And while you’re there – check out all the other great challenges going on!

DIY Christmas Cards - Ingrid Blackburn

Of course, I do like to play along with multiple challenges, and two other’s in mind when I made this card. First up, my inspiration for the red/white – this week’s Muse Christmas Visions. The crazy talented muse this week is Kimberly Weiner – I love everything she creates. Kimberly created a beautiful red/white cardinal creation and that helped me to zero in on my candy cane idea for today’s twine card.

And of course, you know I just LOVE to play along with the CAS Mix it Up challenge as well. This month they’re featuring Die Cuts, so jump on into that fun one too!

Hope to see you in all the challenges! See you in a few days for yet another great project!

Now go get those fingers inky –

Signature

[optin_box style=”12″ alignment=”center” email_field=”email” email_default=”Enter your email address” integration_type=”aweber” double_optin=”Y” list=”3846012″ name_field=”name” name_default=”Enter your first name” name_required=”Y” opm_packages=””][optin_box_field name=”headline”]Learn more with our exclusive FREE video series:[/optin_box_field][optin_box_field name=”paragraph”]PHA+UGx1cyB5b3XigJlsbCBiZSBhZGRlZCB0byBteSBGUkVFIENyZWF0aXZlIFRpcHMgRS1sZXR0ZXIgd2hlcmUgSSBzaGFyZSBleGNsdXNpdmUgcHJvamVjdHMsIHZpZGVvcyAmYW1wOyB0aGUgMTIgRGF5cyBvZiBDaHJpc3RtYXMgUHJvamVjdCBTZXJpZXM8L3A+Cg==[/optin_box_field][optin_box_field name=”privacy”][/optin_box_field][optin_box_field name=”top_color”]undefined[/optin_box_field][optin_box_button type=”0″ button_below=”Y”]Get Instant Access![/optin_box_button] [/optin_box]

How to Get Inks to Shine

Mixed-Media-Stained-Glass-Window-001

All you really wanted from your card was a little shine, right? Have you ever created a stunning background, but hours later your ink colors are flat and faded? Well, this technique is for you then! I’m playing along with the new Mixed Media Challenge over at Happy Little Stampers – Shine.

HLS Mixed Media challenge May 2016

I LOVE to create backgrounds – have you noticed? All to often in card making, we create these amazing colorful backgrounds on cards and then the colors settle as the project fully dries and we’re left with something that is a bit flat and has no vibrant nature left. At least I do! I’m always thinking where did the shine go? Okay, not all of it is shiny, but you know what I mean.

I have a video and step by step tutorial for you, so grab a drink, learn how to create amazing depth first, then a stain glass window that captures the true nature of those amazing colors by trapping the shine element of your card. Here’s the video:

Watch in HD on YouTube

So what did you think? Not that difficut really. What did you think about stretching your stencil for better coverage? Have you ever done that? Here’s the step by step tutorial, and if you really loved this, be sure to sign up for the Creative Tips E Letter for an exclusive video series and more…

[optin_box style=”12″ alignment=”center” email_field=”email” email_default=”Enter your email address” email_order=”2″ integration_type=”aweber” double_optin=”Y” list=”3846012″ name_field=”name” name_default=”Enter your first name” name_order=”1″ name_required=”Y” opm_packages=””][optin_box_field name=”headline”]Learn more with our exclusive FREE video series:[/optin_box_field][optin_box_field name=”paragraph”]PHA+UGx1cyB5b3XigJlsbCBiZSBhZGRlZCB0byBteSBGUkVFIENyZWF0aXZlIFRpcHMgRS1sZXR0ZXIgd2hlcmUgSSBzaGFyZSBleGNsdXNpdmUgcHJvamVjdHMsIHZpZGVvcyAmYW1wOyB0aGUgMTIgRGF5cyBvZiBDaHJpc3RtYXMgUHJvamVjdCBTZXJpZXM8L3A+Cg==[/optin_box_field][optin_box_field name=”privacy”][/optin_box_field][optin_box_field name=”top_color”]undefined[/optin_box_field][optin_box_button type=”0″ button_below=”Y”]Get Instant Access![/optin_box_button] [/optin_box]

Creative Tips on Shine, Texture and Stretching your Stencils

  • Create an in depth textured piece by using the wrinkle free distress technique on a piece of 140# cold pressed watercolor paper and dye based inks. (shown in detail in the video) Tip – For the most vibrant results, try Ranger’s Distress Inks.

Mixed-Media-Stained-Glass-Window-003


  • This project uses Distress Mustard Seed, Spiced Marmalade, Twisted Citron and Peacock Feathers
  • Once your project is totally dry, lightly buff over it with a de-static tool to remove any oils.
  • Smoosh Versamark through the Latticeworks stencil by Tim Holtz or your favorite one for a detailed design as in the video. Since this stencil didn’t cover my watercolor paper, I had to do this in two parts and overlap my design for a seamless flow.

Vibrant Mixed Media Cards

  • Emboss in Clear Embossing Powder – I used Brutus Monroe – and if you’ve never tried it – do so…it rocks!
  • Once your embossed stencil has fully dried, sponge over with Soot Black distress ink.
  • Wipe off your stenciled design with light pressure and a slightly damp cloth or paper towel to pick up the resisted ink.
  • Emboss your die cut greeting in clear for a shiny look. I used Handlettered Holiday by WPlus9. Adhere with Ranger Multi Medium Matte.

using distress inks in mixed media

  • Stamp and emboss the Christmas greeting from HLS Everyday Sentiments in white on black card stock – trim and adhere.
  • Adhere your watercolor paper with glue to a black matte with a 1/16″ border.
  • Pop up Mixed Media Panel with Fun Foam and adhere to a White card base with a 1/4″ border all around.

That’s it! Simple and striking Mixed Media card. I’m also going to play along with this months challenge over at CAS Mix it Up….it’s heat embossing – we definitely fit there!

may

So hop on over to the HLS Mixed Media Challenge and check out all the amazing projects my teammates have created for this challenge.  Plus you’ll want to stop by our Guest Designer Kalina’s blog – she’s SUPER talented when it comes to Mixed Media and her projects are out of this world!

Then get those fingers inky….I can’t wait to see what you do to let your creations shine!

Signature

[optin_box style=”12″ alignment=”center” email_field=”email” email_default=”Enter your email address” email_order=”2″ integration_type=”aweber” double_optin=”Y” list=”3846012″ name_field=”name” name_default=”Enter your first name” name_order=”1″ name_required=”Y” opm_packages=””][optin_box_field name=”headline”]Learn more with our exclusive FREE video series:[/optin_box_field][optin_box_field name=”paragraph”]PHA+UGx1cyB5b3XigJlsbCBiZSBhZGRlZCB0byBteSBGUkVFIENyZWF0aXZlIFRpcHMgRS1sZXR0ZXIgd2hlcmUgSSBzaGFyZSBleGNsdXNpdmUgcHJvamVjdHMsIHZpZGVvcyAmYW1wOyB0aGUgMTIgRGF5cyBvZiBDaHJpc3RtYXMgUHJvamVjdCBTZXJpZXM8L3A+Cg==[/optin_box_field][optin_box_field name=”privacy”][/optin_box_field][optin_box_field name=”top_color”]undefined[/optin_box_field][optin_box_button type=”0″ button_below=”Y”]Get Instant Access![/optin_box_button] [/optin_box]

For Dad

I’m honored to be a guest designer for the Mixed Media Mojo Challenge today. This month, the girls are challenging you to create a mixed media piece (more than one medium) with a flower theme in mind – I chose to make a few abstract flowers. There’s even an optional twist – real or faux stitching – I’m sure you can guess which one I applied!

Mixed Media Mojo

I started out wanting to create a card for a friend. But something happened as I was working on my piece. My dad wandered into my crafting office, stopped an said Wow – that’s really nice! THUD….that was me picking myself up off the floor.

You see, my father has NEVER commented on anything I’ve made unless I gave it to him directly….lol! He lingered next to my crafting desk, and continued to tell me how much he liked this piece – it was about 80% done. Maybe it was the flowers? The colors? I was too dumbstruck to even ask why! Who cares why….He liked it, he liked it – he really, really liked it! (channeling my inner Sally Field)

My dad loves flowers – so in my mind – that’s it. Well, I decided right then and there that this would not be a card, but rather a frame-able piece that I’ll give him for Father’s day. He’s hard to shop for – at 83 he doesn’t need much – and did I mention that he liked it!

So here it is – my little masterpiece. This project was so much fun to make, here’s how I did it.

Mixed Media Mojo Flowers Challenge - Ingrid Blackburn

Abstract Flowers Project Instructions

First you’ll need to create a few Wrinkle Free Distress backgrounds – one in Mustard Seed/Spiced Marmalade and another in Tumbled Glass/Broken China/Mermaid Lagoon/Salty Ocean. The centers of the abstract flowers are with the same technique in Hickory Smoke/Soot Black. Once you have those done, free hand cut the flowers and centers. The background was edged in Hickory Smoke, Soot Black and some Paynes Grey Acrylic diluted with water. Brush some Paynes Grey and Silver acrylic paint onto the background with a fan brush. A little background detail was added using the Latticeworks stencil, a Starbucks cup holder and some bubble wrap. Next add a little faux stitching on the flowers and greeting (from the Noteworthy set by Stamplorations).

Add a little basic shadowing under the abstract flowers, paint some stems in Paynes Grey, and add some PG & White splatters, and a little edging in a black and white pigment pen – that’s it! I love the Mixed Media Mojo piece, I wanted to keep it cool – no browns which is very unlike me!

Since I had decided to frame it for my father, it needed a cool matte. Once I settled on the combination of 1/16 white, 3/4 black and 1/8 Brushed Silver…the black needed to stand apart, add to the design and not take away all at the same time – that’s asking a lot!

Enter clear embossing for a subtle tone on tone effect. To get this perfect result with the Tim Holtz stencil, you’ll want to find the center point in your project. Then line up your stencil over the center. That way you can go up and down in perfect unison to get as close to a perfect pattern as possible. Line up your patterns top and bottom and smoosh Versamark to your project. Add Brutus Monroe clear embossing powder – it’s hands down the best powder I’ve used in 18 years of embossing!  And I’ve used many different kinds. 🙂

Abstract Flowers - Mixed Media Project

I just love the end result – it turned out almost exactly as I envisioned…which is rare! I hope you enjoyed it too. It doesn’t matter if you go the more traditional or Abstract Flower route, you’ll have fun creating your own piece. And stop by the challenge blog for sure a few times this month – there’s a new Mixed Media tutorial every week – a true treasure of creative inspirational how to!

So here’s what I want you to do now….go to the Mixed Media Mojo Challenge and give the Flowers Challenge a try – Mixed Media doesn’t have to be crazy involved, you’d be surprised what you can come up with with just some simple things like watercolor, acrylics, stencils and some water. It’s relaxing and you’ll amaze yourself – I promise!

Now click here to visit the challenge and get inspired with all the great projects designed by the UBER talented Design Team!  I’m off to find the perfect frame for this beauty. Now it’s your turn to get your fingers inky –

Signature

[optin_box style=”12″ alignment=”center” email_field=”email” email_default=”Enter your email address” email_order=”2″ integration_type=”aweber” double_optin=”Y” list=”3846012″ name_field=”name” name_default=”Enter your first name” name_order=”1″ name_required=”Y” opm_packages=””][optin_box_field name=”headline”]Learn more with our exclusive FREE video series:[/optin_box_field][optin_box_field name=”paragraph”]PHA+UGx1cyB5b3XigJlsbCBiZSBhZGRlZCB0byBteSBGUkVFIENyZWF0aXZlIFRpcHMgRS1sZXR0ZXIgd2hlcmUgSSBzaGFyZSBleGNsdXNpdmUgcHJvamVjdHMsIHZpZGVvcyAmYW1wOyB0aGUgMTIgRGF5cyBvZiBDaHJpc3RtYXMgUHJvamVjdCBTZXJpZXM8L3A+Cg==[/optin_box_field][optin_box_field name=”privacy”][/optin_box_field][optin_box_field name=”top_color”]undefined[/optin_box_field][optin_box_button type=”0″ button_below=”Y”]Get Instant Access![/optin_box_button] [/optin_box]


Fluttering through a Beautiful World

Ah, to be a butterfly and flutter your way though a Beautiful World. When I think of butterflies, my head immediately goes two places – elegant and whimsical. How about you? Be sure to tell me in the comment section what you love about Butterfly stamps!

The perfect way to describe the stamp set Beautiful World by GinaK is elegant and whimsical – that’s why I relate to it so well! This stamp set, designed for the Stamp of Approval Beautiful World Collection is a dream to stamp with.  You can keep it light and fun, go dramatic and elegant or just say colorful and whimsical. Any way you stamp it, you can’t go wrong.

I created a video for you too – it’s the second project plus a great tip for customizing the perspective on your stamps! Especially Butterflies.

View on YouTube in HD

Here are just a few ways I had fun with this set – okay, and a few others from the collection – for you today.

My Colorful Beautiful World – Day Four

Project One

To create this elegant card, break out your pearl embossing powder for a definite wow in the background. The swirly flourish stamp is just stunning in Pearl. To get the effect I was after, I have most of my tails lead toward a spot in the center behind the frame. I wanted to keep the card rather simple and just have a little pop. The card front is the actual folded card and it’s mounted onto a traditional A2 card base just 4 1/4 x 5 1/2″.

The frame is popped up and I just LOVE that greeting!

Creative Tip –  This set has two butterflies in it – a large full one and a smaller half flying toward the right. Well, did you notice that my larger butterfly is flying to the left and is on it’s side? Check out the images in Project Two and you’ll see what I mean.

To make a butterfly on it’s side, cut around one side, and trim off the other side of wings and that side’s antennae. Viola – you have a half on it’s side in whichever direction you need!

SOA Enchanted Frame

Project Two

For this colorful project, you’ll want to start off with an effortlessly blended background. If you are subscribed to my YouTube channel, there’s a video above showing you how I get a perfect blend for this card.

Colorful Beautiful World 001

The key is to pick colors that not only compliment one another, but won’t make mud – an ugly shade of brown. After creating my gorgeous background, I added the Beautiful World images and embossed them with white powder. I just LOVE that fancy flourish image in the bottom right – simply gorgeous. Some of my design team mates have made the most beautiful cards with that stamp – and the butterfly. Don’t forget to check out all their inspiration as well!

It may be hard to see, but I used Catherine’s new Geobuilders stamp set for some interest behind my panel. I embossed it white on white, and it’s the perfect small touch to finish the card.

Colorful Beautiful World Close Up

The greeting is from the All about You set by CAS-ual Fridays. I love that set – anytime I have stamps that I can mix match and build my own greetings, I”m sold! And in one of my favorite fonts too – perfection! Some simple sparkling clear sequins finish the card out.

Be sure to stop by tomorrow for a full Blog Hop. Here are the other designers that are creating amazing works for you today:

In case you missed all the inspiration from the past three days, here are a few quick links to get you to the other seven projects I’ve created. The DT on each day has created some amazing inspired works for you.

Day One            Day Two               Day Three

If you’re not on the list to find out the link for when SOA Beautiful World goes on sale…what are you waiting for? Click Here to be in the know first before it sells out on the 20th.

SOA April 2016

Stamp of Approval comes with many many many projects all put together in a project guide. Be sure to visit Catherine’s Blog, she’s linked to everyone’s projects each day, and is featuring all the stamp sets in videos leading up to the 20th. See you tomorrow for a fun blog hop, prizes and yet more inspiration! Now run off and create your own sideways butterflies ….have fun!

Signature

[optin_box style=”12″ alignment=”center” email_field=”email” email_default=”Enter your email address” email_order=”2″ integration_type=”aweber” double_optin=”Y” list=”3846012″ name_field=”name” name_default=”Enter your first name” name_order=”1″ name_required=”Y” opm_packages=””][optin_box_field name=”headline”]Learn more with our exclusive FREE video series:[/optin_box_field][optin_box_field name=”paragraph”]PHA+UGx1cyB5b3XigJlsbCBiZSBhZGRlZCB0byBteTxzdHJvbmc+IEZSRUU8L3N0cm9uZz4gQ3JlYXRpdmUgVGlwcyBFLWxldHRlci4gRnJvbSB0aW1lIHRvIHRpbWUgeW914oCZbGwgZ2V0IGV4Y2x1c2l2ZSBwcm9qZWN0cywgdmlkZW9zICZhbXA7IHRoZSAxMiBEYXlzIG9mIENocmlzdG1hcyBzZXJpZXMuPC9wPgo=[/optin_box_field][optin_box_field name=”privacy”][/optin_box_field][optin_box_field name=”top_color”]undefined[/optin_box_field][optin_box_button type=”0″ button_below=”Y”]Get Instant Access![/optin_box_button] [/optin_box]

It’s a Beautiful World

I’ll admit, I’ve been in a little creative funk lately. It happens to the best of us. I was able to create, it just wasn’t flowing like it normally did. Enter the Beautiful World Collection by Stamp of Approval. I’m serious…I was struggling and then I decided to do what has always worked for me in the past – sit down and sketch.

Okay – I lost some of you, well, to let you in on my little process – I’ve always been a sketcher. And this new stamp collection opened the flood gates for me – literally…I even have three projects and a video  for you today!

Here’s a peek at what I was able to quickly come up with in just 60 minutes with the stamp and die sets laid out in front of me:

Card Sketches

So sit back and get set to take a creative ride with me over the next five days – what?!! Yes, you read that right…be sure to stop back every day 9:00 AM eastern time for a creative journey into the new Stamp of Approval collection – Beautiful World. Don’t you just LOVE that name!

Every day I will showcase a few new projects for you from this easy to use stamp collection curated by my friend Catherine Pooler. Catherine worked together with some of the industries top stamp companies – CAS-ual Fridays, GinaK, & SugarPea Designs to create an amazing collection of stamps and dies showcasing a Beautiful World.  You’ve got to be on the wait list to find out when it goes on sale on April 20th!

To see all the products in action before it goes on sale, just stop by my friend Catherine’s blog every day leading up to the 20th. She’ll showcase each piece so you can see them in action ahead of time.

PLUS...there are feature days from a whole team of designers that are super creative. Catherine will link to everyone’s features from her blog (as will I), and on April 19th there’s a blog hop with prizes.

Did I also mention there’s a Project Guide with many, many, many cards with step by step instructions for you as well! An instant library of projects so you’re all set and ready to create.

Stamp of Approval Beautiful World

And as if that wasn’t enough…I’m going to highlight each stamp and die set for you too- not in quite as much detail as Catherine will, but I’ll have a full range of CAS, technique and even a few mixed media pieces over the next five days. So, are you on the wait list yet? Get on the wait list HERE to find out when it’s available

Now… let’s get our fingers inky and started with some CAS inspiration for today. Here Are a few cards that showcase three items in the collection: 2Yous dies & All About You stamp set by CAS-ual Fridays, and the Geobuilders Stamp Set by CP herself!

Beautiful World Projects – Day One

Project One

Here is one of my favorites. We have a little word play going on in the background. This card is great for anyone, but I thought with father’s day coming up, this would be a perfect card for my dad – telling him all the things I love about him.

You’ll want to emboss all the words with Pewter powder on black card stock and cut it down. Next pop it up with a little deep red and added a few matching hearts at the bottom – also part of the dies – love that! The fun scripty You die was perfect for this card – simple white for the ultimate contrast between black and white and you’re all set!

All about You CAS-ual Fridays

Project Two

Next up we have another square card. This is also a great go to clean and simple card with potential for just about ANY greeting – love that!  Did you see that the underneath piece is actually a technique? I know it looks crazy simple, but there’s a little technique involved. Here’ s a video to show you exactly what I did to give this little beauty a fun pop. Make sure you’re subscribed  to my YouTube channel to see all the videos as they go live!

Click here to watch on YouTube in HD

Here you see the negative of the die showcased to let the colorful and shimmery pink piece shinning through (hard to see in the photo, but check the video out later for a great look).

I love the thickness of this die – it’s perfect for projects where you want to use the negative image, or make a statement with the positive. This is the other You in the 2 Yous die set. You can use patterned paper, colored card stock or whip up some cool technique piece to showcase underneath like I did. Stamp your sentiment on top and add a few sequins. Quick, and great if you have little technique pieces like this in a basket like me hanging around!

Negative image Die Cuts

Project Three

This is a super quick card for anyone – especially a man! I LOVE this greeting – it’s perfect for so many reasons. We’re playing here with one of the awesome images from the Geobuilders stamp set in addition to the two sets we used above. To see more – definitely see Maureen’s post from today- she showcased a few of the other images in this stamp set. I have links  of all the other designers at the end.

You’ll want to line up the chevron stamp – yes, it’s a single chevron, so think of the possibilities – they’re endless! You’ll want to stamp from the top down so you can see and line it up a bit easier. Keep it tone on tone with the Kraft card stock and then stamp one in a different color to pop up for some contrast. I used a navy color. To give it a little more punch, you can also emboss your greeting and single chevron in Clear like here. It helps to really make it stand out with a glossy shine on your card.

Neutral Geobuilders

I admit, this card kinda makes me think of star trek a little (the popped up chevron)…any trekkies out there? I’m a HUGE Next Generation fan. Okay…I’m getting off topic…lol – let me know what you think in the comments of the three projects and if you’re a trekkie like me!

Stop by these blogs to see more inspiration:

Now, go check out the other projects, subscribe to my YouTube channel if you haven’t to see the Video when it goes live this afternoon and then it’s your turn to get your fingers inky. See you tomorrow with more creative goodness –

Signature

[optin_box style=”12″ alignment=”center” email_field=”email” email_default=”Enter your email address” email_order=”2″ integration_type=”aweber” double_optin=”Y” list=”3846012″ name_field=”name” name_default=”Enter your first name” name_order=”1″ name_required=”Y” opm_packages=””][optin_box_field name=”headline”]Learn more with our exclusive FREE video series:[/optin_box_field][optin_box_field name=”paragraph”]PHA+UGx1cyB5b3XigJlsbCBiZSBhZGRlZCB0byBteTxzdHJvbmc+IEZSRUU8L3N0cm9uZz4gQ3JlYXRpdmUgVGlwcyBFLWxldHRlci4gRnJvbSB0aW1lIHRvIHRpbWUgeW914oCZbGwgZ2V0IGV4Y2x1c2l2ZSBwcm9qZWN0cywgdmlkZW9zICZhbXA7IHRoZSAxMiBEYXlzIG9mIENocmlzdG1hcyBzZXJpZXMuPC9wPgo=[/optin_box_field][optin_box_field name=”privacy”][/optin_box_field][optin_box_field name=”top_color”]undefined[/optin_box_field][optin_box_button type=”0″ button_below=”Y”]Get Instant Access![/optin_box_button] [/optin_box]

MM Watercolor Butterflies Video

Yesterday I posted a very cool, fun and quirky butterfly card for the Wings Mixed Media challenge over at Happy Little Stampers. It was such a fun project to create, rather relaxing actually, I’m so glad that I filmed it for you! I won’t lie – the project took me two hours to create, so I had to majorly edit the video down for you. I even split it up so that you can find your way easier around the two distinct different components of this card – watercoloring the butterflies and creating the mixed media background that allows them to literally fly off the page.

Mixed-Media-Watercolor-Butterflies-001

Enjoy the process – grab a beverage and have fun – I’d LOVE to see your cards when you create them! And if you haven’t subscribed to my YouTube channel yet – be sure to do so so you see them as they first come out.

Part One focuses on the masked border used to create this card and the actual watercoloring process for keeping the light and darker tones in the butterflies.

Click Here to watch Part One in HD on YouTube

Part two focuses on the Mixed Media portion of this card used to literally pop the butterflies off the page.

Click Here to see Part Two in HD on YouTube

If you want to see the written tutorial and close up photos, be sure to check out the original post right HERE.

See you soon –

Signature

[optin_box style=”2″ alignment=”center” email_field=”email” email_default=”Enter your email address” email_order=”2″ integration_type=”aweber” double_optin=”Y” list=”3846012″ name_field=”name” name_default=”Enter your first name” name_order=”1″ name_required=”Y” opm_packages=””][optin_box_field name=”headline”]Learn more with our exclusive FREE video series:[/optin_box_field][optin_box_field name=”paragraph”]PHA+UGx1cyB5b3XigJlsbCBiZSBhZGRlZCB0byBteTxzdHJvbmc+IEZSRUU8L3N0cm9uZz4gQ3JlYXRpdmUgVGlwcyBFLWxldHRlci4gRnJvbSB0aW1lIHRvIHRpbWUgeW914oCZbGwgZ2V0IGV4Y2x1c2l2ZSBwcm9qZWN0cywgdmlkZW9zICZhbXA7IHRoZSAxMiBEYXlzIG9mIENocmlzdG1hcyBzZXJpZXMuPC9wPgo=[/optin_box_field][optin_box_field name=”privacy”][/optin_box_field][optin_box_field name=”top_color”]undefined[/optin_box_field][optin_box_button type=”0″ button_below=”Y”]Get Immediate Access![/optin_box_button] [/optin_box]