CAS – Ghosting Technique

Have you ever tried the ghosting technique before? A ghosted look is an image that appears either as a light or double image. You can actually achieve this look in several ways, I’m going to talk about three today.

I personally love this technique, it gives a great look and added emphasis to a stamped or stenciled image. You’ll need to use one of three mediums – water, white pigment ink or a clear watermark ink like Versamark.

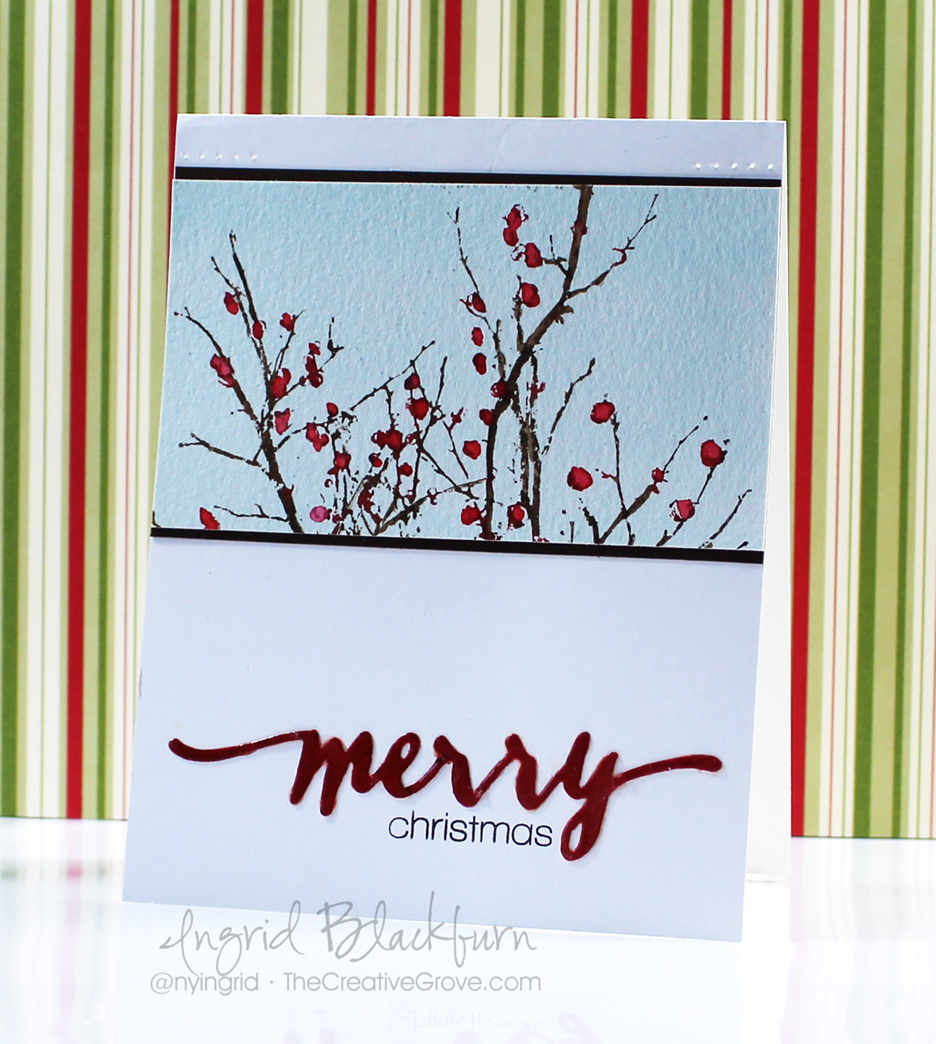
This is my first month playing along with a fun challenge over at Happy Little Stampers, and I’m quite excited to be a new member of the CAS team! The challenge for the month of June is to use Ghosting on your card in a CAS (Clean and Simple) style. Here’s what I came up with:

Ghost Stamping

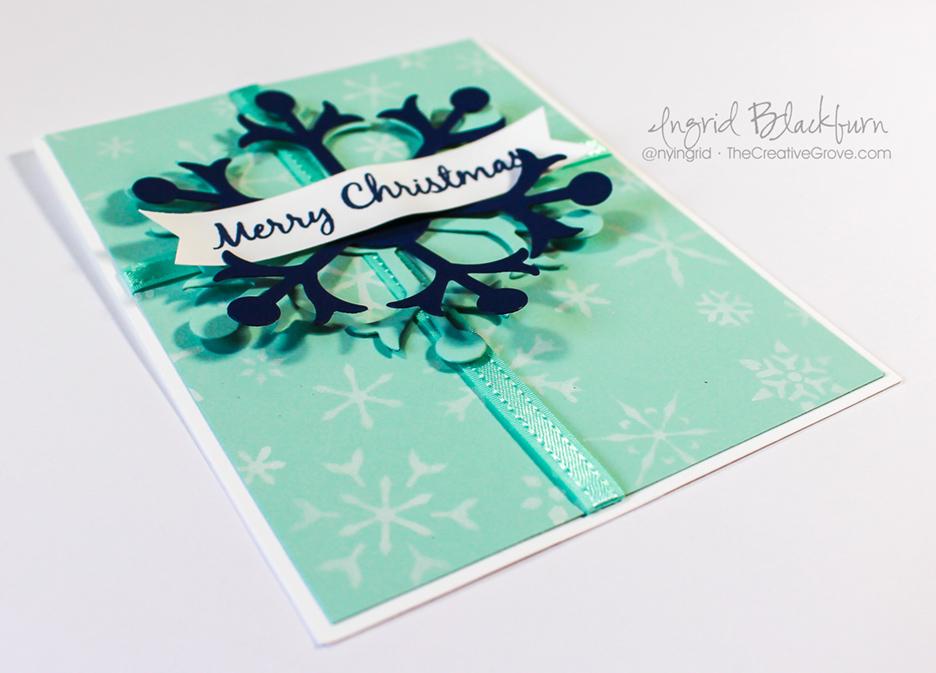
Now I’ll be honest – I’m fresh off a transatlantic trip and have been a little jet lagged! We were in New York for my grand daughter’s Christening – little Lylah is SO cute! It was a short trip, but a long one on the way back. I was excited when I remembered that I created this word cluster using this very technique several months ago for a Christmas challenge and went another way. Even better – I had the snowflakes left over from another project too – I love it when I get to use things from my scrap bin!

Ghosting Technique Tutorials

Technique #1 – Emerging Images (Stamp/Stencil)

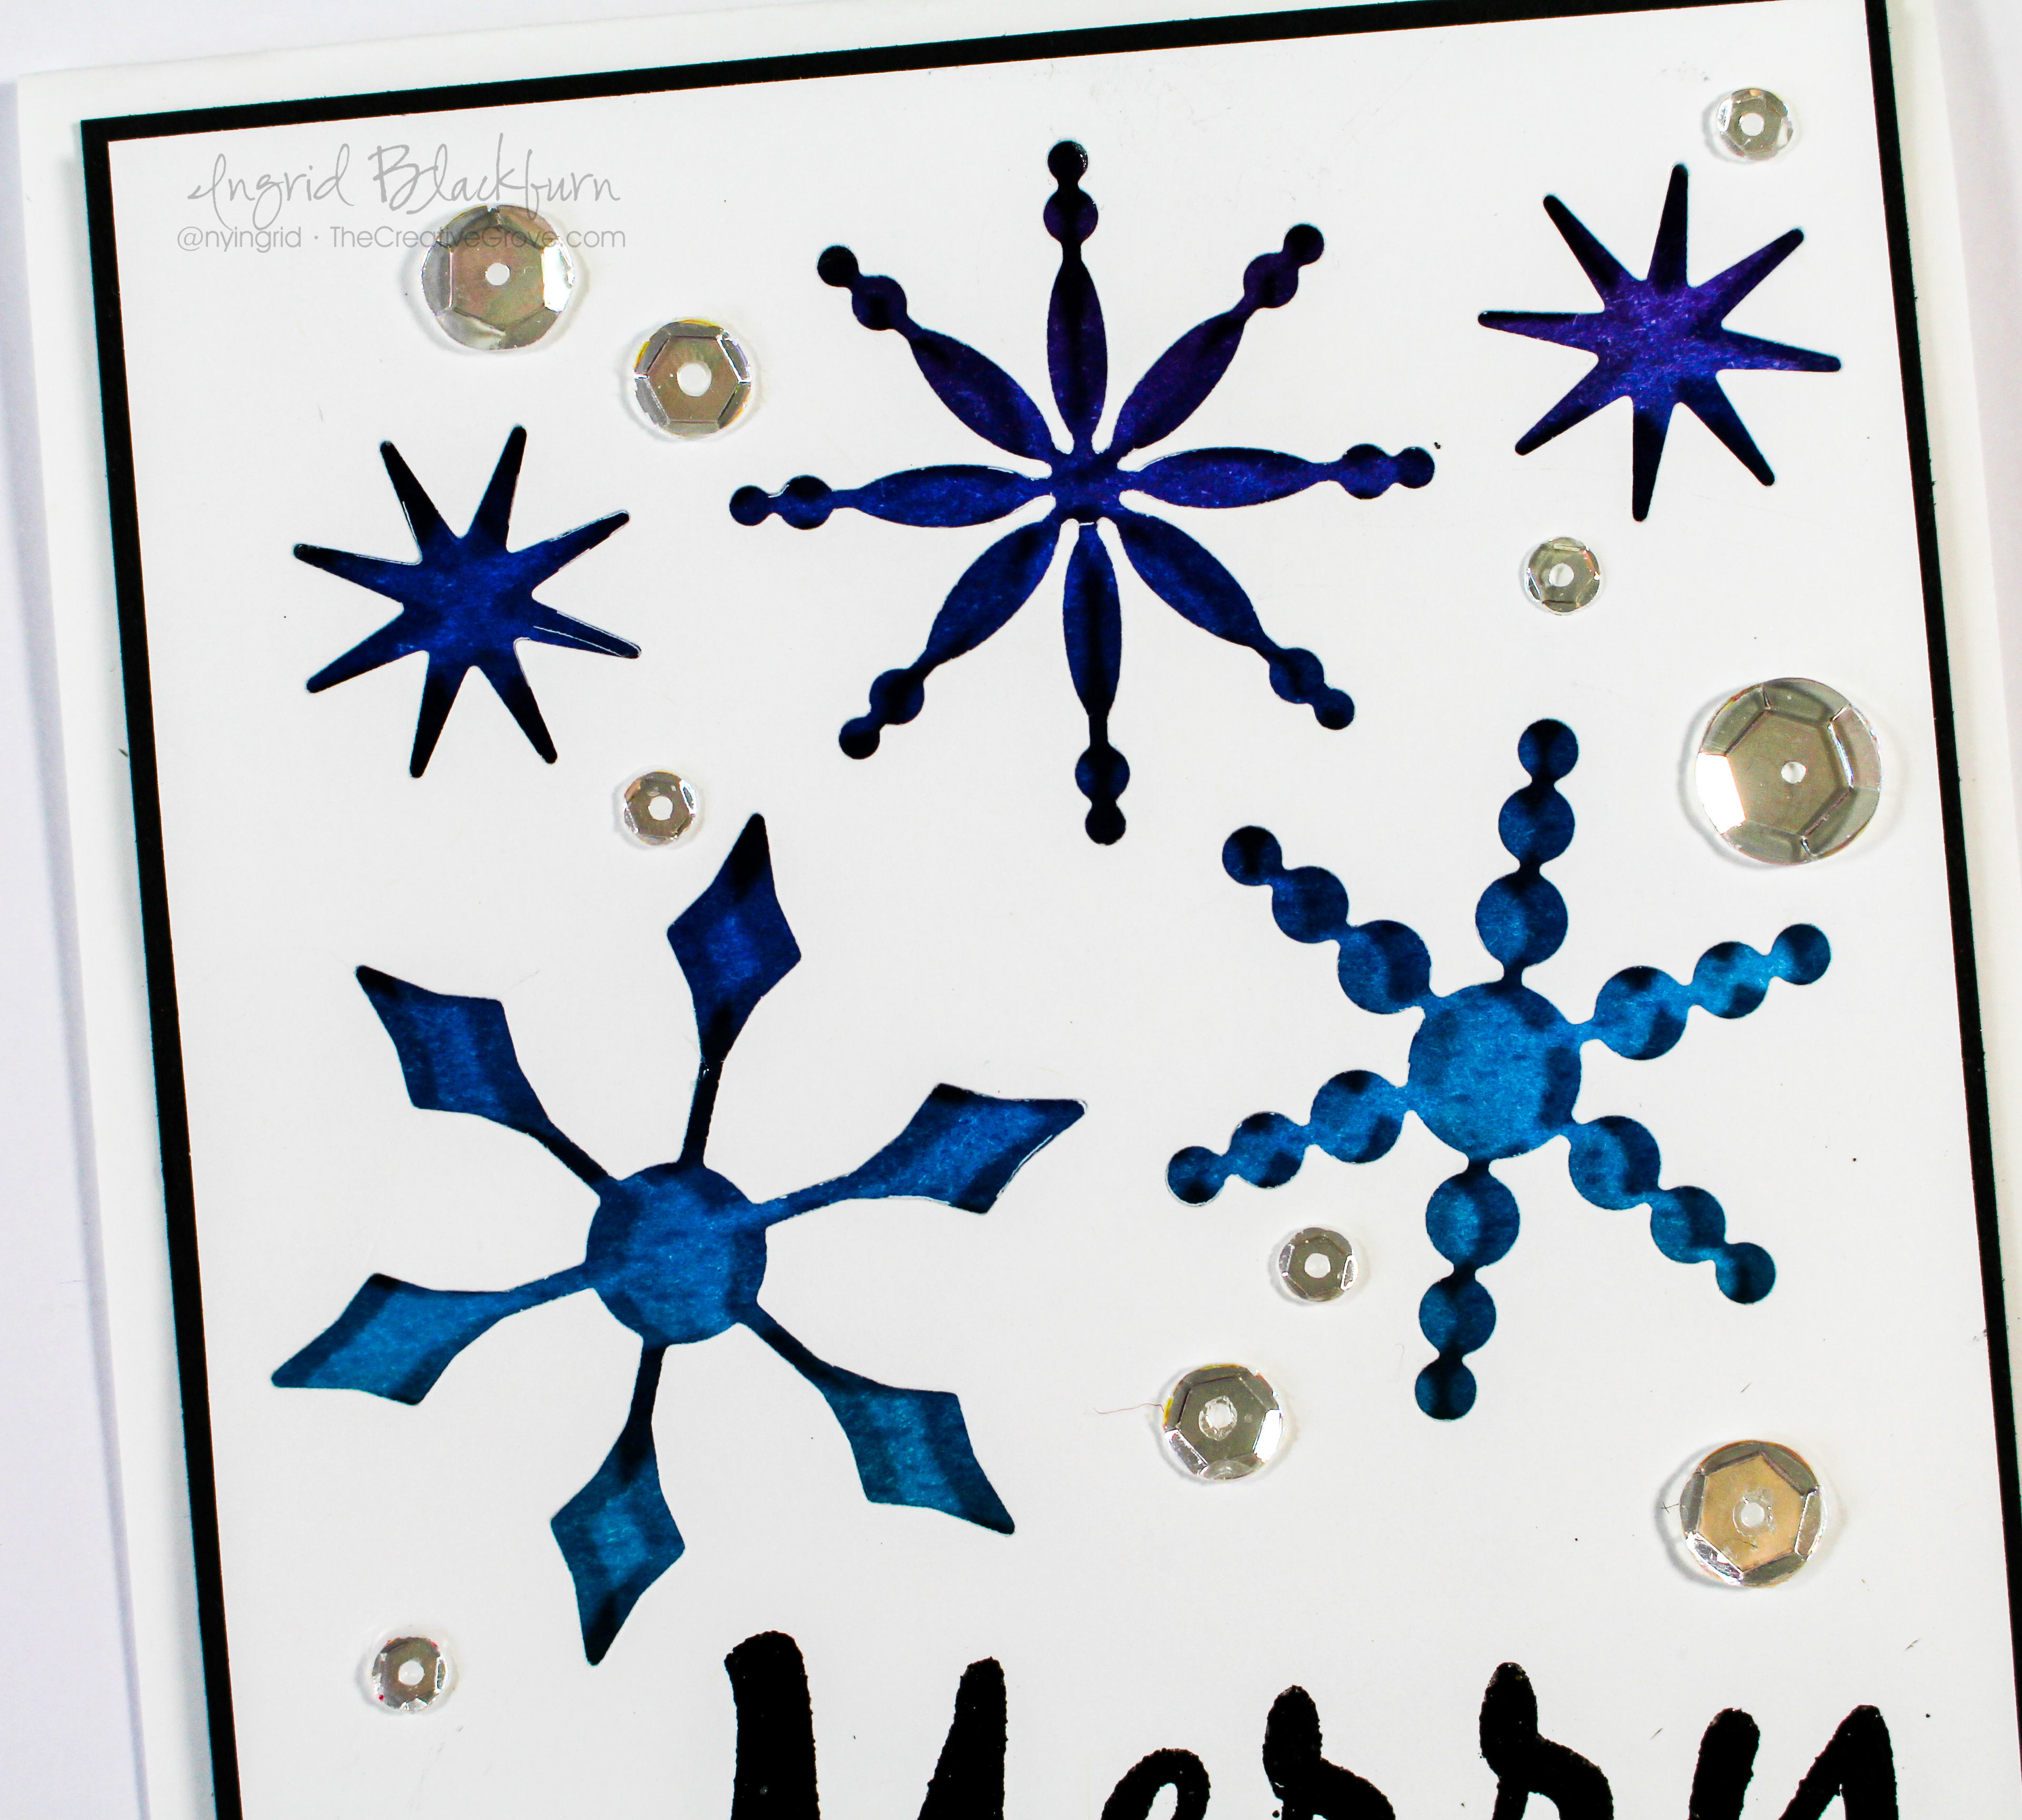
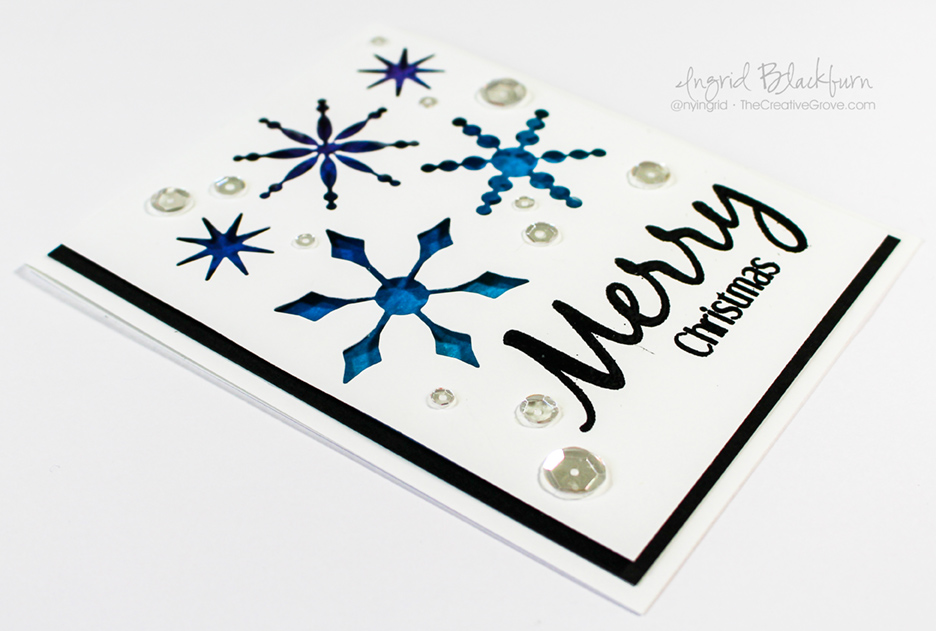
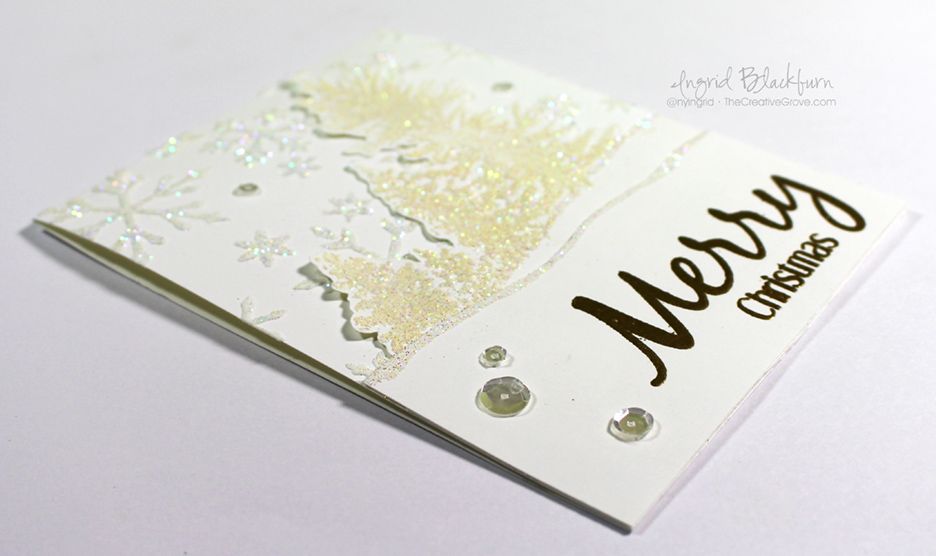
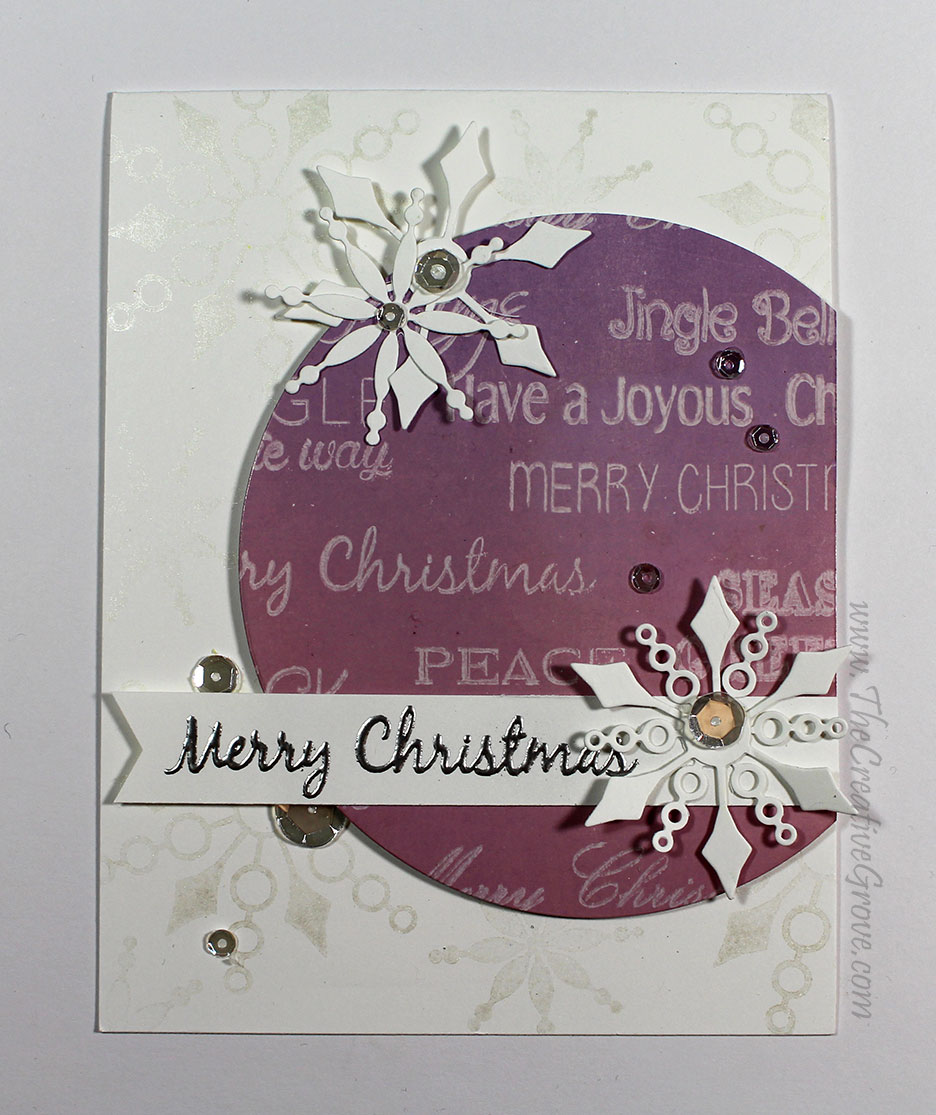
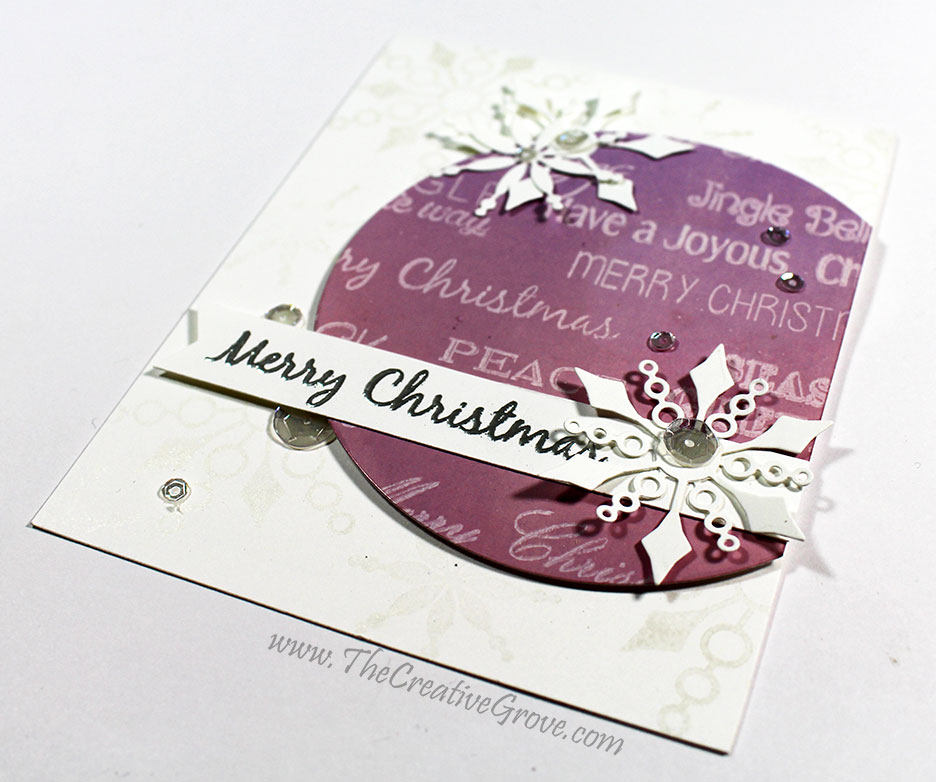
To create the ghost image, stamp a word cluster with various greetings from the Happy Little Stampers set Mixed Christmas Greetings in Versamark ink on glossy card stock.  Next brayer colored dye inks, covering your card stock. I used the Distress inks Victorian Velvet and Dusty Concorde for a slight ombre look. The versamark ink resists the dye ink and shows up as a ghost image.

Ghosting-Technique-003

Another way to get the same result, but not quite as sharp is to use Watercolor paper, cover it well with Distress Ink and stamp with water. That’s the water stamping technique which can produce a ghosted result.

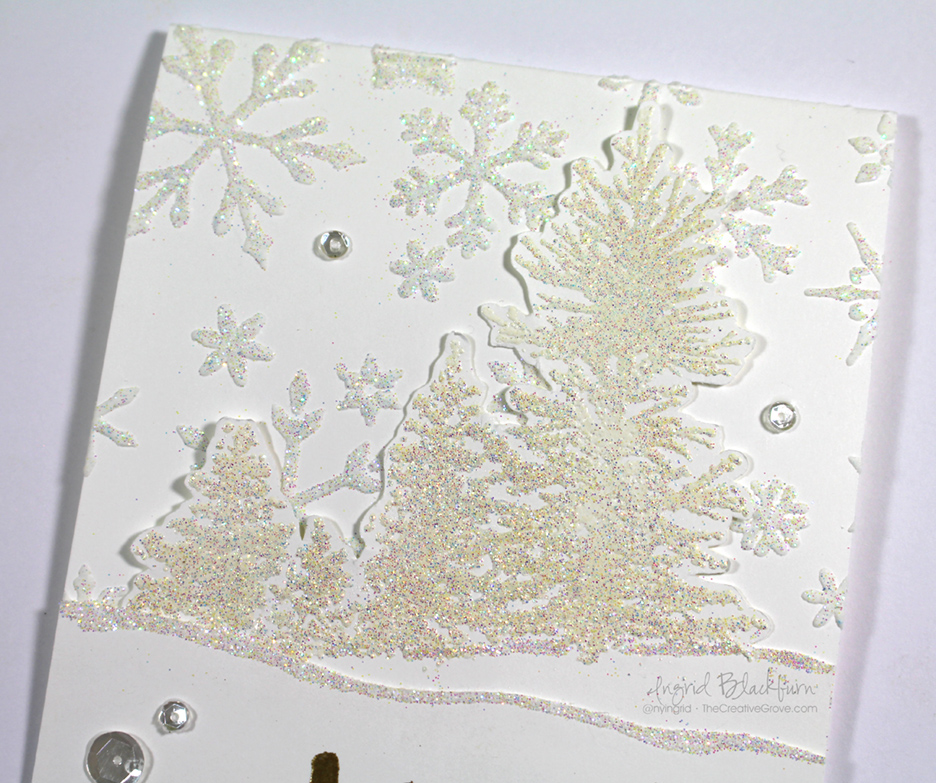
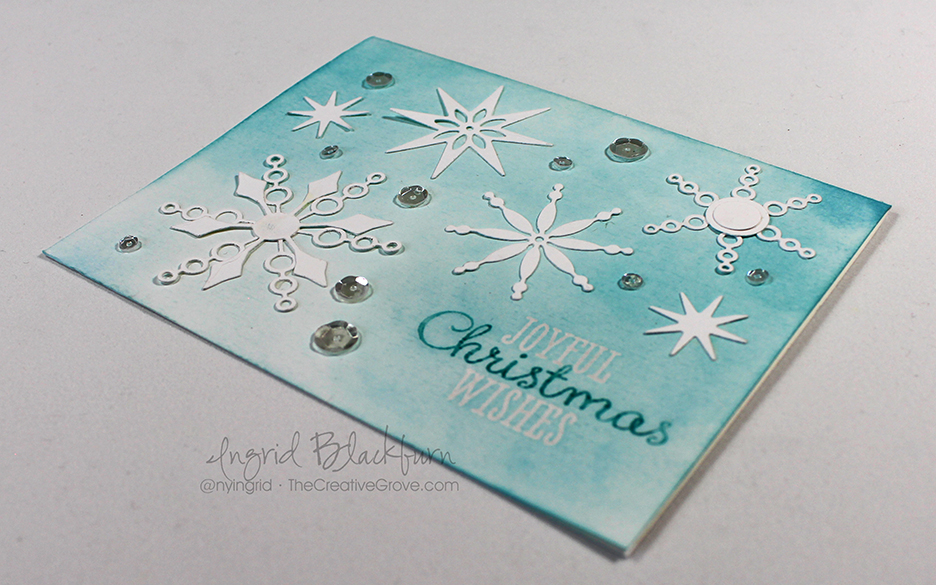
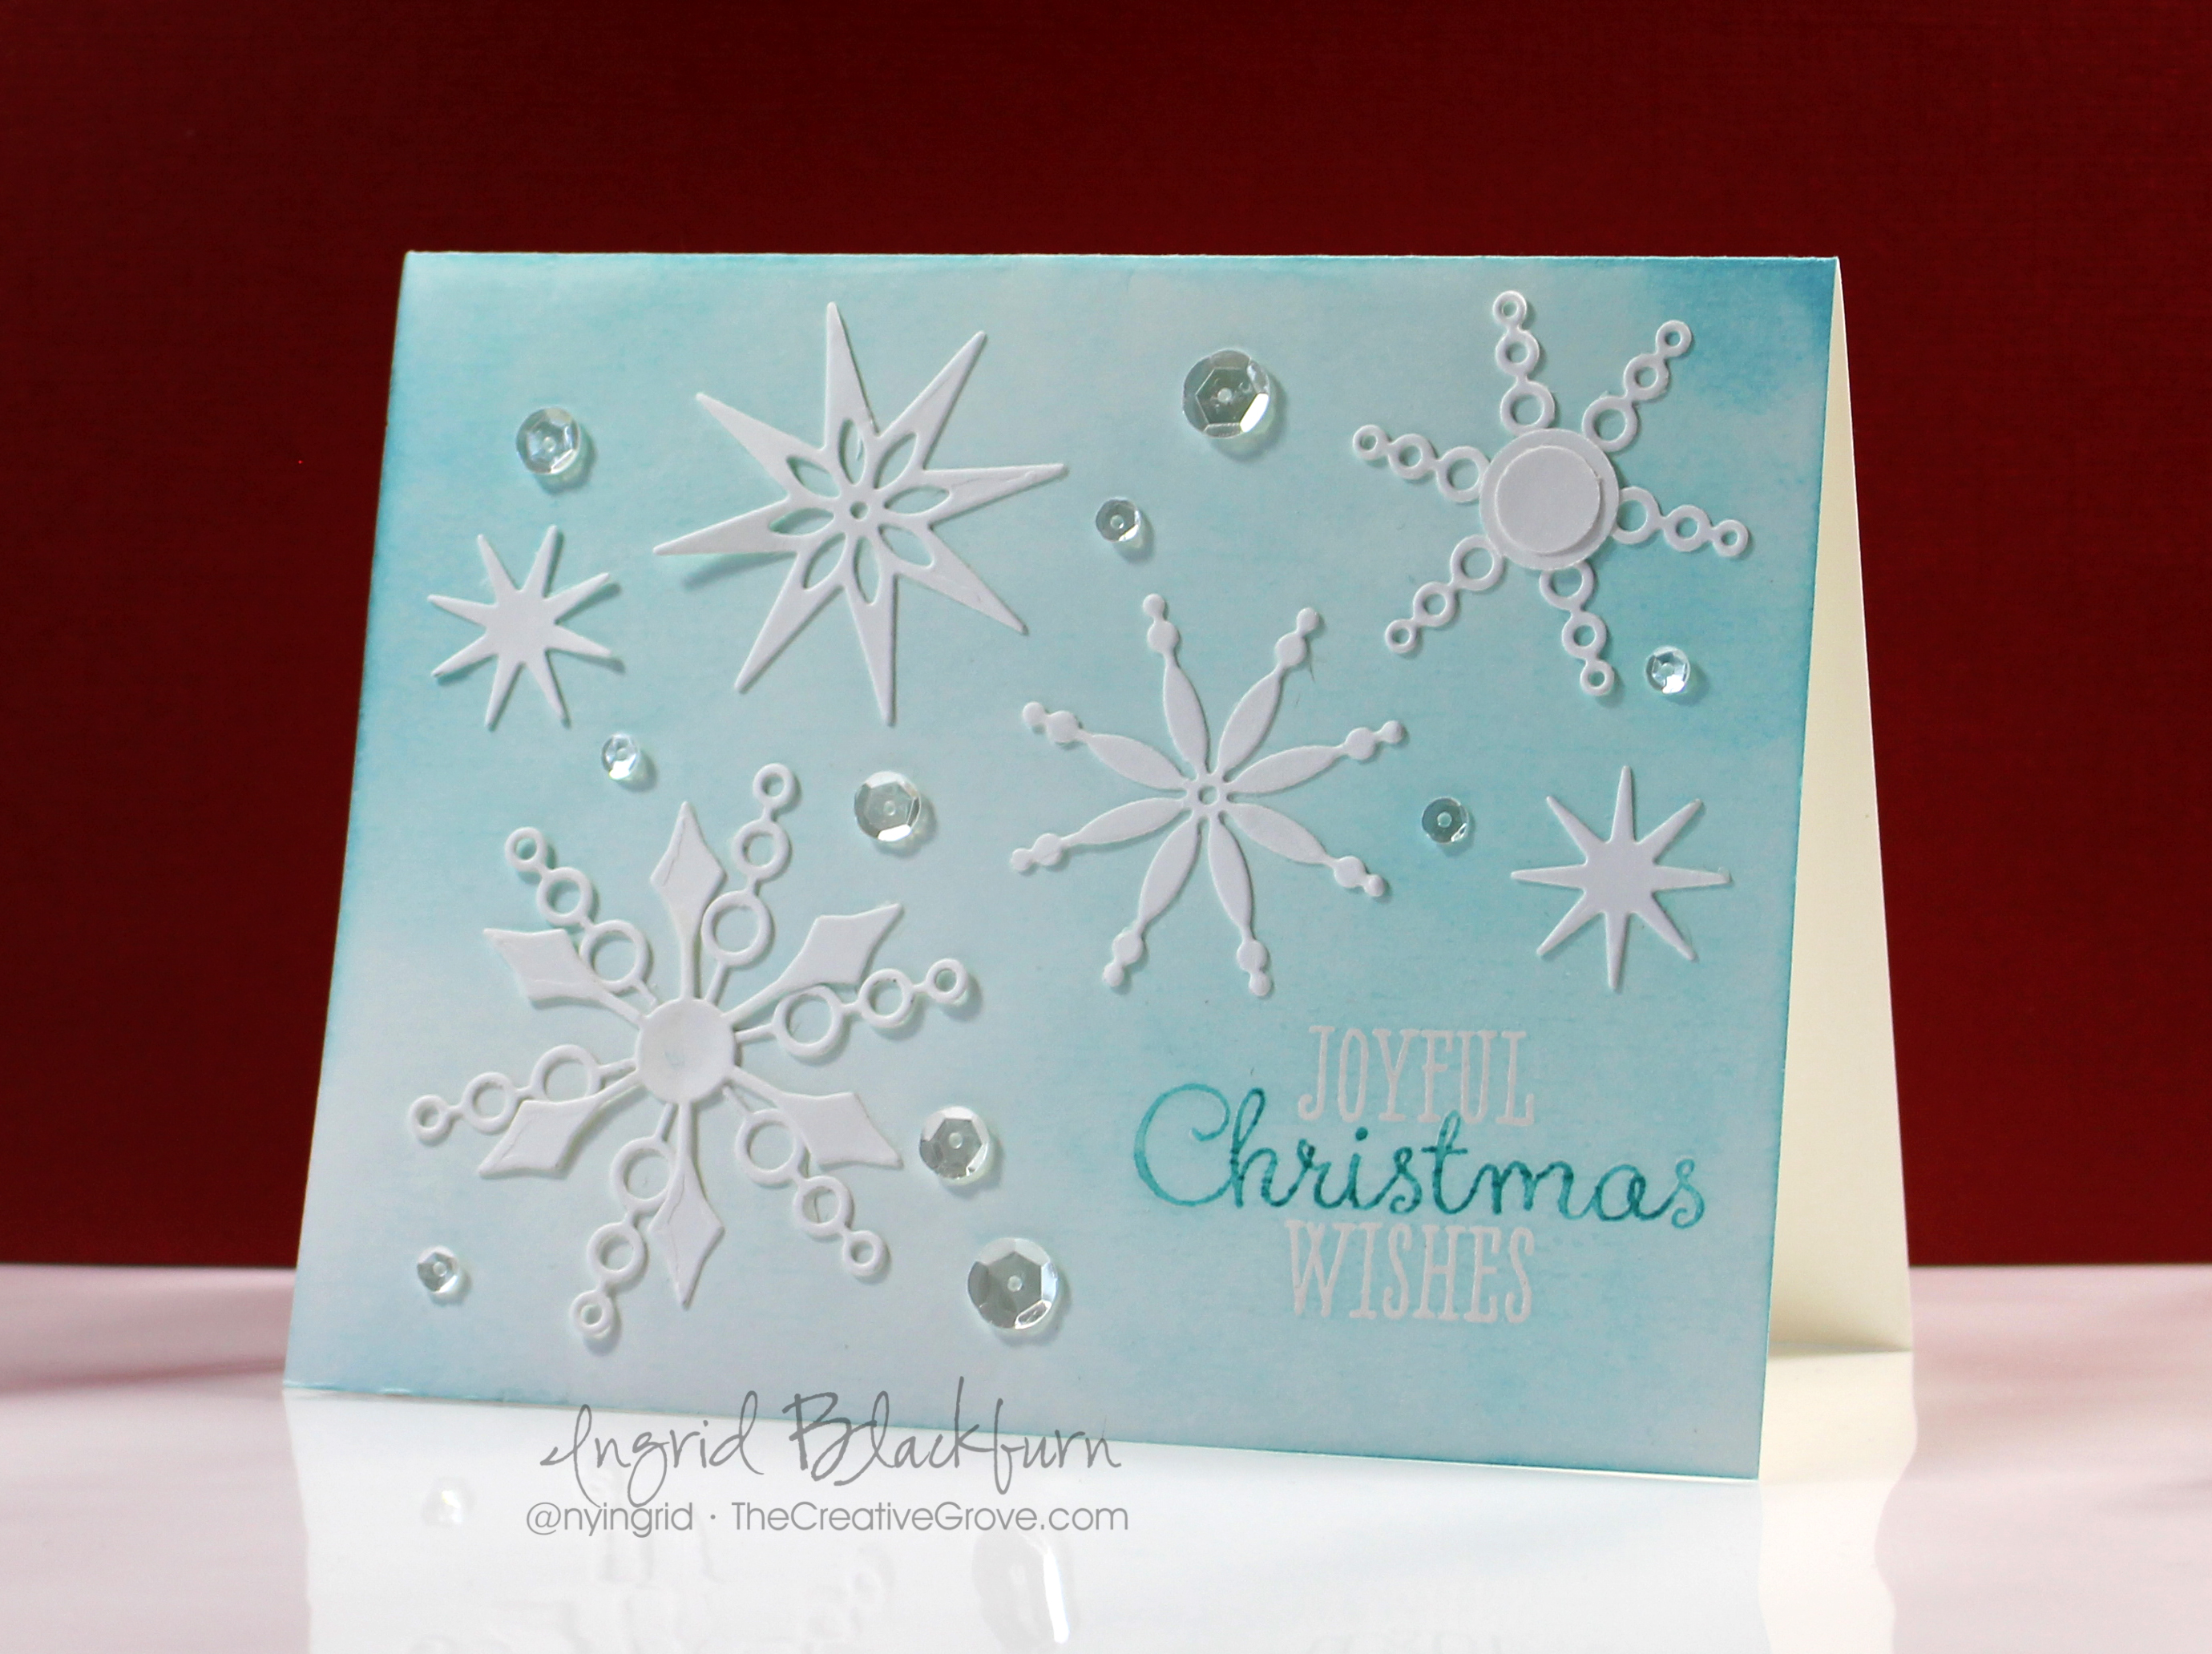
For the background, stamp snowflakes from Bring on the Snowflakes by CAS-ual Fridays in Illuminate ink for a subtle pearl look. Add a few white snowflake dies from the companion die set along with ta few sequins and you have a great look.

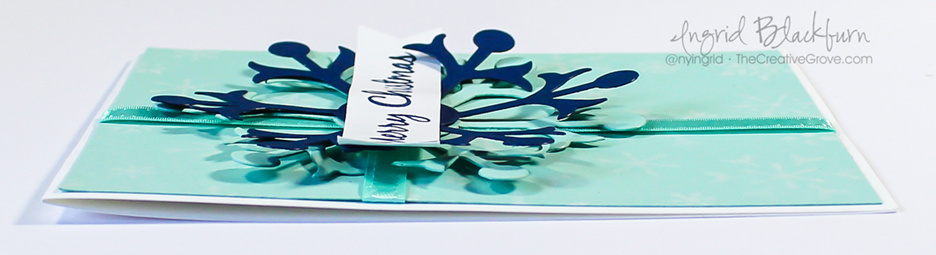
Although I probably didn’t need an additional sentiment, I added one in embossed silver on a banner. The ghosted circle is popped up for a little drama to the card and the sparkling clear sequins by Pretty Pink Posh for the perfect sparkling effect.

Ghosting-Technique-002

Technique #2 – Double Stamp/Stencil

This technique is my favorite way to achieve a ghosted image.  Click here to see another written & video tutorial on how to use white pigment ink to get a great ghosted image with stamps or a stencil. This is also known as the double stamping technique.

Technique #3 – Water Stamping/Stenciling

The third way to create a great ghosted image is to stamp or lift with water. This can be applied to stamps or stencils. I have another written and video tutorial for this concept in the simplest of manners – the flicked distress technique.  Click here to view the video and written tutorial for this technique.

Ghosting-Technique-005

So that’s three tutorials on how to use this very technique – have fun with it! If you’re a Just Cards online student – you have even more tutorials on various ways to create this technique in your classroom too!

Thanks for joining me today, I don’t share many personal photos, but couldn’t resist with these – here are a few pictures of our sweet little grand daughter Lylah, and the family!

IMG_4647-edit-2

IMG_4554-edit-2

IMG_4789-edit-2

Lylah, Allyson and a rare photo of me – I’m always BEHIND the camera!

Isn’t she cute?!! We miss them already! I hope you have a great start to June…and I can’t wait to see what you create this month in the CAS Ghosting challenge over at Happy Little Stampers – I challenge you to try out the ghosting technique – have fun!

🙂

Ingrid

[optin_box style=”12″ alignment=”center” email_field=”email” email_default=”Enter your email address” integration_type=”aweber” double_optin=”Y” list=”3846012″ name_field=”name” name_default=”Enter your first name” name_required=”Y” opm_packages=””][optin_box_field name=”headline”]Learn more with our exclusive FREE video series:[/optin_box_field][optin_box_field name=”paragraph”]PHA+UGx1cyB5b3XigJlsbCBiZSBhZGRlZCB0byBteSBGUkVFIENyZWF0aXZlIFRpcHMgRS1sZXR0ZXIgd2hlcmUgSSBzaGFyZSBleGNsdXNpdmUgcHJvamVjdHMsIHZpZGVvcyAmYW1wOyB0aGUgMTIgRGF5cyBvZiBDaHJpc3RtYXMgUHJvamVjdCBTZXJpZXM8L3A+Cg==[/optin_box_field][optin_box_field name=”privacy”][/optin_box_field][optin_box_field name=”top_color”]undefined[/optin_box_field][optin_box_button type=”0″ button_below=”Y”]Get Instant Access![/optin_box_button] [/optin_box]

Creative Cards – Snowflake Gift

Snowflake-Gift-001

This month’s Christmas Challenge card is a creative card for you – a snowflake gift. The theme at the Happy Little Stampers Christmas challenge this month is Gift, so why not just wrap it all up in a snowflake bow?

HLS Christmas Challenge May 2016

To create this card, I wanted a simple and straightforward background – white pigment ink stenciled with the Snowflakes stencil by Memory Box onto some Pool Party card stock by Stampin Up. I had some matching pool party satin ribbon for my wrapping, a couple Snowflake die cuts in Pool Party and Night of Navy card stock as my bow.

Snowflake-Gift-008

Just stamp the greeting from the Mixed Christmas Sentiments by Happy Little Stampers, cut some banner edges and pop up the middle for a little movement and Voila – all done!

Snowflake-Gift-0056Snowflake Gift Card

Quick, simple, interesting and this can be done over and over in any color theme and with any dies – think Graduation with hats and a diploma, Happy Birthday with anything – polka dots, little cakes, streamers – you name it. Baby, flowers, butterflies, I can go on and on and on. Quick, easily mass produced and so cute! Tell me YOUR idea in the comments below – I’d love to compile a list of awesome ideas.

Snowflake Stencil Gift

Thanks for stopping by today for this quick tutorial, be sure to swing by the Design Team’s cool creations as well. Now go create your own “Gift” for the challenge – I can’t wait to see what you do!

Signature

[optin_box style=”12″ alignment=”center” email_field=”email” email_default=”Enter your email address” email_order=”2″ integration_type=”aweber” double_optin=”Y” list=”3846012″ name_field=”name” name_default=”Enter your first name” name_order=”1″ name_required=”Y” opm_packages=””][optin_box_field name=”headline”]Learn more with our exclusive FREE video series:[/optin_box_field][optin_box_field name=”paragraph”]PHA+UGx1cyB5b3XigJlsbCBiZSBhZGRlZCB0byBteSBGUkVFIENyZWF0aXZlIFRpcHMgRS1sZXR0ZXIgd2hlcmUgSSBzaGFyZSBleGNsdXNpdmUgcHJvamVjdHMsIHZpZGVvcyAmYW1wOyB0aGUgMTIgRGF5cyBvZiBDaHJpc3RtYXMgUHJvamVjdCBTZXJpZXM8L3A+Cg==[/optin_box_field][optin_box_field name=”privacy”][/optin_box_field][optin_box_field name=”top_color”]undefined[/optin_box_field][optin_box_button type=”0″ button_below=”Y”]Get Instant Access![/optin_box_button] [/optin_box]

Showcasing the Negative

Negative die cuts

When you think Die Cuts, usually you would think about something laying on top of your project, or a paper piecing. But do you ever think in reverse? Today is all about showcasing what’s left over, once you use your die cuts to cut out your images – the negative die cut images. Over at Happy Little Stampers this month, the theme is Die Cuts. Now, normally I’d whip up something way cool piecing together some cool images that pop off your card. I thought it would be fun instead to pop UP my card and show a shadowed negative of the image. Best part – I still have the positive images cut out by my steel dies! That’s for another project….oh wait – I already created it HERE.

Happy Little Stampers Die Cut Challenge

Before I get into the nitty gritty of how easy it is to create this very cool card – be sure to welcome our Guest Designer for this month – Christine.

For this month’s project, I paired up with a rocking HLS sentiment from Everyday Sentiments and a few sparkling clear sequins – I have a great card that’s not only quick – serves double duty – not bad! Here’s how you can create your own:

using negative die cuts

How to Use Negative Die Cuts

  • Emboss your greeting in black first in the lower right corner of your card front – 3 13/16 x 5 1/16″. I wanted something big and bold to balance our my snowflake sky, so I chose Everyday Sentiments by HLS.
  • Arrange your snowflake dies – I used Bring on the Snowflakes by CAS-ual Fridays – , and cut out with your Die Cutting Machine. I got mine in the Holiday Collection from Stamp of Approval, but they’ll be released individually later this year.
  • Remove the dies cuts, leaving only the negative images in your card front

backgrounds for negative die cuts

  • On a second slightly smaller piece – 3 11/16 x 4 15/16″ , sponge your desired colors or use a fun colored piece of card stock. You can do anything here, washi tape, watercolors, solids, patterned papers – it’s literally endless possibilities. I sponged an Ombre look starting with Broken China-Salty Ocean-Faded Jeans-Seedless Preserves and ending in Dusty Concord.
  • Adhere your colored background piece to a black piece of card stock cut slightly larger than your card front – mine is 1/16th larger  – 4 x 5 1/4″

easy christmas cards

  • Now for the fun part – pop up your card front using fun foam, foam tape and dimensionals – I used all three with two sizes of smaller dots. Every nook and cranny was popped up – so nothing droops after shipping. You really want your card to have that full shadow effect.
  • Attach your black card stock to a folded A2 sized card (4 1/4 x 5 1/2″)
  • Add some sparkling clear sequins  by pretty pink posh – and you’re all set!

happy little stampers christmas challenge

And if you used colored card stock or sparkly paper, think of how easy and mass producible this card is!! Now it’s your turn – whip out those die cuts and get in on the action. It’s Happy Little Stampers birthday, so don’t miss out on some great prizes! Can’t wait to see what you create!

Now go get those fingers inky –

Signature

[optin_box style=”2″ alignment=”center” email_field=”email” email_default=”Enter your email address” email_order=”2″ integration_type=”aweber” double_optin=”Y” list=”3846012″ name_field=”name” name_default=”Enter your first name” name_order=”1″ name_required=”Y” opm_packages=””][optin_box_field name=”headline”]Learn more with our exclusive FREE video series:[/optin_box_field][optin_box_field name=”paragraph”]PHA+UGx1cyB5b3UnbGwgYmUgYWRkZWQgdG8gbXkgRlJFRSBDcmVhdGl2ZSBUaXBzIEUtbGV0dGVyIHdoZXJlIEkgc2hhcmUgZXhjbHVzaXZlIHByb2plY3RzLCB2aWRlb3MgJmFtcDsgdGhlIDEyIERheXMgb2YgQ2hyaXN0bWFzPC9wPgo=[/optin_box_field][optin_box_field name=”privacy”][/optin_box_field][optin_box_field name=”top_color”]undefined[/optin_box_field][optin_box_button type=”0″ button_below=”Y”]Get access now![/optin_box_button] [/optin_box]


Winter Berries

WInter-Berries-001

It’s been a while since I’ve had a chance to play along with the girls over at Merry Monday. This week Bonnie challenged us to use Berries on a Christmas Card. I was in a watercolor stamping mood, so I pieced this quick little card together.

192

First I did a light wash using Broken China and Tumbled Glass Distress inks in the background, keeping the darker colors toward the top. Next I inked up my Berry Bevy stamp by Penny Black in Ground Espresso and Barn Door Distress Markers, gave it a good light spritz and stamped onto my watercolor background. I added a sponged and embossed greeting using the Handlettered Holiday dies by WPlus9.

WInter-Berries-002

It’s a quick and simple card, okay there are a few steps in there, but I love the CAS style. To finish the card I added a little paper piercing up top after matting my watercolored berries on espresso card stock.

Berries on branches are some of my favorite things, I’m always fascinated by them. Here’s another Christmas card done for this year…I’m running a bit behind…have to play along a little more with Merry Monday’s – hope to see you there too!

WInter-Berries-003

Thanks for stopping by today –

Signature

[optin_box style=”2″ alignment=”center” email_field=”email” email_default=”Enter your email address” email_order=”2″ integration_type=”aweber” double_optin=”Y” list=”3846012″ name_field=”name” name_default=”Enter your first name” name_order=”1″ name_required=”Y” opm_packages=””][optin_box_field name=”headline”]Learn with our exclusive FREE video series[/optin_box_field][optin_box_field name=”paragraph”]PHA+R2V0IHRoZSBmcmVlIENyZWF0aXZlIFRpcHMgRS1sZXR0ZXIgYW5kIGxlYXJuIHdpdGggc3Vic2NyaWJlciBleGNsdXNpdmUgdmlkZW8gYW5kIHBpY3RvcmlhbCBjb250ZW50LiBJbmNsdWRpbmcgb3VyIHllYXJseSAxMiBEYXlzIG9mIENocmlzdG1hcyBzZXJpZXMhPC9wPgo=[/optin_box_field][optin_box_field name=”privacy”][/optin_box_field][optin_box_field name=”top_color”]undefined[/optin_box_field][optin_box_button type=”0″ button_below=”Y”]Send me exclusive videos![/optin_box_button] [/optin_box]

White Christmas Cards

White-Christmas-Cards-001

Don’t you just love white on white cards? They make the perfect Christmas cards. This month at the Happy Little Stampers Christmas Challenge, we have a Tic Tac Toe challenge. I chose the classic diagonal path of White, Gold and Sentiment – a classic.

HLS Christmas Challenge February 2016tictactoe badge

This month we have an awesome guest designer for the Christmas Challenge – Ksenija Rizova, you may know her in the blog-o-sphere as Sweet Kobylkin. Be sure to Click Here to check out her blog and creation.

White Christmas Tutorial

  • Create your textured background on the top 2/3 of a folded A2 white card. I used the Large Winter Snowflakes by Memory Box and Dreamweaver white embossing paste.

White-Christmas-Cards-005

  • Sprinkle glitter onto your wet embossing paste snowflakes, and set aside to dry completely.
  • Emboss the Impression Obsession Tree Group in White, then Iridescent Ice.
  • Fussy Cut out and add glitter to the hill line.

White-Christmas-Cards-003

  • Add a second piece of card  stock with a slight downward slope in the opposite direction to overlap over your stamped trees. Add glitter with two way glue to the hill edge.
  • Once your embossing paste is dry. Add trees and front hill to your card, getting the spacing just right. Trim the bottom to fit the front and add a greeting embossed in Gold. I chose one from Everyday Sentiments by Happy Little Stampers.

White-Christmas-Cards-004

  • Add sparkling clear sequins by Pretty Pink Posh.

Now it’s your turn! Which bingo path are you going to take? I can’t wait to see what you enter into this month’s Christmas Challenge.

Keep those fingers inky –

Signature

[optin_box style=”2″ alignment=”center” email_field=”email” email_default=”Enter your email address” email_order=”2″ integration_type=”aweber” double_optin=”Y” list=”3846012″ name_field=”name” name_default=”Enter your first name” name_order=”1″ name_required=”Y”][optin_box_field name=”headline”]Learn with our exclusive FREE video series[/optin_box_field][optin_box_field name=”paragraph”]PHA+R2V0IHRoZSBmcmVlIENyZWF0aXZlIFRpcHMgRS1sZXR0ZXIgYW5kIGxlYXJuIHdpdGggc3Vic2NyaWJlciBleGNsdXNpdmUgdmlkZW8gYW5kIHBpY3RvcmlhbCBjb250ZW50LsKgPGVtPjxzdHJvbmc+SW5jbHVkaW5nwqA8L3N0cm9uZz48L2VtPm91ciB5ZWFybHkgMTIgRGF5cyBvZiBDaHJpc3RtYXMgc2VyaWVzITwvcD4K[/optin_box_field][optin_box_field name=”privacy”][/optin_box_field][optin_box_field name=”top_color”]undefined[/optin_box_field][optin_box_button type=”0″ button_below=”Y”]Send me exclusive tips now![/optin_box_button] [/optin_box]


Vintage Christmas Star

Vintage Christmas Star 001

Today’s challenge keyword is star – so let’s learn how to incorporate that into this vintage holiday card. This month’s challenge at Happy Little Stampers is to use a star in some form on your card. I have to admit, I started off in a very different direction…then ultimately decided to create a simple card with a vintage masculine feel that could showcase the ultimate Christmas star.

HLS Christmas Challenge December 2015

I guess I’ve been in a vintage kind of a mood these past few months. At least here on the blog! I don’t know what it is that seems soothing about this color palette to me, but I’m really loving the feel. Maybe it’s because I’ve been injured and not able to walk as much as I would like in the woods…who knows?!! Here’s a quick tutorial for you, and be sure to stop by again next week for the video!

Creating a Quick Vintage Feel to your Holiday Cards –

  • This project was done on kraft colored paper – not white. It helps with the overall look and feel.
  • I find that the brown tone fits this style better than black. So ink your stamps up in a dark brown – something earthy. I used Ground Espresso by Ranger Distress.
  • Stamp the Stampscapes Pines & Rocks Lg on the left and the left side of Lakeside Reflections Lg to the right Tip – use a torn piece of paper towel to mask off the edge and create a seamless scene.

Vintage Christmas Star 002

  • Place two post it notes in copy paper and punch out your moon with a 1 1/4″ circle punch. This will be your mask.
  • Place your moon where you’d like it before adding blues to the sky
  • Use a mini sponge tool and some blue hues to shade in your water and sky.
  • Stamp Cloud Strips Lg by Stampscapes in Stormy Sky Distress. Be sure to overlap the moon slightly.
  • Once you have the look you’d like – add a little shading with s neutral like Weathered Wood Distress to the rocks.
  • Sponge the entire scene around the perimeter with  a brown – I used Gathered twigs for a slightly different feel than the trees.
  • Add your star and emboss in Pewter. I used the Nativity Angel Stencil by Stamplorations.

Vintage Christmas Star 004

  • The perfect sentiment makes this card and nails the vintage feel. Here you see one of the many sentiments from Mixed Christmas Sentiments by Happy Little Stampers. Emboss it in Pewter for a great look, rather than something bright.
  • The scene is matted onto Vanilla card stock for contrast before being popped up on fun foam onto an Espresso card base.

I do hope you like this card – it’s actually a great one to mass produce and goes much faster than you think! I hope this inspired you to create something special with a star for your cards. Be sure to enter them into the Christmas Challenge at Happy Little Stampers!

Keep those fingers inky –


Signature.jpg

[optin_box style=”2″ width=”500″ alignment=”center” email_field=”email” email_default=”Enter your email address” integration_type=”aweber” double_optin=”Y” list=”3846012″ name_field=”name” name_default=”Enter your first name” name_required=”N”][optin_box_field name=”headline”]Learn with our exclusive FREE Video Series[/optin_box_field][optin_box_field name=”paragraph”]PHA+R2V0IHRoZSBmcmVlIENyZWF0aXZlIFRpcHMgRS1sZXR0ZXIgYW5kIGxlYXJuIHdpdGggc3Vic2NyaWJlciBleGNsdXNpdmUgdmlkZW8gYW5kIHBpY3RvcmlhbCBjb250ZW50LiA8ZW0+PHN0cm9uZz48c3BhbiBzdHlsZT0iY29sb3I6ICM4MDAwMDA7Ij5JbmNsdWRpbmc8L3NwYW4+wqA8L3N0cm9uZz48L2VtPm91ciB5ZWFybHkgMTIgRGF5cyBvZiBDaHJpc3RtYXMgc2VyaWVzITwvcD4K[/optin_box_field][optin_box_field name=”privacy”][/optin_box_field][optin_box_field name=”top_color”]undefined[/optin_box_field][optin_box_button type=”1″ text=”Subscribe now!” text_size=”26″ text_color=”#ffffff” text_bold=”Y” text_letter_spacing=”0″ text_shadow_panel=”Y” text_shadow_vertical=”1″ text_shadow_horizontal=”0″ text_shadow_color=”#000000″ text_shadow_blur=”0″ styling_width=”36″ styling_height=”15″ styling_border_color=”#000000″ styling_border_size=”1″ styling_border_radius=”6″ styling_border_opacity=”100″ styling_shine=”Y” styling_gradient_start_color=”#345523″ styling_gradient_end_color=”#68ab46″ drop_shadow_panel=”Y” drop_shadow_vertical=”1″ drop_shadow_horizontal=”0″ drop_shadow_blur=”1″ drop_shadow_spread=”0″ drop_shadow_color=”#ffffff” drop_shadow_opacity=”50″ inset_shadow_panel=”Y” inset_shadow_vertical=”0″ inset_shadow_horizontal=”0″ inset_shadow_blur=”0″ inset_shadow_spread=”1″ inset_shadow_color=”#000000″ inset_shadow_opacity=”50″ location=”optin_box_style_2″ button_below=”Y”]Subscribe now![/optin_box_button] [/optin_box]

Simple Snowflakes

It’s lightly snowing today – I’ve never had a white Thanksgiving! Although nothing is really sticking, and we lost all the snow from the other day…I’m enjoying the fire, and getting ready to make our Thanksgiving dinner. Michael asked me what time the “Wurst” was going in the oven…. I guess that’s his German/Thanksgiving day humor…lol! We’re making a stuffed Pork Loin, as I can never find a large turkey to save my life here. I do miss that!

Snowflake Wishes 001

It’s been a busy past few weeks here – getting ready for the holidays and more Christmas card making, videoing and editing than I’ve ever done! We’re in full swing for our 12 Days of Christmas series and Class! The projects have been varied and so much fun to make and share.

So, In the spirit of snowy days and the upcoming holidays…I have a quick little card for you. Although it’s Thanksgiving – here’s a Christmas one. I’ve been having fun playing with Catherine Pooler’s Stamp of Approval Holiday Box (already sold out – but you can get on her list for the next version in January)! These particular snowflakes will be released in 2016 by CAS-ual Friday and I just LOVE stamping and cutting them out – the designs are awesome and very different from what I’ve seen before.

Snowflake Wishes 002

Here’s the how to for this card:

  • Stamp and emboss your greeting. I used a retired one from the Joyful Christmas Set by Stampin Up. First I inked up stamp in Versamark and then went over the word Christmas with an Island Indigo Marker by Stampin Up. I embossed it in Clear Embossing Powder.
  • Sponge your card base with Rumbled Glass. Leave spots more white for a flurry effect.
  • Cut out several snowflakes using the matching dies to the Bring on the Snowflakes stamps in White.

Snowflake Wishes 003

  • Adhere snowflakes to card. I doubled up the largest one and added two sizes of circles over the top right one.
  • Add Sparkling Clear sequins by Pretty Pink Posh.

That’s it! Super fast and easy. The best part – it’s a very cost effective card! You could easily mass produce this one for the holidays sitting in front of a movie.

Hope you enjoyed that! If you’d like more ideas – check out our 12 Days of Christmas class. We’re LIVE and on day 5 – 24 project ideas, 12 videos and PDFs. Find out more here

Snowflake Wishes 005

Have a Happy Thanksgiving with your friends and family! I wish you a memorable day filled with love and laughter!!

Keep those fingers inky –


Signature-24-pt.jpg

[optin_box style=”2″ width=”500″ alignment=”center” email_field=”email” email_default=”Enter your email address” integration_type=”aweber” double_optin=”Y” list=”3846012″ name_field=”name” name_default=”Enter your first name” name_required=”N”][optin_box_field name=”headline”]Learn with our exclusive FREE Video Series[/optin_box_field][optin_box_field name=”paragraph”]PHA+R2V0IHRoZSBmcmVlIENyZWF0aXZlIFRpcHMgRS1sZXR0ZXIgYW5kIGxlYXJuIHdpdGggc3Vic2NyaWJlciBleGNsdXNpdmUgdmlkZW8gYW5kIHBpY3RvcmlhbCBjb250ZW50LiA8ZW0+PHN0cm9uZz48c3BhbiBzdHlsZT0iY29sb3I6ICM4MDAwMDA7Ij5JbmNsdWRpbmc8L3NwYW4+wqA8L3N0cm9uZz48L2VtPm91ciB5ZWFybHkgMTIgRGF5cyBvZiBDaHJpc3RtYXMgc2VyaWVzITwvcD4K[/optin_box_field][optin_box_field name=”privacy”][/optin_box_field][optin_box_field name=”top_color”]undefined[/optin_box_field][optin_box_button type=”1″ text=”Subscribe now!” text_size=”26″ text_color=”#ffffff” text_bold=”Y” text_letter_spacing=”0″ text_shadow_panel=”Y” text_shadow_vertical=”1″ text_shadow_horizontal=”0″ text_shadow_color=”#000000″ text_shadow_blur=”0″ styling_width=”36″ styling_height=”15″ styling_border_color=”#000000″ styling_border_size=”1″ styling_border_radius=”6″ styling_border_opacity=”100″ styling_shine=”Y” styling_gradient_start_color=”#345523″ styling_gradient_end_color=”#68ab46″ drop_shadow_panel=”Y” drop_shadow_vertical=”1″ drop_shadow_horizontal=”0″ drop_shadow_blur=”1″ drop_shadow_spread=”0″ drop_shadow_color=”#ffffff” drop_shadow_opacity=”50″ inset_shadow_panel=”Y” inset_shadow_vertical=”0″ inset_shadow_horizontal=”0″ inset_shadow_blur=”0″ inset_shadow_spread=”1″ inset_shadow_color=”#000000″ inset_shadow_opacity=”50″ location=”optin_box_style_2″ button_below=”Y”]Subscribe now![/optin_box_button] [/optin_box]

Blended Distress Christmas Tags

DIY Vintage Christmas Tags

Christmas Tags is how my stamping journey began…many, many years ago.  I would spend hours stamping cute large Santas and Snowmen by DJ Inkers and coloring them in with pencils and markers. I spent so much time on these tags, I would save them all and reuse them for years to come – I still even have most of them! The kids new the wrapping paper was toast – but not the tags – I know…sad, but true!

So today I have a different version of a tag for you. More of my style today – not as much coloring anymore, I’m more into backgrounds, and clean & simple designs now – well, you may just see some mixed media or watercoloring the next few months from me too! So to kick off this month, I thought I’d film a tutorial on how to create an antique or vintage background for you.

HLS Christmas Challenge November 2015

This month at Happy Little Stampers, the theme is Tags, so for today’s project, I designed a clean and simple tag that has some simple paper piecings, and a great bold font greeting – courtesy of the new Everyday Sentiments stamp set.  Have fun with this tutorial! See you in a few days with another. 🙂

And be sure to check out our guest designer – Bonnie Klass’s blog for her cool project as well. I’ve been a huge fan of Bonnie’s work for a few years now – she’s a very talented stamper. 🙂

Creating a Vintage look for your Christmas Tags

  • Start with a piece of white card stock. I used a scrap piece that was 3 3/4 x 4″. Sponge Distress Inks to create your background as in the video – Old Paper, Antique Linen, Scattered Straw. Be sure to go over the colors to get a smooth antique look
  • Don’t worry about funky marks left initially by the sponge tools – they’ll work themselves out the more layers of distress ink you layer over them.

How to create an Antique Look

  • The key to achieving the antique finish or vintage look is adding a light edging around the antique finish you’ve created. I used Vintage Photo.
  • Cut your tag corners as in the video if you haven’t already.
  • As in the video, the majority of your sponge tool will be off your project, not on. Light is key here.
  • You can even add some of the lighter colors such as Scattered Straw or Antique Linen inside to smooth the Vintage Photo edging out.
  • Assemble your snowflakes and add them to your project. I used the Snowflake BigZ die by Sizzix designed for Stampin Up. Use any Snowflake dies you have. Layer to create a 3D look with different colors and sparkly embellishments.

Distress Ink Blending to create a vintage feel

  • Make sure your vintage background is fully dry – I used a heat tool, as I”m quite impatient. But if you’re making several at a time, you can dry them naturally.
  • Test the tag out as in the video to see if it’s ready to be embossed.
  • Ink up the Merry & Christmas with Versamark, stamp and emboss in Espresso Powder. I used the Everyday Sentiments set by HLS – they are bold and large stamps which works well with this project. You’ll want something that can stand out from the Snowflakes.
  • Attach your snowflakes with a strong adhesive as in the video.
  • Punch a 1/4″ hole and add some ribbon.

Vintage Christmas Tags using Distress Ink Blending

I hope you liked this tutorial! I love the end result of this tag. I’ve made several for various packages this Christmas. It’s quite easy to mass produce actually. Sponge a larger sheet, cut it down, edge and mass assemble. Work smarter – not harder! 🙂

Stay tuned in a few days for another great tag tutorial, and if you want to see more, be sure you’re on the Creative Tips E-letter! Sign up below, it’s free and has exclusive content.

I’m also entering this tag is a fun Christmas Tag event over at my good friend Loll’s blog. I encourage you to enter yours as well!

twelve_tags_badge_2015

Until next time – now go get those fingers inky, make some Christmas Tags and join us for the challenge over at Happy Little Stampers!

Signature-24-pt_thumb.jpg

[optin_box style=”8″ width=”500″ alignment=”center” disable_name=”Y” email_field=”email” email_default=”Enter your email address” email_order=”Enter your email address” integration_type=”aweber” double_optin=”Y” list=”3846012″ name_field=”name” name_default=”Enter your first name” name_order=”1″ name_required=”N” extra_field_1_name=”name” extra_field_1_title=”Enter your first name” extra_field_1_order=”1″ extra_field_1_required=”N”][optin_box_field name=”headline”]If you enjoyed this tutorial…[/optin_box_field][optin_box_field name=”paragraph”]PHA+4oCmeW914oCZbGwgbG92ZSBvdXIgPGVtPjxzdHJvbmc+ZnJlZSA8L3N0cm9uZz48L2VtPnN1YnNjcmliZXIgb25seSB2aWRlbyBzZXJpZXMuIMKgTGVhcm4gbmV3IHRlY2huaXF1ZXMgdGhyb3VnaCBvdXIgPGVtPjxzdHJvbmc+ZXhjbHVzaXZlPC9zdHJvbmc+PC9lbT7CoENyZWF0aXZlIFRpcHMgZS1sZXR0ZXLCoGFuZCBzdWJzY3JpYmVyIG9ubHkgdmlkZW8gYW5kIHByb2plY3QgdHV0b3JpYWxzITwvcD4K[/optin_box_field][optin_box_field name=”privacy”][/optin_box_field][optin_box_field name=”top_color”]undefined[/optin_box_field][optin_box_button type=”1″ text=”Send me exclusive tips!” text_size=”32″ text_color=”#000000″ text_bold=”Y” text_letter_spacing=”0″ text_shadow_panel=”Y” text_shadow_vertical=”1″ text_shadow_horizontal=”0″ text_shadow_color=”#ffffff” text_shadow_blur=”0″ styling_width=”40″ styling_height=”30″ styling_border_color=”#000000″ styling_border_size=”1″ styling_border_radius=”6″ styling_border_opacity=”100″ styling_shine=”Y” styling_gradient_start_color=”#a3b640″ styling_gradient_end_color=”#80902c” drop_shadow_panel=”Y” drop_shadow_vertical=”1″ drop_shadow_horizontal=”0″ drop_shadow_blur=”1″ drop_shadow_spread=”0″ drop_shadow_color=”#000000″ drop_shadow_opacity=”50″ inset_shadow_panel=”Y” inset_shadow_vertical=”0″ inset_shadow_horizontal=”0″ inset_shadow_blur=”0″ inset_shadow_spread=”1″ inset_shadow_color=”#80902c” inset_shadow_opacity=”50″ location=”optin_box_style_8″ button_below=”Y”]Send me exclusive tips![/optin_box_button] [/optin_box]