CAS – Masked Vines

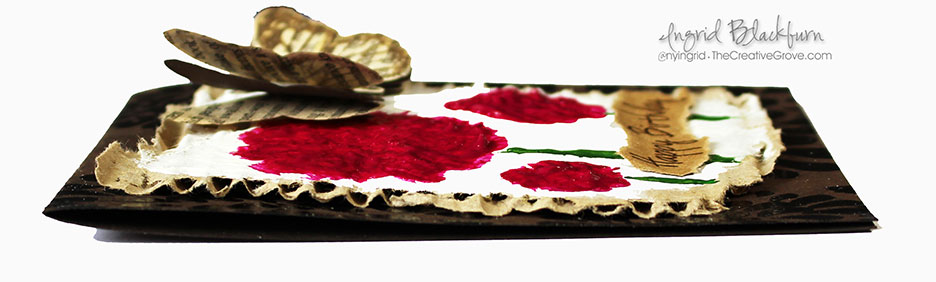
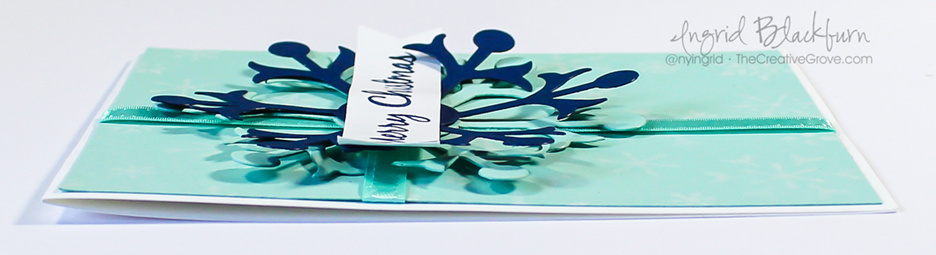
How much do you love the masking technique? I love masking – it’s one of my two go to basic techniques that I use over and over again. There are so many ways to mask and I always love the end result.

cas august badge

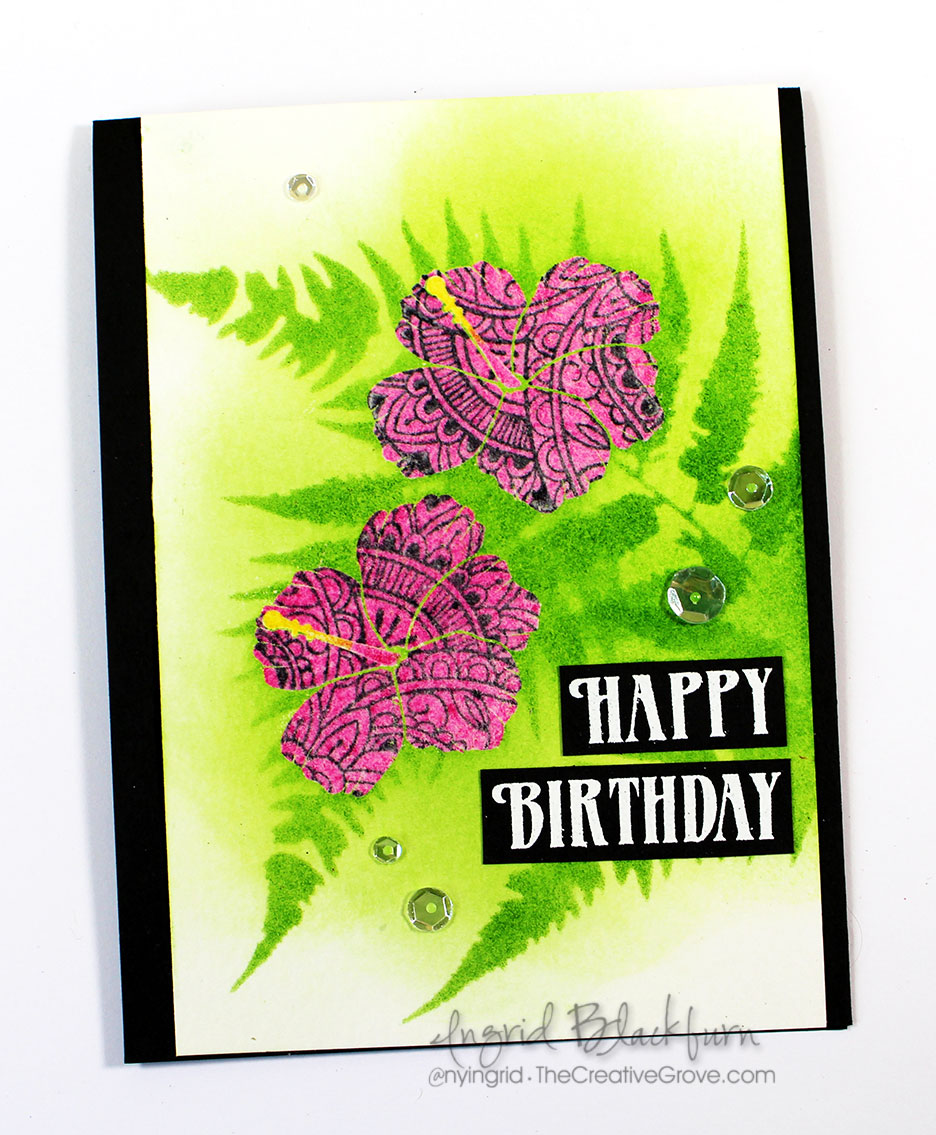
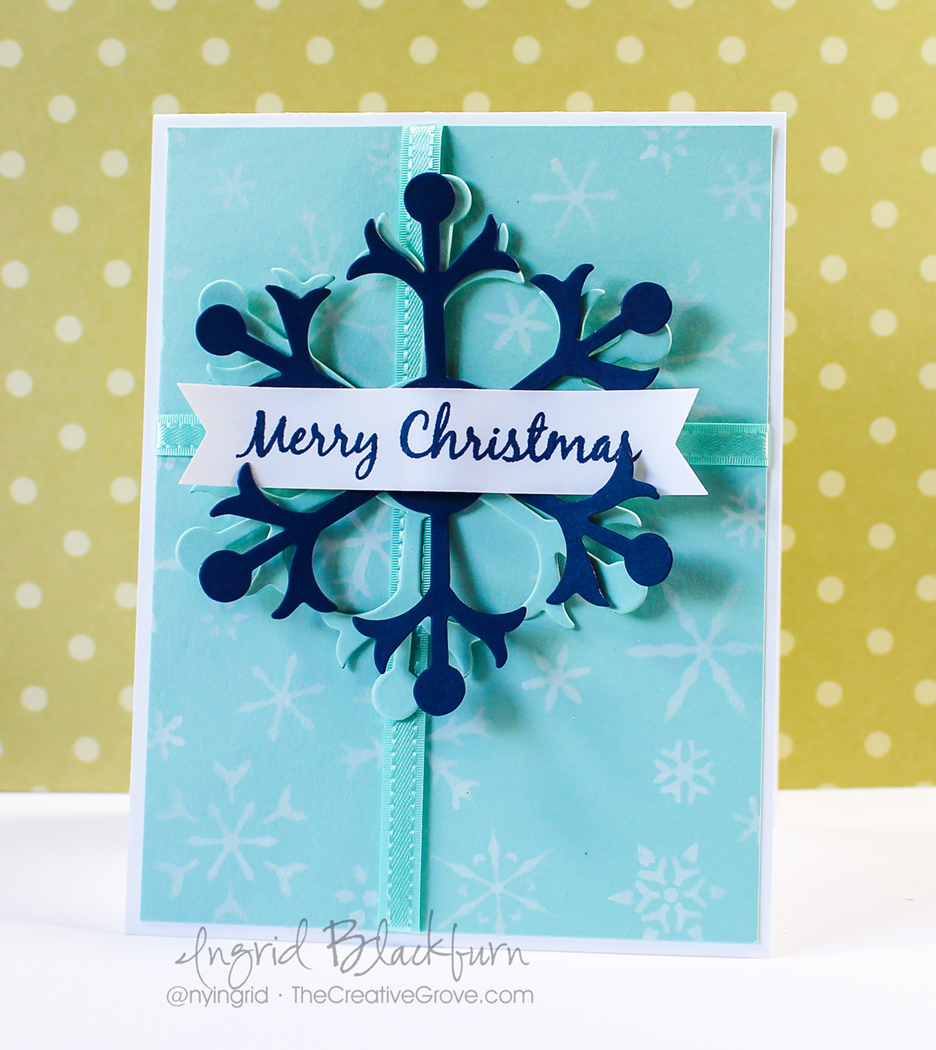
This month over at the Happy Little Stampers CAS challenge, masking is the hot topic. So I created a fun project utilizing some great new stamps from Create a Smile.

CAS-Vines-Masking-Technique-Ingrid-Blackburn-001

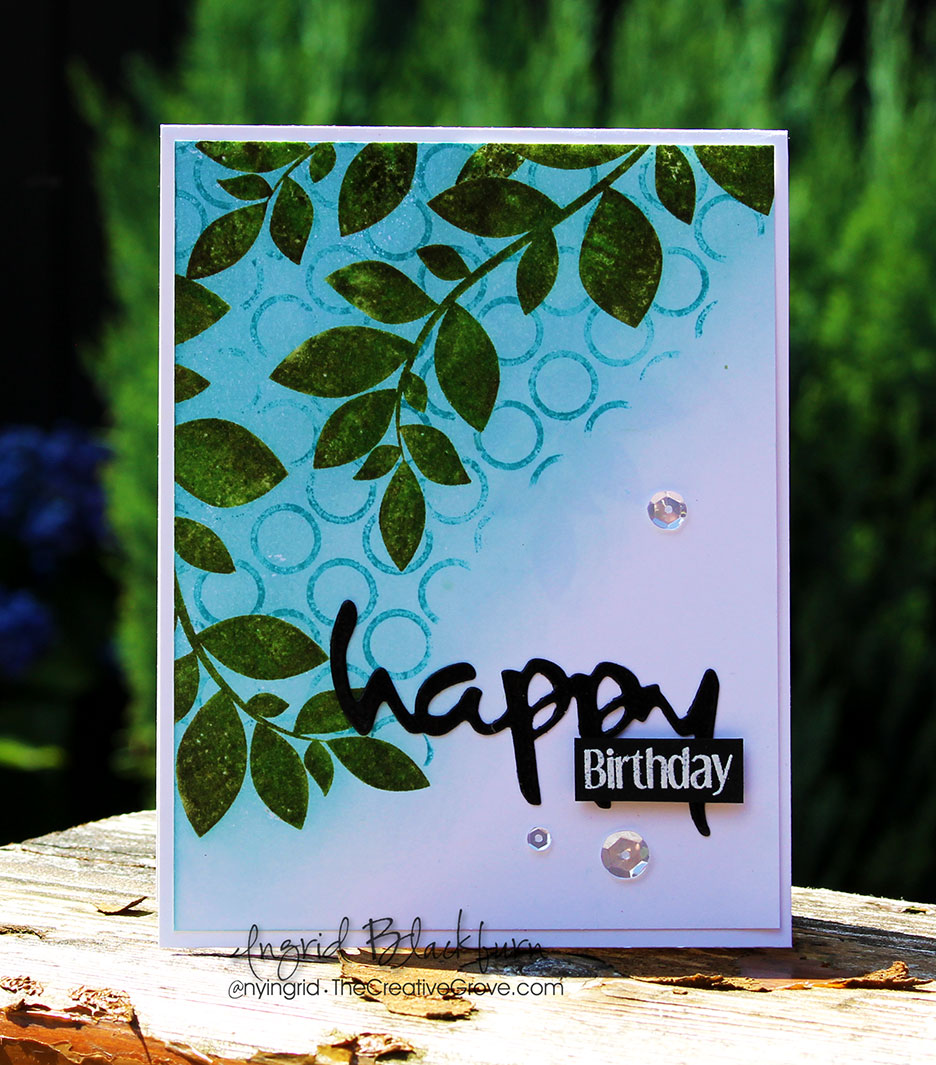
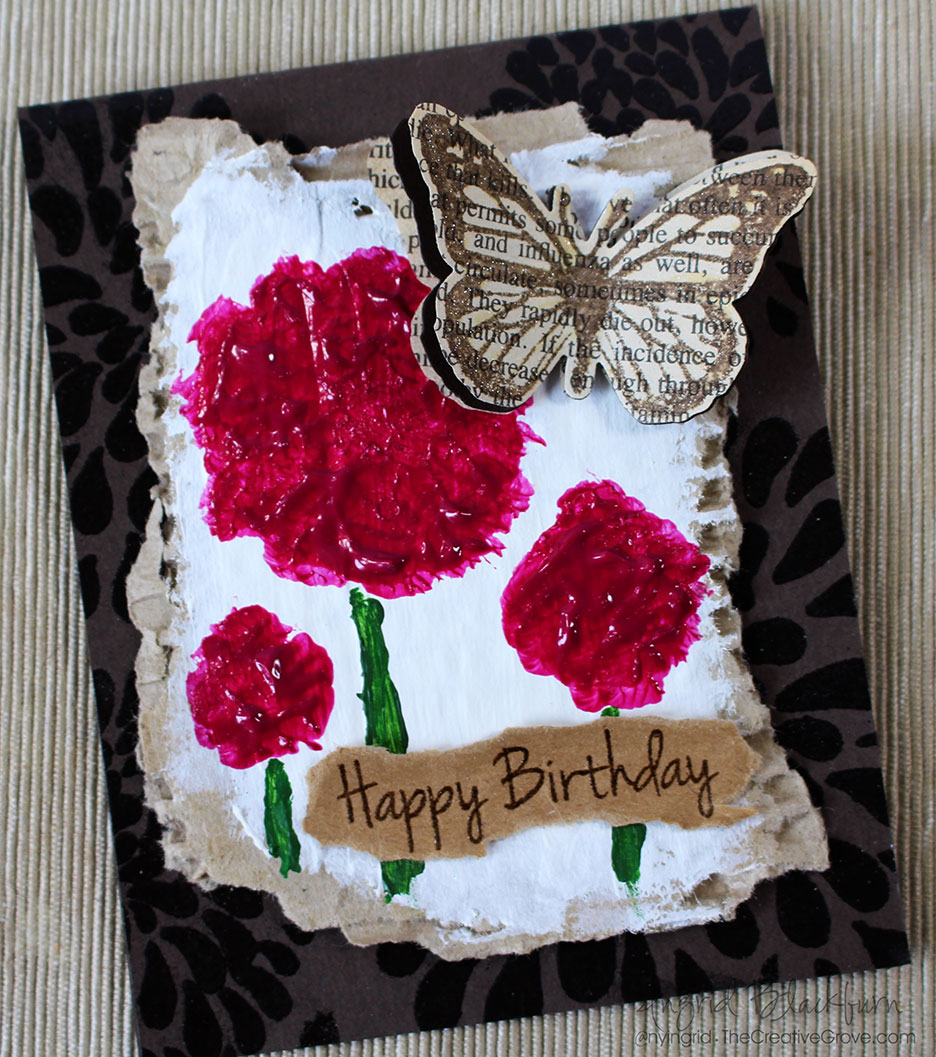
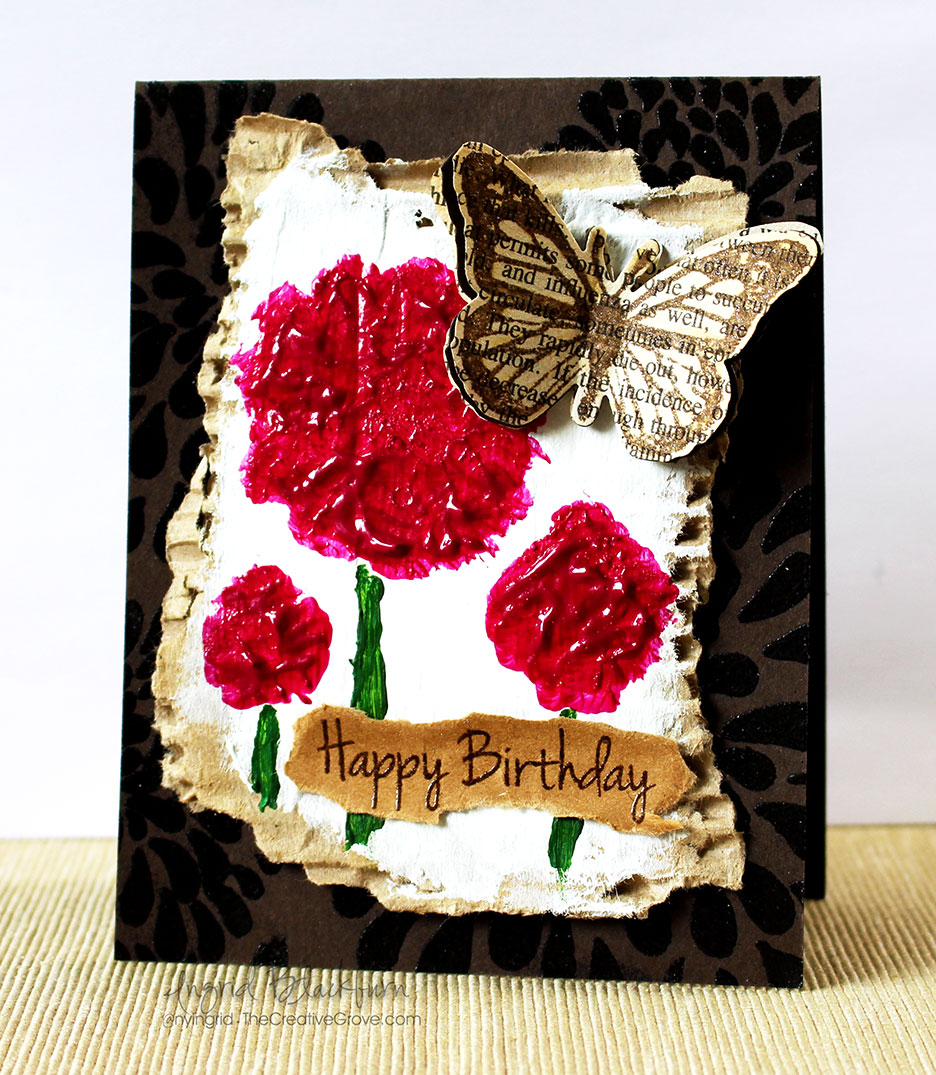
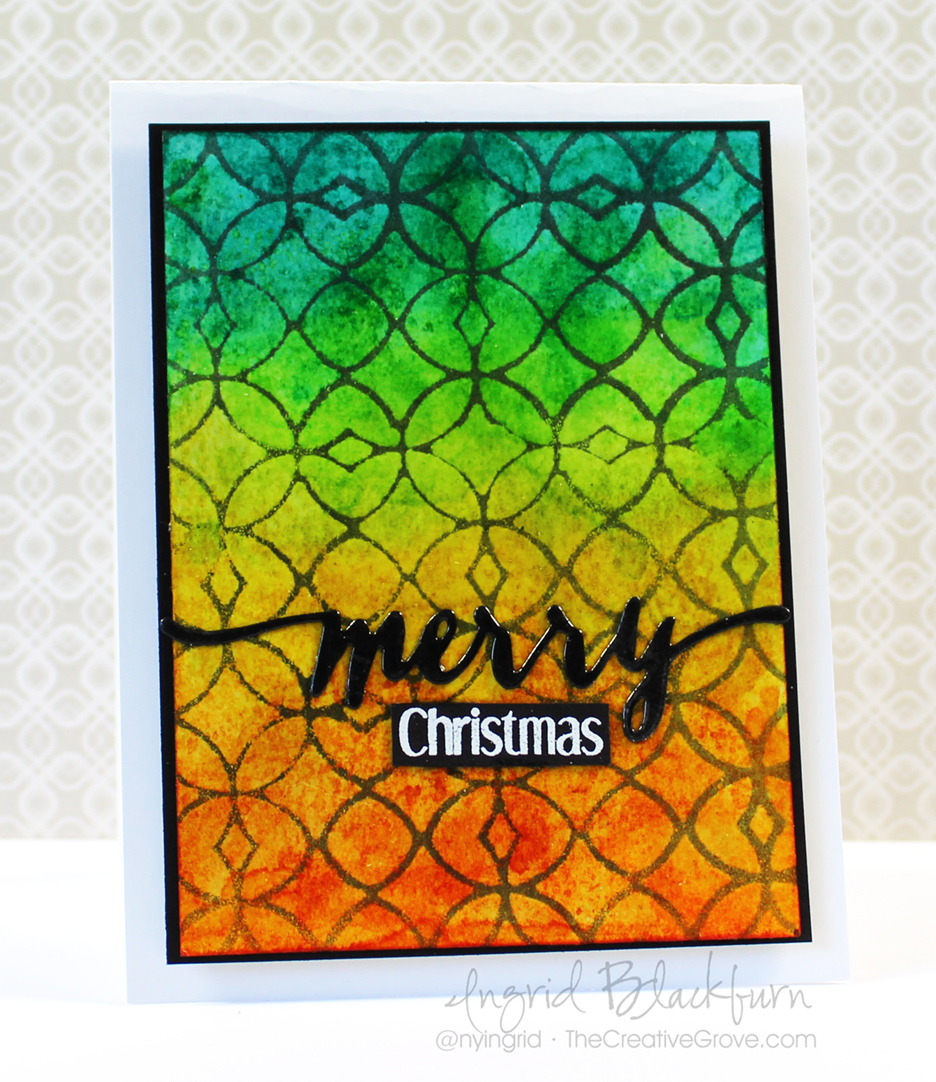
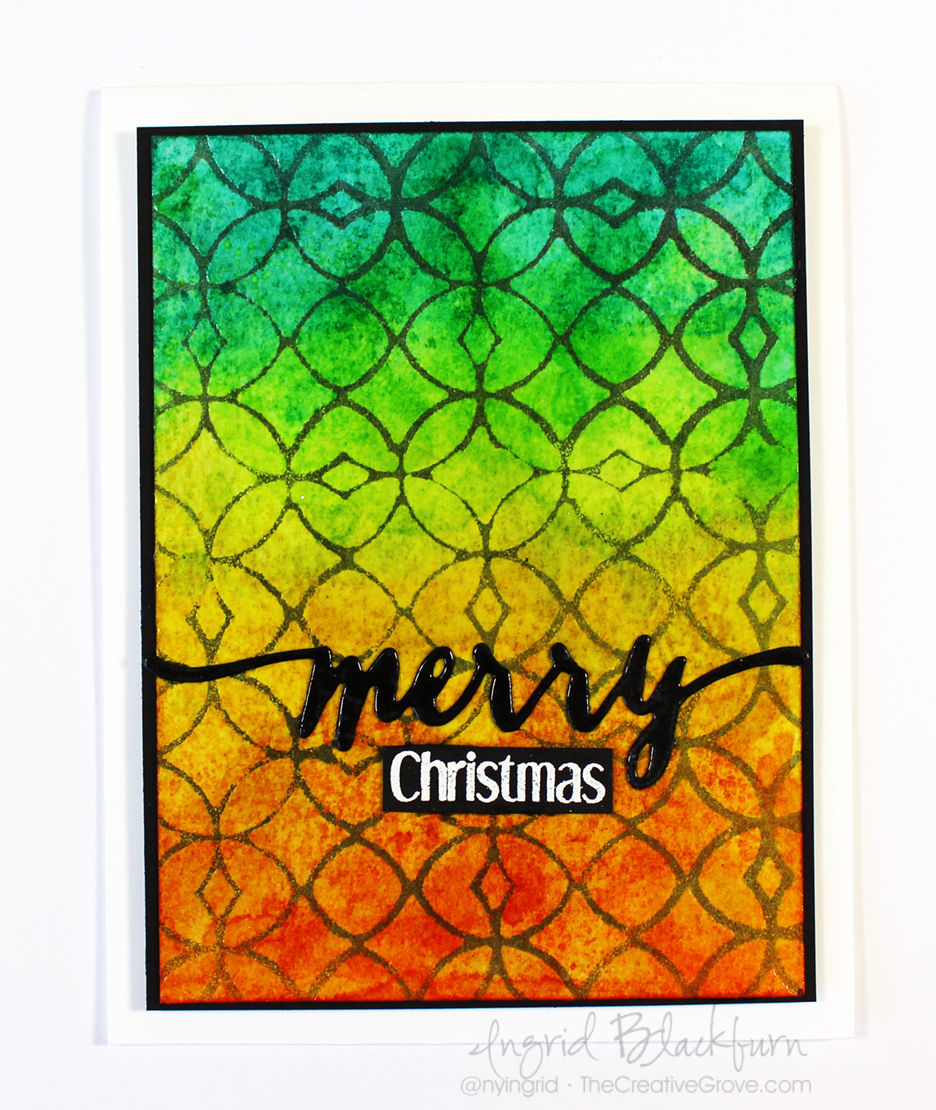
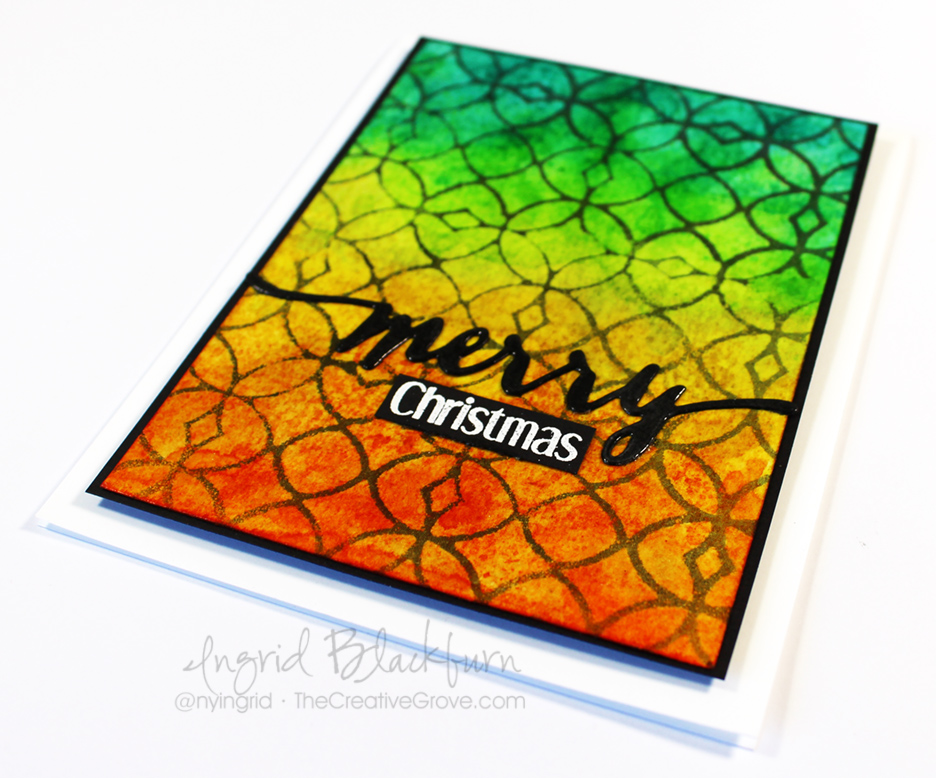
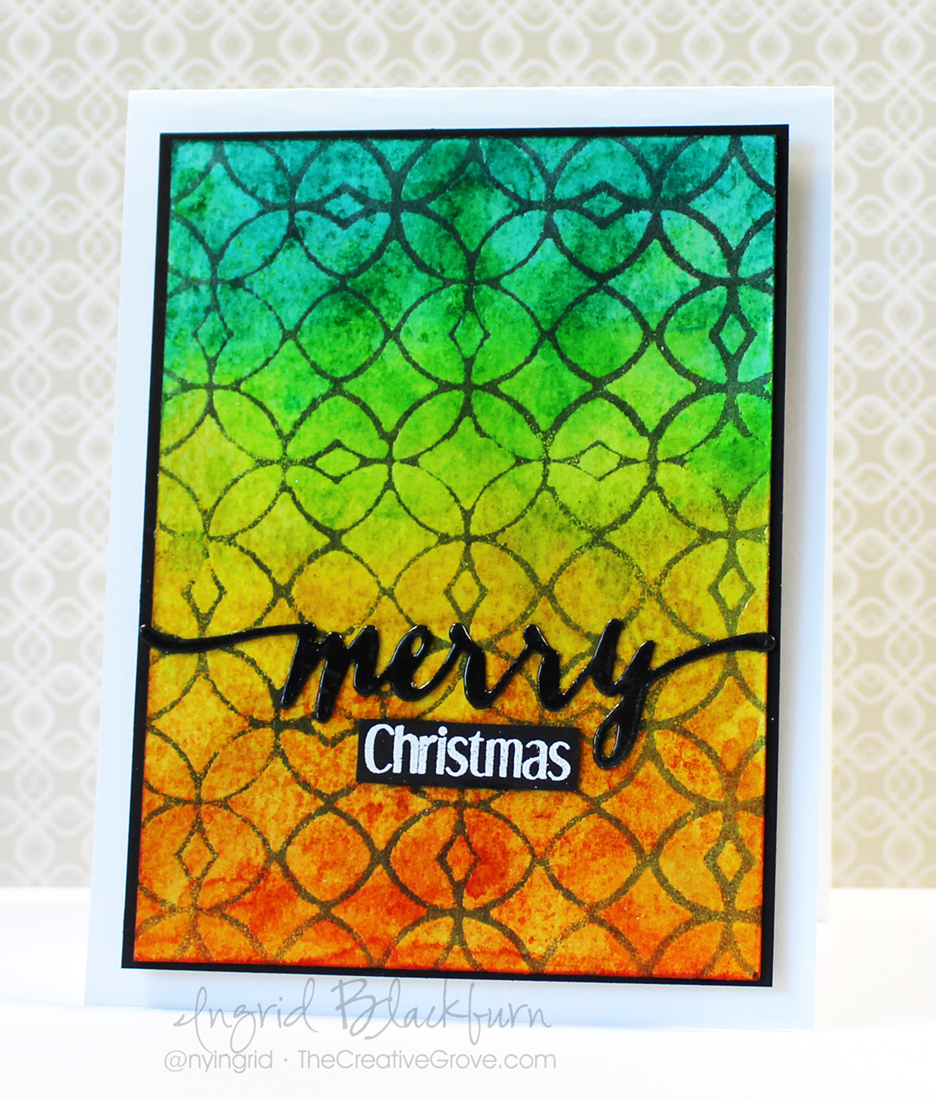
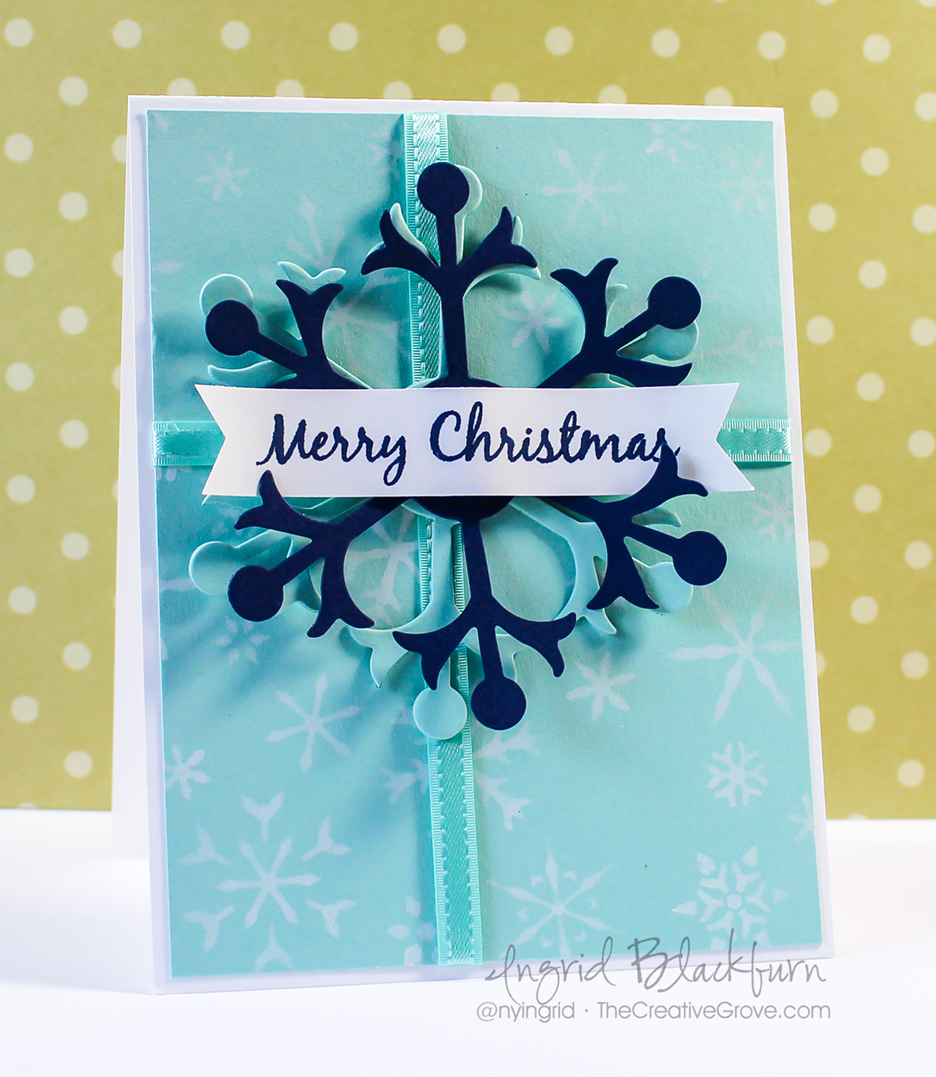
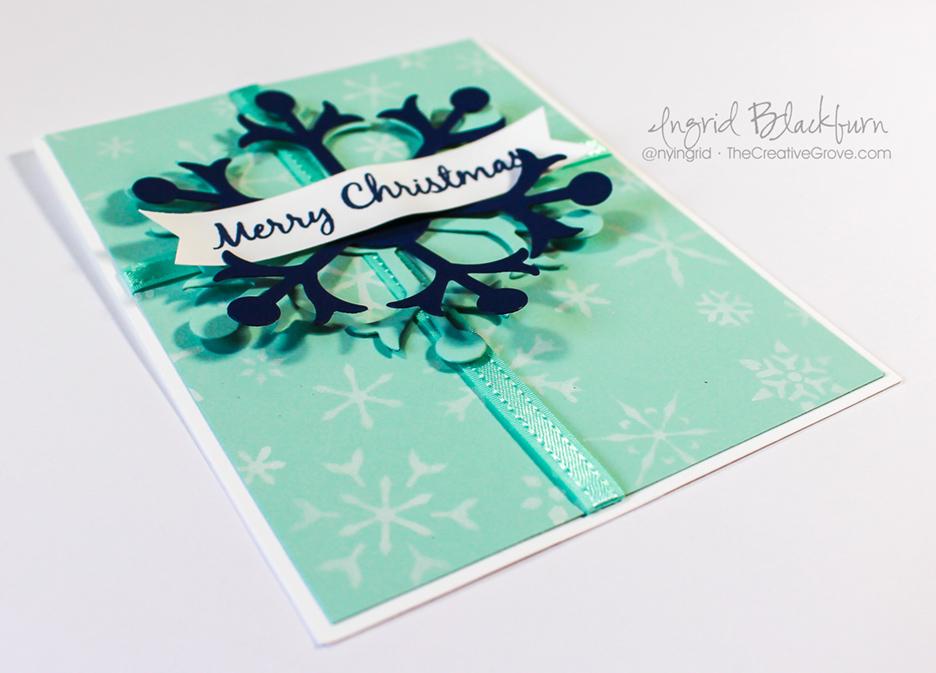
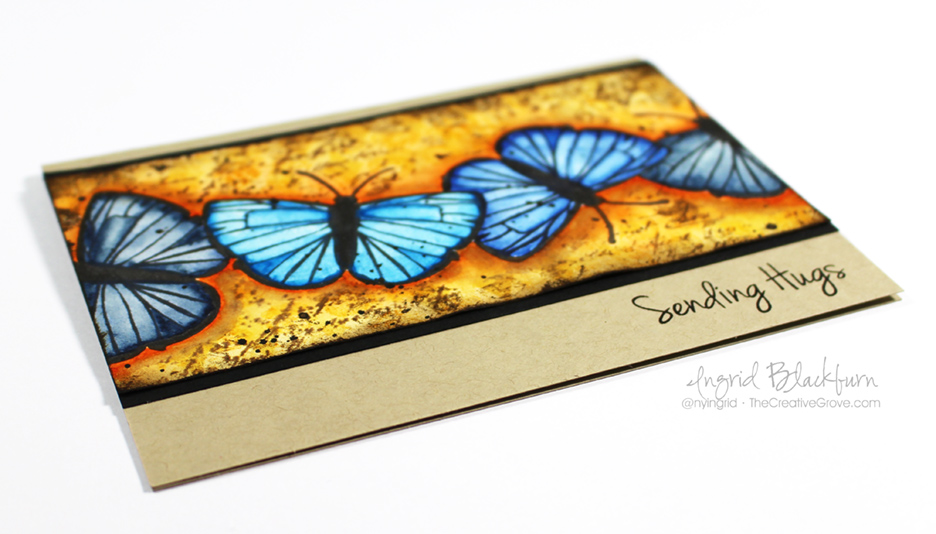
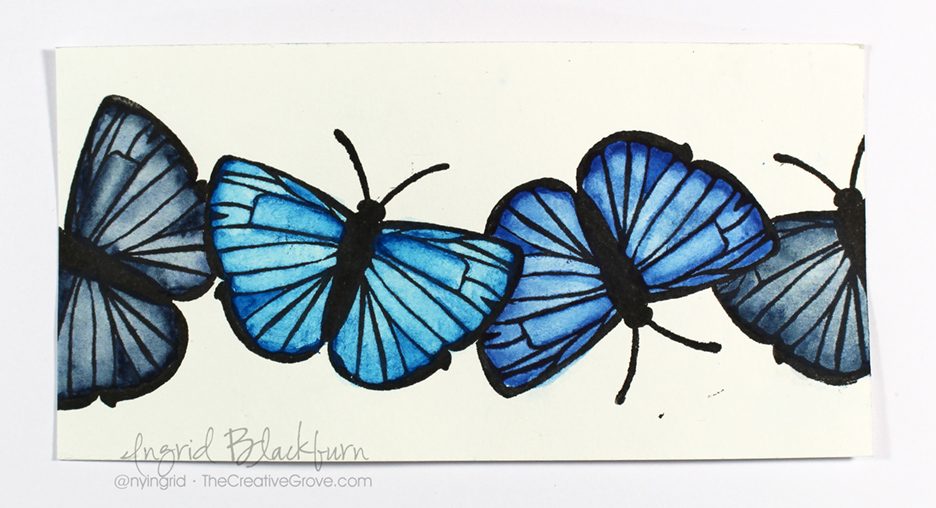
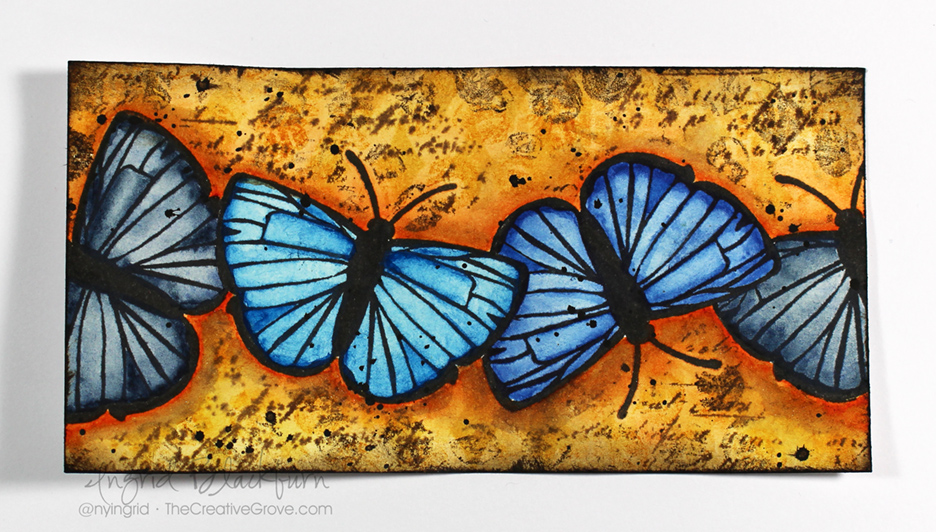
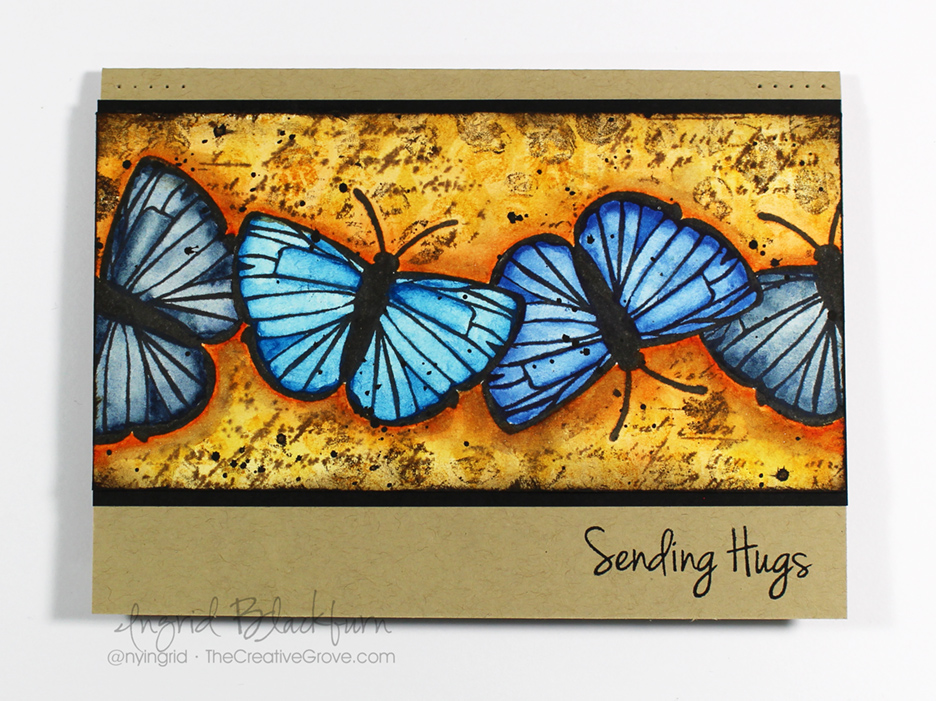
As you can see, I embossed the Clustered Vines stamp which created not only a fun interesting look – they’re embossed in Mowed Lawn and Peeled Paint Distress Inks with clear embossing powder. They provided a great protective mask for the Color Your Polka background stamp which here is only partially stamped in areas over a torn masked edge, ensuring a clean and simple look.

To help accentuate that area, lightly sponge a little tumbled glass to color the background, fading out as you near the white edge.

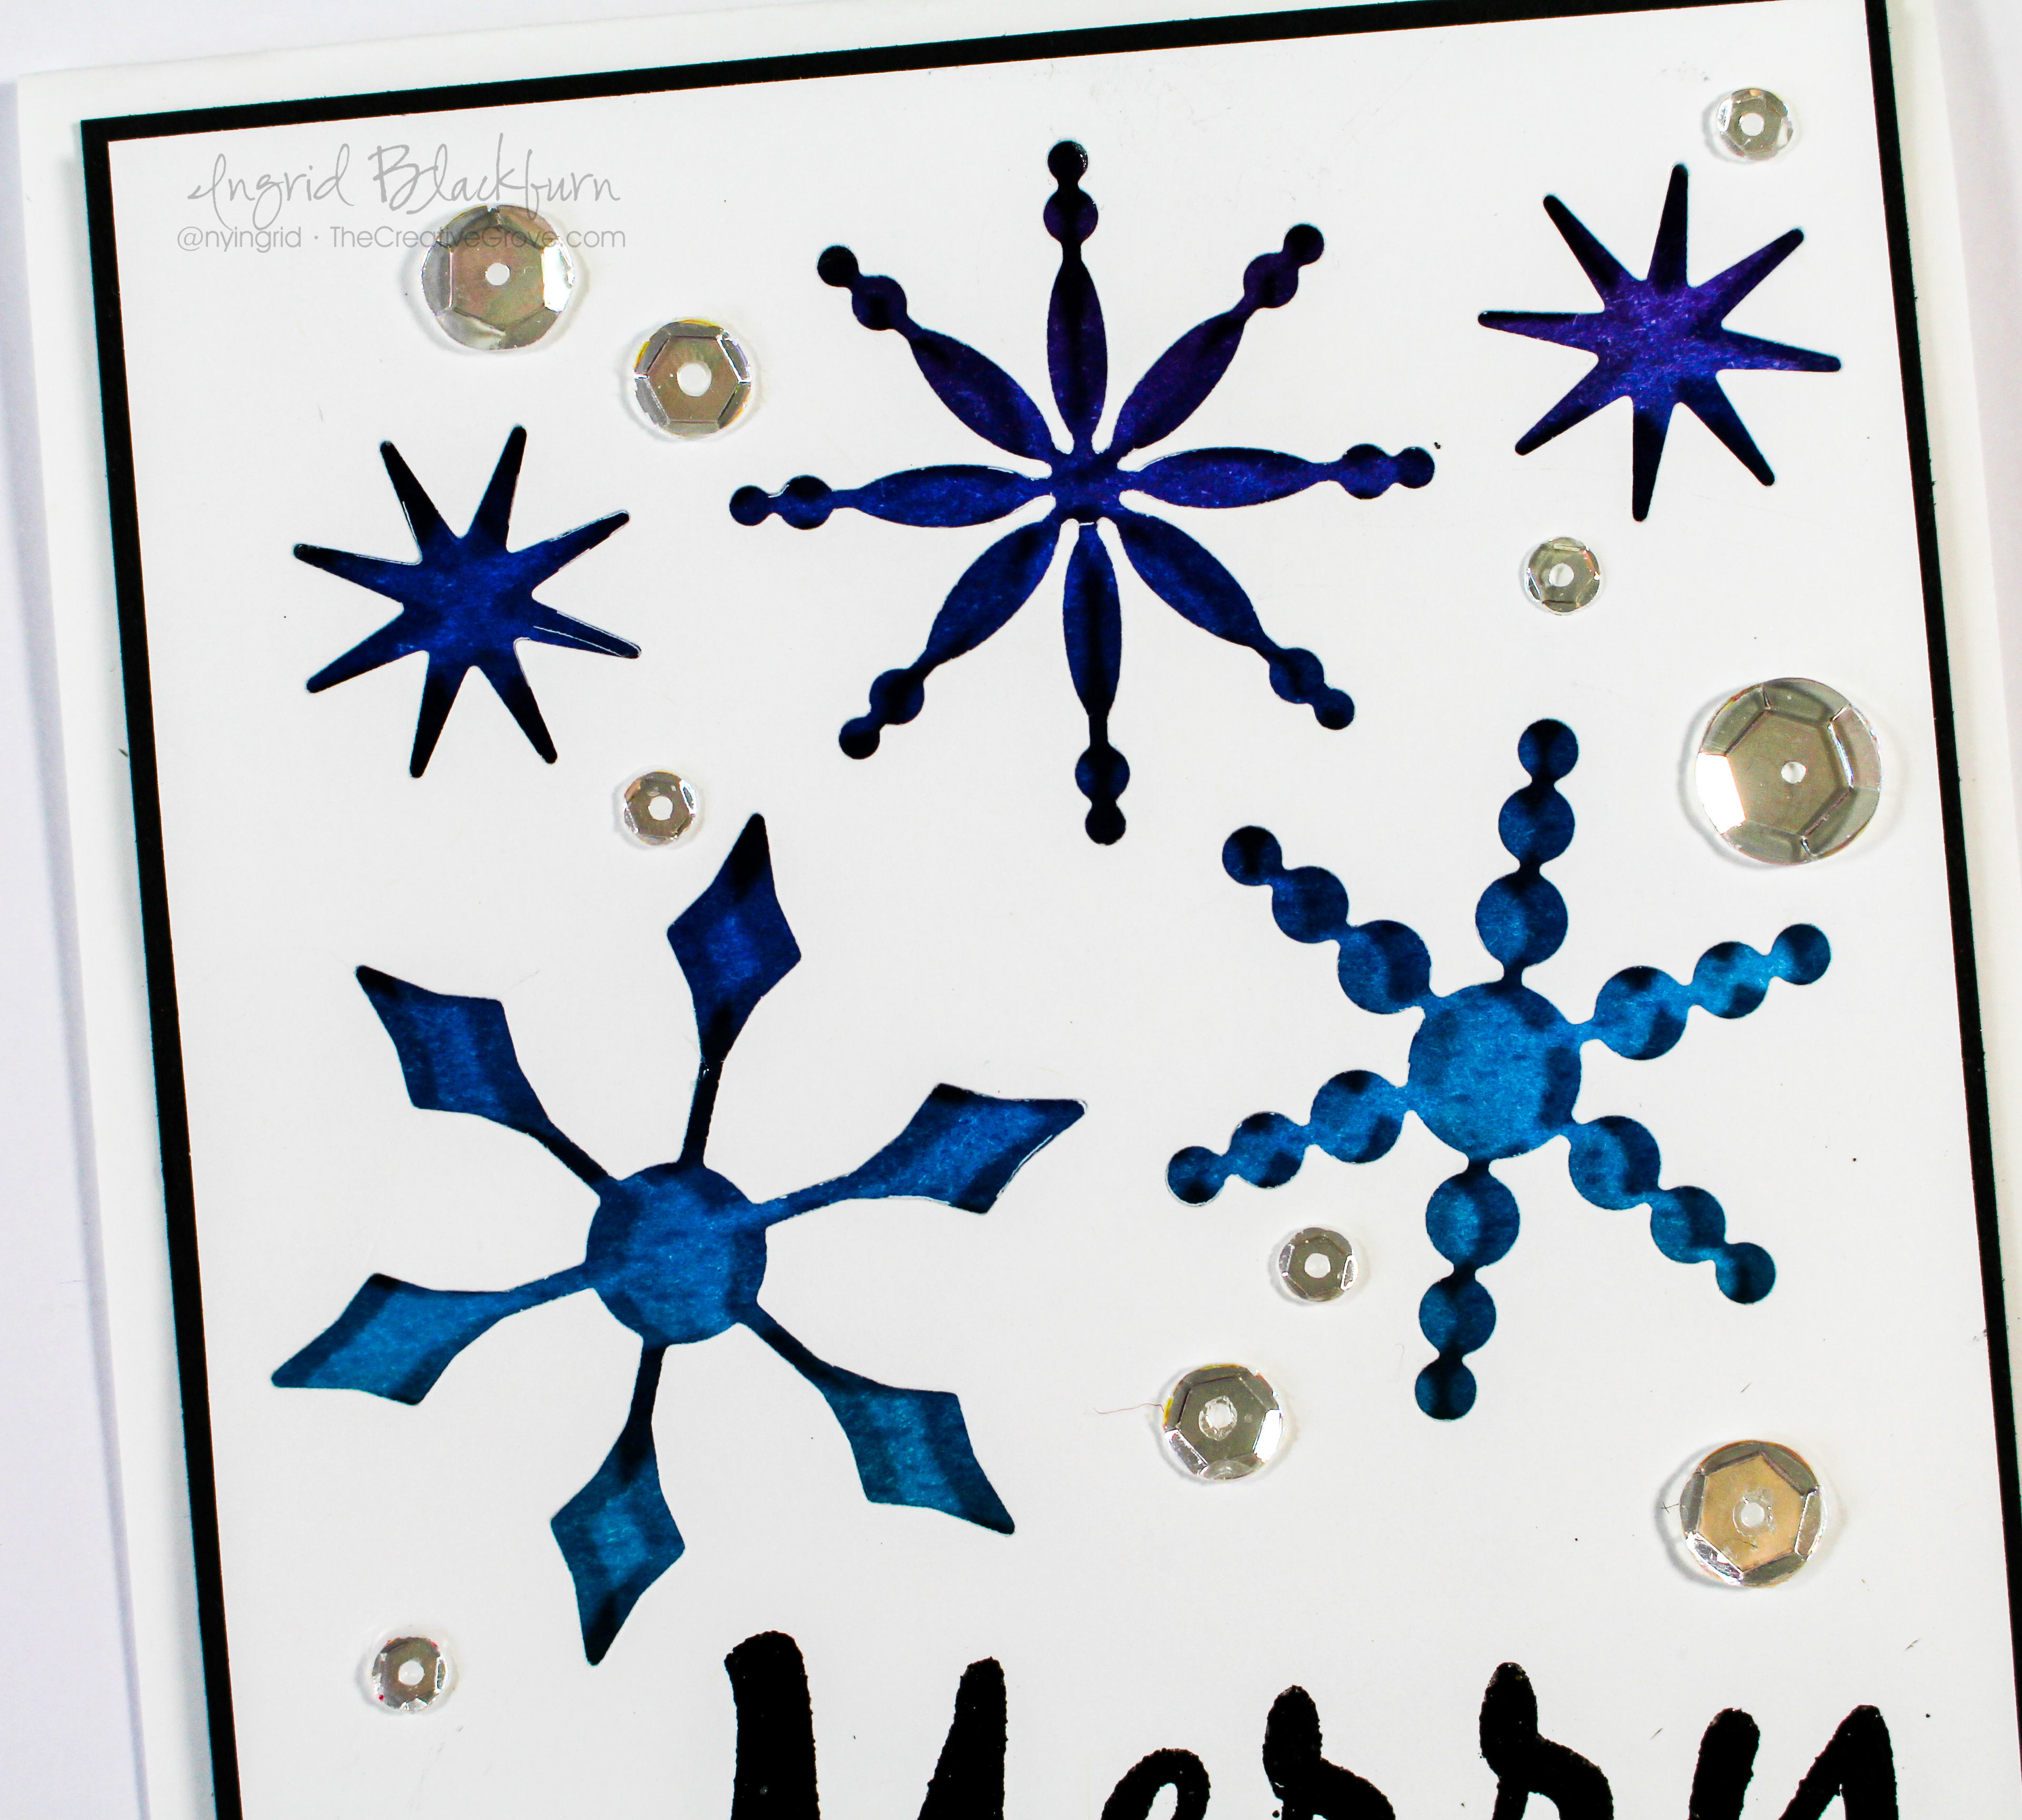
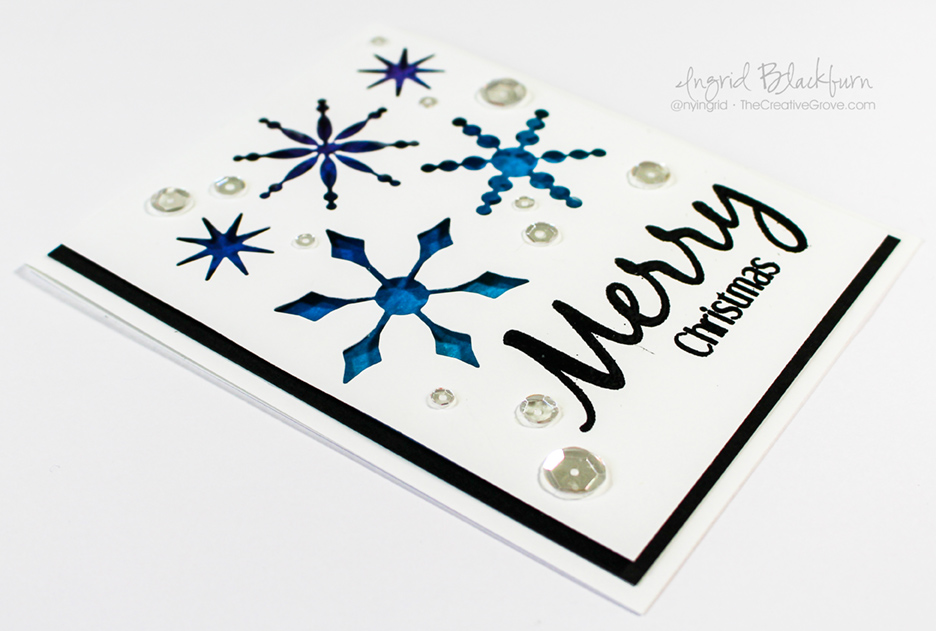
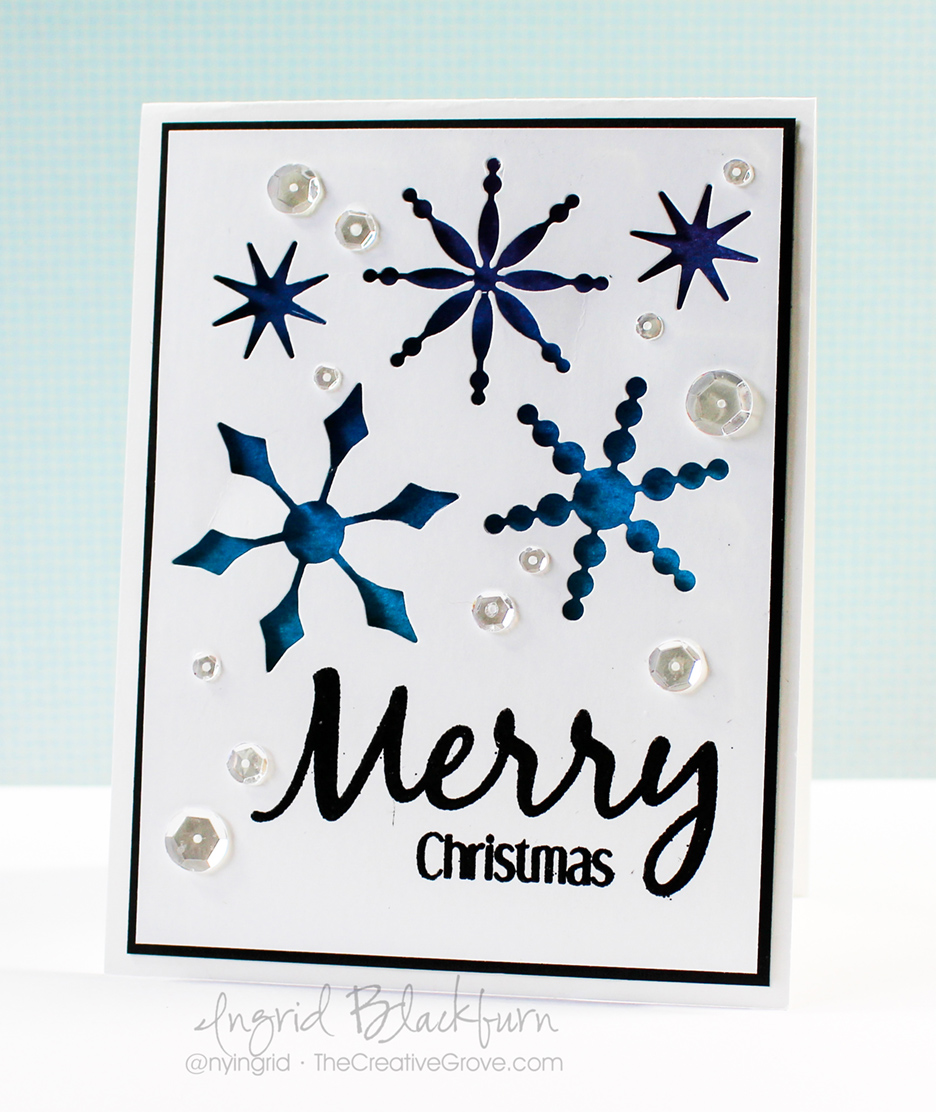
A fun die cut from Stamplorations paired up with my absolutely favorite little Birthday stamp from Everyday Sentiments by Happy Little Stampers and you’re all set!

CAS-Vines-Masking-Technique-Ingrid-Blackburn-005

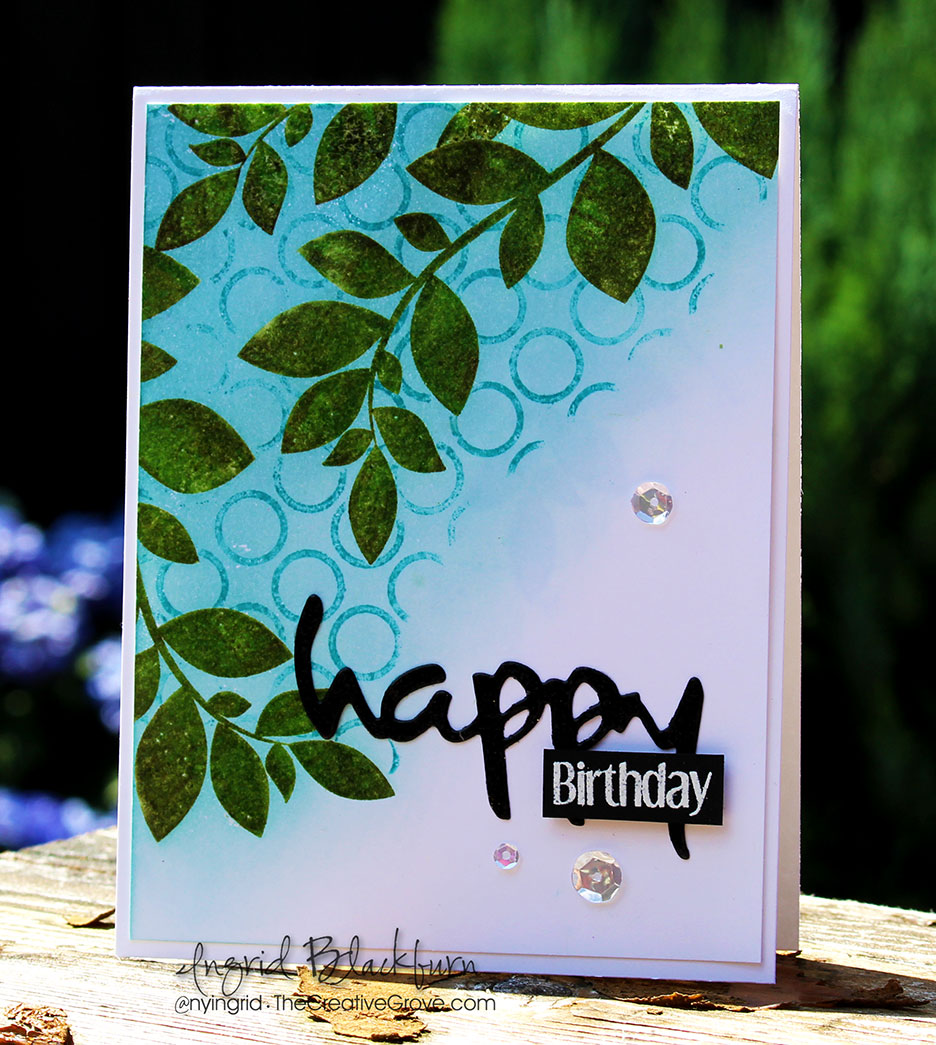
Simple Sparkling clear sequins and a white on white card completes the look. I love this card – it’s clean, it’s simple and makes an impact. Now it’s your turn! Create a fun masked clean and simple card for the challenge – you have till the end of the month!
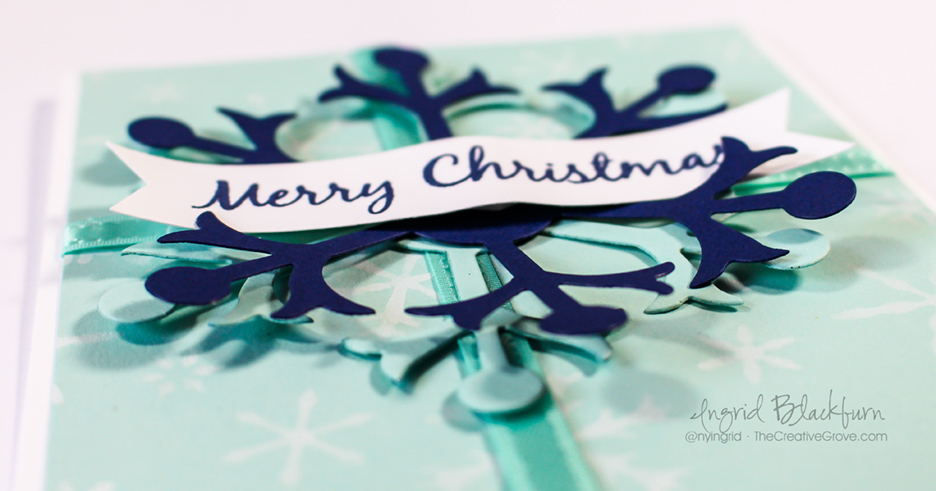
cas august badge

But before you go, I’m totally curious – what’s YOUR favorite way to use the masking technique? Tell me below in the comment section!

Till next time!

Signature

[optin_box style=”12″ alignment=”center” email_field=”email” email_default=”Enter your email address” integration_type=”aweber” double_optin=”Y” list=”3846012″ name_field=”name” name_default=”Enter your first name” name_required=”Y” opm_packages=””][optin_box_field name=”headline”]Learn more with our exclusive FREE video series:[/optin_box_field][optin_box_field name=”paragraph”]PHA+UGx1cyB5b3XigJlsbCBiZSBhZGRlZCB0byBteSBGUkVFIENyZWF0aXZlIFRpcHMgRS1sZXR0ZXIgd2hlcmUgSSBzaGFyZSBleGNsdXNpdmUgcHJvamVjdHMsIHZpZGVvcyAmYW1wOyB0aGUgMTIgRGF5cyBvZiBDaHJpc3RtYXMgUHJvamVjdCBTZXJpZXM8L3A+Cg==[/optin_box_field][optin_box_field name=”privacy”][/optin_box_field][optin_box_field name=”top_color”]undefined[/optin_box_field][optin_box_button type=”0″ button_below=”Y”]Get Instant Access![/optin_box_button] [/optin_box]

Using Recycled Materials on Cards

Have you every thought to use Recycled Materials on your cards before? This month over at Happy Little Stampers, the challenge is just that – Recycle. This one threw me. Yes, I could come up with lots of 3D projects, and that was where my head kept going…but I wanted to challenge myself to a card. So what do you use? Well, you can use anything that your recycling!

HLS Mixed Media challenge July 2016

I’m currently living in Germany – and recycling is a MAJOR thing here. SO big, that it’s the #2 country in the world for diverting 62% of its trash from landfills – second only to Austria which diverts 63% of all trash. And it’s no joke over here – our recycling calendar is insane – almost all garbage is separated. (And in case you were wondering where the US stacks up…34% – toward the end of the middle pack)

So, I thought it was appropriate that I add my fair share on this project. With the exception of my card base, and one tiny die cut, all my materials (paper) used on this project are…yup, you guessed it – recycled!

Recycle-Mixed-Media-Card-Ingrid-Blackburn---001

Be sure to stop by this month’s guest designer – Stephanie Lanzalotto’s blog as well as the other design team members blogs.

Recycled Birthday Butterfly Tutorial

My card front is made of something we ALL have plenty of – a torn up box from Amazon. The base of my painting is the corrugated inside of the box. I tore it so you can see a little more of the texture and character. In order to have the paint really grab onto my cardboard without sinking into it, I first covered it with some clear gesso.

To make the piece lighter, remove one of the slick sides that cover the corrugated part – I used that for the greeting…yup – that’s not card stock – it’s recycled cardboard!

Recycled-Mixed-Media-Card-Ingrid-Blackburn--007

For the butterflies, I used a page from an old book. I definitely wanted to have some discoloration on the pages. If you don’t want to break apart a book, try newspaper!

  • Tear a piece of the box the size you want and remove one of the slick sides for later.
  • Paint some clear gesso onto your recycled cardboard piece.

Recycled Materials in Cards

  • Cover your cardboard in a few coats of white acrylic paint – this will become the background for your painting.
  • While your white is drying (I sped mine up a bit with a heat tool), stamp your butterfly from the HLS Butterfly Birthday set in Ground Espresso onto a page from an old book.
  • Layer your stamped butterfly over a piece of espresso card stock and another piece from the book – die cut at once.
  • Curl up the card stock and stamped layers a bit. Attach to each other using mini glue dots at the butterfly body.
  • Separate the top and middle layer with a foam dot cut in half. This will help to pop up those top wings.

Recycled-Mixed-Media-Card-Ingrid-Blackburn--006

  • Once your white is dry, add some pink flowers by thickly applying some acrylic paint with a rounded brush. To get the texture, just keep dabbing in a push down motion and move to another area. I left it rather thick so that it would give the appearance of petals.
  • Add stems with a little sap green mixed with Burnt Umber for an olive green look. I needed to use a smaller brush to keep the stems from being too thick.
  • Allow your flowers to dry – I used a heat tool a little, and then allowed the flowers to dry over several hours. Once dry, they had a shiny appearance.

Painted Mixed Media Flowers - Recycled

  • Stamp your greeting (HLS Doodled Flowers) using Ground Espresso Distress Ink onto the back piece of card board that you separated from the center & front. I used the slick side as the reverse had the imprint from the corrugated part.
  • Immediately dip your greeting into clear embossing powder and heat set. To see how I use distress inks with embossing powders and other embossing techniques – click here for a great video tutorial.
  • Tear closely around your greeting and adhere to your project using Multi Medium Matte or glue (be sure your stems are dry!)

Happy Little Stampers Mixed Media Challenge - Recycled

  • Smoosh a versamark pad through the Patina stencil by Penny Black so that creates a border on your card base. I didn’t want to add too many layers, as the recycled cardboard was heavy enough.
  • Add clear embossing powder and heat set.
  • Adhere your cardboard card front to the card base using glue on the ridges.
  • Go over your stamped butterfly image with a Spectrum Noir glitter pen & Attach to your painted base using foam dots.

Patina Stencil - Penny Black - Recycle

So what do you think? I bet you think twice about throwing out that Amazon box next time…lol! The best part about this Mixed Media card is that the recycled cardboard has such great texture! And to think I usually use it just to add lines with acrylic paints! Thanks for joining me today, I hope I inspired you in some way to use some recycled materials on your cards. I can’t WAIT to see what you come up with.

Join us over at Happy Little Stampers Mixed Media Challenge – now it’s your turn.

Go get those fingers inky –

Signature

[optin_box style=”12″ alignment=”center” email_field=”email” email_default=”Enter your email address” integration_type=”aweber” double_optin=”Y” list=”4161292″ name_field=”name” name_default=”Enter your first name” name_required=”Y” opm_packages=””][optin_box_field name=”headline”]Learn more with our exclusive FREE video series:[/optin_box_field][optin_box_field name=”paragraph”]PHA+UGx1cyB5b3XigJlsbCBiZSBhZGRlZCB0byBteSBGUkVFIENyZWF0aXZlIFRpcHMgRS1sZXR0ZXIgd2hlcmUgSSBzaGFyZSBleGNsdXNpdmUgcHJvamVjdHMsIHZpZGVvcyAmYW1wOyB0aGUgMTIgRGF5cyBvZiBDaHJpc3RtYXMgUHJvamVjdCBTZXJpZXM8L3A+Cg==[/optin_box_field][optin_box_field name=”privacy”][/optin_box_field][optin_box_field name=”top_color”]undefined[/optin_box_field][optin_box_button type=”0″ button_below=”Y”]Get Instant Access![/optin_box_button] [/optin_box]

MWAH – The Kissing Technique

The Kissing Technique has been around for forever, and chances are you already know how to do it. But for today’s card, I thought I’d re-visit an oldie but a goodie – it is the challenge theme over at Happy Little Stampers for the CAS Challenge this month!

July 2016 CAS Badge

I love this technique, it’s super easy to do, but for best results, use a bold image. I used the Hibiscus flower from the Aloha Spirit set by Create a Smile and kissed it together with the Spice Market background stamp by Hero Arts. It paired perfectly with the fern stencils by The Crafters Workshop & the sentiments from the Mix Mashed set by Happy Little Stampers.

Kissing Technique

Kissing Technique Tutorial

  • Ink up your flowers in versamark, then Picked Raspberry Distress Ink.
  • Ink up your Spice Market background stamp with Black Soot Distress Ink.
  • Stamp your flower onto the inked up background stamp, in essence kissing them together and then stamp onto your watercolor paper. When you kiss them together, the background image transfers to your inked up stamp giving you a very cool effect.

The Crafters Workshop Stencils

  • Tip – for an extra project, once you’re done kissing your images, place a piece of card stock on your background stamp and rub the back to transfer the images. Where you kissed the two together you’ll have a “missing” lighter design of your flowers!
  • Next, sprinkle clear embossing powder over your kissed images and heat set.
  • Ink up the stamens of the flowers in Picked Raspberry at the bottom and Mustard Seed at the top crossing somewhere in the middle. Stamp and heat set with clear embossing powder.

Kissing Technique - Create a Smile Stamps

  • Lightly sponge the center area of your watercolor paper in Twisted Citron and Mowed Lawn. I used watercolor paper as it makes sponging super flawless. Tip – your embossed images will resist your ink.
  • Add the fern images by lightly stenciling them in Mowed Lawn Distress Ink and a sponge tool. Since these are quite fine and easily move, I pounce my tool. Shift and repeat until you have a desired effect.
  • Lightly spritz a cloth and rub over your flowers to remove any ink left behind from the background.
  • Emboss your greeting from Happy Little Stampers, white on black card stock, trim down & separate. Attach to your card along with some sparkling clear sequins.
  • Matte onto black card stock, slightly offsetting to the right.

-Kissing-Technique-stamping techniques

It’s a super cute technique that will definitely have everyone say…how did she do that?!! Now it’s your turn – join us this month over at the Happy Little Stampers CAS Challenge and show off your kisses!!!!

Go get those fingers inky!!!

Signature

[optin_box style=”12″ alignment=”center” email_field=”email” email_default=”Enter your email address” integration_type=”aweber” double_optin=”Y” list=”3846012″ name_field=”name” name_default=”Enter your first name” name_required=”Y” opm_packages=””][optin_box_field name=”headline”]Learn more with our exclusive FREE video series:[/optin_box_field][optin_box_field name=”paragraph”]PHA+UGx1cyB5b3XigJlsbCBiZSBhZGRlZCB0byBteSBGUkVFIENyZWF0aXZlIFRpcHMgRS1sZXR0ZXIgd2hlcmUgSSBzaGFyZSBleGNsdXNpdmUgcHJvamVjdHMsIHZpZGVvcyAmYW1wOyB0aGUgMTIgRGF5cyBvZiBDaHJpc3RtYXMgUHJvamVjdCBTZXJpZXM8L3A+Cg==[/optin_box_field][optin_box_field name=”privacy”][/optin_box_field][optin_box_field name=”top_color”]undefined[/optin_box_field][optin_box_button type=”0″ button_below=”Y”]Get Instant Access![/optin_box_button] [/optin_box]

CAS – Ghosting Technique

Have you ever tried the ghosting technique before? A ghosted look is an image that appears either as a light or double image. You can actually achieve this look in several ways, I’m going to talk about three today.

I personally love this technique, it gives a great look and added emphasis to a stamped or stenciled image. You’ll need to use one of three mediums – water, white pigment ink or a clear watermark ink like Versamark.

This is my first month playing along with a fun challenge over at Happy Little Stampers, and I’m quite excited to be a new member of the CAS team! The challenge for the month of June is to use Ghosting on your card in a CAS (Clean and Simple) style. Here’s what I came up with:

Ghost Stamping

Now I’ll be honest – I’m fresh off a transatlantic trip and have been a little jet lagged! We were in New York for my grand daughter’s Christening – little Lylah is SO cute! It was a short trip, but a long one on the way back. I was excited when I remembered that I created this word cluster using this very technique several months ago for a Christmas challenge and went another way. Even better – I had the snowflakes left over from another project too – I love it when I get to use things from my scrap bin!

Ghosting Technique Tutorials

Technique #1 – Emerging Images (Stamp/Stencil)

To create the ghost image, stamp a word cluster with various greetings from the Happy Little Stampers set Mixed Christmas Greetings in Versamark ink on glossy card stock.  Next brayer colored dye inks, covering your card stock. I used the Distress inks Victorian Velvet and Dusty Concorde for a slight ombre look. The versamark ink resists the dye ink and shows up as a ghost image.

Ghosting-Technique-003

Another way to get the same result, but not quite as sharp is to use Watercolor paper, cover it well with Distress Ink and stamp with water. That’s the water stamping technique which can produce a ghosted result.

For the background, stamp snowflakes from Bring on the Snowflakes by CAS-ual Fridays in Illuminate ink for a subtle pearl look. Add a few white snowflake dies from the companion die set along with ta few sequins and you have a great look.

Although I probably didn’t need an additional sentiment, I added one in embossed silver on a banner. The ghosted circle is popped up for a little drama to the card and the sparkling clear sequins by Pretty Pink Posh for the perfect sparkling effect.

Ghosting-Technique-002

Technique #2 – Double Stamp/Stencil

This technique is my favorite way to achieve a ghosted image.  Click here to see another written & video tutorial on how to use white pigment ink to get a great ghosted image with stamps or a stencil. This is also known as the double stamping technique.

Technique #3 – Water Stamping/Stenciling

The third way to create a great ghosted image is to stamp or lift with water. This can be applied to stamps or stencils. I have another written and video tutorial for this concept in the simplest of manners – the flicked distress technique.  Click here to view the video and written tutorial for this technique.

Ghosting-Technique-005

So that’s three tutorials on how to use this very technique – have fun with it! If you’re a Just Cards online student – you have even more tutorials on various ways to create this technique in your classroom too!

Thanks for joining me today, I don’t share many personal photos, but couldn’t resist with these – here are a few pictures of our sweet little grand daughter Lylah, and the family!

IMG_4647-edit-2

IMG_4554-edit-2

IMG_4789-edit-2

Lylah, Allyson and a rare photo of me – I’m always BEHIND the camera!

Isn’t she cute?!! We miss them already! I hope you have a great start to June…and I can’t wait to see what you create this month in the CAS Ghosting challenge over at Happy Little Stampers – I challenge you to try out the ghosting technique – have fun!

🙂

Ingrid

[optin_box style=”12″ alignment=”center” email_field=”email” email_default=”Enter your email address” integration_type=”aweber” double_optin=”Y” list=”3846012″ name_field=”name” name_default=”Enter your first name” name_required=”Y” opm_packages=””][optin_box_field name=”headline”]Learn more with our exclusive FREE video series:[/optin_box_field][optin_box_field name=”paragraph”]PHA+UGx1cyB5b3XigJlsbCBiZSBhZGRlZCB0byBteSBGUkVFIENyZWF0aXZlIFRpcHMgRS1sZXR0ZXIgd2hlcmUgSSBzaGFyZSBleGNsdXNpdmUgcHJvamVjdHMsIHZpZGVvcyAmYW1wOyB0aGUgMTIgRGF5cyBvZiBDaHJpc3RtYXMgUHJvamVjdCBTZXJpZXM8L3A+Cg==[/optin_box_field][optin_box_field name=”privacy”][/optin_box_field][optin_box_field name=”top_color”]undefined[/optin_box_field][optin_box_button type=”0″ button_below=”Y”]Get Instant Access![/optin_box_button] [/optin_box]

How to Get Inks to Shine

Mixed-Media-Stained-Glass-Window-001

All you really wanted from your card was a little shine, right? Have you ever created a stunning background, but hours later your ink colors are flat and faded? Well, this technique is for you then! I’m playing along with the new Mixed Media Challenge over at Happy Little Stampers – Shine.

HLS Mixed Media challenge May 2016

I LOVE to create backgrounds – have you noticed? All to often in card making, we create these amazing colorful backgrounds on cards and then the colors settle as the project fully dries and we’re left with something that is a bit flat and has no vibrant nature left. At least I do! I’m always thinking where did the shine go? Okay, not all of it is shiny, but you know what I mean.

I have a video and step by step tutorial for you, so grab a drink, learn how to create amazing depth first, then a stain glass window that captures the true nature of those amazing colors by trapping the shine element of your card. Here’s the video:

Watch in HD on YouTube

So what did you think? Not that difficut really. What did you think about stretching your stencil for better coverage? Have you ever done that? Here’s the step by step tutorial, and if you really loved this, be sure to sign up for the Creative Tips E Letter for an exclusive video series and more…

[optin_box style=”12″ alignment=”center” email_field=”email” email_default=”Enter your email address” email_order=”2″ integration_type=”aweber” double_optin=”Y” list=”3846012″ name_field=”name” name_default=”Enter your first name” name_order=”1″ name_required=”Y” opm_packages=””][optin_box_field name=”headline”]Learn more with our exclusive FREE video series:[/optin_box_field][optin_box_field name=”paragraph”]PHA+UGx1cyB5b3XigJlsbCBiZSBhZGRlZCB0byBteSBGUkVFIENyZWF0aXZlIFRpcHMgRS1sZXR0ZXIgd2hlcmUgSSBzaGFyZSBleGNsdXNpdmUgcHJvamVjdHMsIHZpZGVvcyAmYW1wOyB0aGUgMTIgRGF5cyBvZiBDaHJpc3RtYXMgUHJvamVjdCBTZXJpZXM8L3A+Cg==[/optin_box_field][optin_box_field name=”privacy”][/optin_box_field][optin_box_field name=”top_color”]undefined[/optin_box_field][optin_box_button type=”0″ button_below=”Y”]Get Instant Access![/optin_box_button] [/optin_box]

Creative Tips on Shine, Texture and Stretching your Stencils

  • Create an in depth textured piece by using the wrinkle free distress technique on a piece of 140# cold pressed watercolor paper and dye based inks. (shown in detail in the video) Tip – For the most vibrant results, try Ranger’s Distress Inks.

Mixed-Media-Stained-Glass-Window-003


  • This project uses Distress Mustard Seed, Spiced Marmalade, Twisted Citron and Peacock Feathers
  • Once your project is totally dry, lightly buff over it with a de-static tool to remove any oils.
  • Smoosh Versamark through the Latticeworks stencil by Tim Holtz or your favorite one for a detailed design as in the video. Since this stencil didn’t cover my watercolor paper, I had to do this in two parts and overlap my design for a seamless flow.

Vibrant Mixed Media Cards

  • Emboss in Clear Embossing Powder – I used Brutus Monroe – and if you’ve never tried it – do so…it rocks!
  • Once your embossed stencil has fully dried, sponge over with Soot Black distress ink.
  • Wipe off your stenciled design with light pressure and a slightly damp cloth or paper towel to pick up the resisted ink.
  • Emboss your die cut greeting in clear for a shiny look. I used Handlettered Holiday by WPlus9. Adhere with Ranger Multi Medium Matte.

using distress inks in mixed media

  • Stamp and emboss the Christmas greeting from HLS Everyday Sentiments in white on black card stock – trim and adhere.
  • Adhere your watercolor paper with glue to a black matte with a 1/16″ border.
  • Pop up Mixed Media Panel with Fun Foam and adhere to a White card base with a 1/4″ border all around.

That’s it! Simple and striking Mixed Media card. I’m also going to play along with this months challenge over at CAS Mix it Up….it’s heat embossing – we definitely fit there!

may

So hop on over to the HLS Mixed Media Challenge and check out all the amazing projects my teammates have created for this challenge.  Plus you’ll want to stop by our Guest Designer Kalina’s blog – she’s SUPER talented when it comes to Mixed Media and her projects are out of this world!

Then get those fingers inky….I can’t wait to see what you do to let your creations shine!

Signature

[optin_box style=”12″ alignment=”center” email_field=”email” email_default=”Enter your email address” email_order=”2″ integration_type=”aweber” double_optin=”Y” list=”3846012″ name_field=”name” name_default=”Enter your first name” name_order=”1″ name_required=”Y” opm_packages=””][optin_box_field name=”headline”]Learn more with our exclusive FREE video series:[/optin_box_field][optin_box_field name=”paragraph”]PHA+UGx1cyB5b3XigJlsbCBiZSBhZGRlZCB0byBteSBGUkVFIENyZWF0aXZlIFRpcHMgRS1sZXR0ZXIgd2hlcmUgSSBzaGFyZSBleGNsdXNpdmUgcHJvamVjdHMsIHZpZGVvcyAmYW1wOyB0aGUgMTIgRGF5cyBvZiBDaHJpc3RtYXMgUHJvamVjdCBTZXJpZXM8L3A+Cg==[/optin_box_field][optin_box_field name=”privacy”][/optin_box_field][optin_box_field name=”top_color”]undefined[/optin_box_field][optin_box_button type=”0″ button_below=”Y”]Get Instant Access![/optin_box_button] [/optin_box]

Creative Cards – Snowflake Gift

Snowflake-Gift-001

This month’s Christmas Challenge card is a creative card for you – a snowflake gift. The theme at the Happy Little Stampers Christmas challenge this month is Gift, so why not just wrap it all up in a snowflake bow?

HLS Christmas Challenge May 2016

To create this card, I wanted a simple and straightforward background – white pigment ink stenciled with the Snowflakes stencil by Memory Box onto some Pool Party card stock by Stampin Up. I had some matching pool party satin ribbon for my wrapping, a couple Snowflake die cuts in Pool Party and Night of Navy card stock as my bow.

Snowflake-Gift-008

Just stamp the greeting from the Mixed Christmas Sentiments by Happy Little Stampers, cut some banner edges and pop up the middle for a little movement and Voila – all done!

Snowflake-Gift-0056Snowflake Gift Card

Quick, simple, interesting and this can be done over and over in any color theme and with any dies – think Graduation with hats and a diploma, Happy Birthday with anything – polka dots, little cakes, streamers – you name it. Baby, flowers, butterflies, I can go on and on and on. Quick, easily mass produced and so cute! Tell me YOUR idea in the comments below – I’d love to compile a list of awesome ideas.

Snowflake Stencil Gift

Thanks for stopping by today for this quick tutorial, be sure to swing by the Design Team’s cool creations as well. Now go create your own “Gift” for the challenge – I can’t wait to see what you do!

Signature

[optin_box style=”12″ alignment=”center” email_field=”email” email_default=”Enter your email address” email_order=”2″ integration_type=”aweber” double_optin=”Y” list=”3846012″ name_field=”name” name_default=”Enter your first name” name_order=”1″ name_required=”Y” opm_packages=””][optin_box_field name=”headline”]Learn more with our exclusive FREE video series:[/optin_box_field][optin_box_field name=”paragraph”]PHA+UGx1cyB5b3XigJlsbCBiZSBhZGRlZCB0byBteSBGUkVFIENyZWF0aXZlIFRpcHMgRS1sZXR0ZXIgd2hlcmUgSSBzaGFyZSBleGNsdXNpdmUgcHJvamVjdHMsIHZpZGVvcyAmYW1wOyB0aGUgMTIgRGF5cyBvZiBDaHJpc3RtYXMgUHJvamVjdCBTZXJpZXM8L3A+Cg==[/optin_box_field][optin_box_field name=”privacy”][/optin_box_field][optin_box_field name=”top_color”]undefined[/optin_box_field][optin_box_button type=”0″ button_below=”Y”]Get Instant Access![/optin_box_button] [/optin_box]

Mixed Media Watercolored Butterflies

Mixed-Media-Watercolor-Butterflies-001

Have you ever wondered how to create depth & texture without bulk? You may find that it’s much easier to do than you think – just grab some watercolor brushes, a few stencils, some distress inks and you may just surprise even yourself! This  month over at the Happy Little Stampers we’re challenging you to play around with Wings in your Mixed Media pieces. That could be any way you interpret it. I chose to use the bold butterfly image from Butterfly Birthday set and see if I could make it feel like it was actually fluttering on the paper with some watercolor magic and stencils in the background. What do you think? Did I hit the mark?

HLS Mixed Media challenge April 2016

Be sure to stop by all the Design Team’s blogs to check out just how they created their own masterpieces. I have a written tutorial for you today, and a video for you! It’s a rather in depth project, so I split it into two videos so you can find your place better. Grab a beverage and enjoy the process! Of course if you want to see it in HD, click the link below to view on YouTube.

View Part One in HD on YouTube

View Part Two in HD on YouTube

This card is actually quite simple to do, it does take a little time, but it’s a great relaxing project – especially if you like to watercolor! Here’s how you can create your very own:

How to Create Depth & Texture without Bulk

  • First you’ll want to cut out a few masks. I used the coordinating Butterfly Dies for the Butterfly Birthday stamp set. I knew I was going to be watercoloring right up to the edge, so I found a way around the ‘edge’ you get when using dies as masks – you’ll see it in the video. Cut several masks – I stacked four post it notes and ran it through once since they were so thin – super easy!
  • Stamp your butterfly pattern in a border along your paper. Be sure to overlap them using your masks so that they are on top of each other. I used an image from the Butterfly Birthday stamp set from Happy Little Stampers. I stamped mine in Versafine Onyx Black Pigment Ink on a 12 x 3″ scrap piece of Canson 138# Mixed Media paper. That way I could make two or three projects – depending on how I cut it down.
  • Heat set your pigment ink before going to the next step!

Mixed-Media-Watercolor-Butterflies-004

  • Watercolor your butterflies in similar colors – some vibrant, others more matte. That will allow them to pop and compliment each other. I chose the following watercolors by Schminke – Hordam Aquarelle Artist: Cobalt, Phthalo Blue, Indigo, Paris and Winsor Newton Cotman Ultramarine and Turquoise.
  • Watercolor a light base coat in a watered down wash, then once dry come back to add darker highlights allowing for lightness in your wings. This helps your images to really pop!
  • Once your butterflies are dry, cut your border down.
  • Add a light watercolor wash of Schminke Translucent Orange framing your butterflies. First wet your paper on the half you’re painting, add your darkest color to the border and lighten outward. Try and keep the bulk of the color around your winged creatures.

Mixed-Media-Watercolor-Butterflies-007Mixed Media Textures

  • Once dry, add a light wash of Ochre from the border inward. Try and keep some lightness to the outer border if possible. You want your wings to be the star.
  • While your piece is still damp and drying, ink up a script stamp in Ground Espresso Distress Ink – I used one by Kaiser Crafts and stamp in random spots. Be sure to have your butterflies covered with your masks. With the paper wet, your Distress Ink will blur a bit. If it’s too wet you will lose all detail.
  • Add various textures with stencils to your outer pieces around your butterflies using Wild Honey, Antique Linen and Espresso Distress Inks. I added texture with some bubble wrap & a diamond stencil (Harleen by Winnie & Walter).

CAS mixed media cards

  • Smoosh some Ground Espresso Distress Ink on your craft mat and spritz with water. Use a light wash over your orange at the edge of your butterflies. This will dirty it up a bit, tone down the orange, and help give life and depth to your winged creatures. It helps to make them seem as if they are fluttering. Keep your shadow a bit thicker on the bottom than the top. It’s okay if some touches the script, but you don’t want to wash away all the great texture you created.
  • Lightly Sponge a frame in Ground Espresso Distress Ink and edge your piece in Soot Black.
  • Splatter some Paynes Grey watercolor with a brush.

Depth & Texture in Bulk

  • Allow it to completely dry.
  • Matte onto a black strip and add to a kraft colored base.
  • Stamp your greeting – I used the fun quirky ones from the new HLS set Doodled Flowers – I LOVE these sentiments. They are the perfect size and looks as if I just wrote it myself.

Part of what makes this project work are the complimentary colors. Not just the butterflies, but blue and orange. Other combinations that are great are purple and yellow or red and green. Basically any two colors that are on the opposite of the color wheel from one another. The black really makes it pop and I love the brown and black together. It works!

Well, there you go, not too many steps. Okay – I’ll be honest, this project did take me over an hour to do – closer to two, but don’t let that scare you. It was fun, relaxing and is truly a piece of artwork. I don’t know if the photos relay it well, but the butterflies look as if they’re about to leap off the page or twirling from one side to the other. It turned out better than I could have imagined. So I encourage you to jump on in and try it yourself. Use whatever you have – hearts, Circles, Snowmen, Butterflies – we all have butterflies! Just have fun.

Mixed-Media-Watercolor-Butterflies-006

I can’t wait to see your Winged Mixed Media creations – use texture, embossing, whatever you have. I chose Watercolor, Distress, stamping, and stenciling. The sky is the limit. Jump on into the Mixed Media April Challenge – Wings. I can’t wait to see what you do!

I’m also going to play along with one of my new favorite Mixed Media challenges – CAS Mix Up challenge – if you haven’t checked this one out, don’t wait! This month it’s all about stamping & stenciling – LOVE that!

april

Now go get those fingers inky –

Signature

[optin_box style=”2″ alignment=”center” email_field=”email” email_default=”Enter your email address” email_order=”2″ integration_type=”aweber” double_optin=”Y” list=”3846012″ name_field=”name” name_default=”Enter your first name” name_order=”1″ name_required=”Y” opm_packages=””][optin_box_field name=”headline”]Learn more with our exclusive FREE video series:[/optin_box_field][optin_box_field name=”paragraph”]PHA+UGx1cyB5b3UnbGwgYmUgYWRkZWQgdG8gbXk8c3Ryb25nPiBGUkVFPC9zdHJvbmc+IENyZWF0aXZlIFRpcHMgRS1sZXR0ZXIuIEZyb20gdGltZSB0byB0aW1lIHlvdSdsbCBnZXQgZXhjbHVzaXZlIHByb2plY3RzLCB2aWRlb3MgJmFtcDsgdGhlIDEyIERheXMgb2YgQ2hyaXN0bWFzIHNlcmllcy48L3A+Cg==[/optin_box_field][optin_box_field name=”privacy”][/optin_box_field][optin_box_field name=”top_color”]undefined[/optin_box_field][optin_box_button type=”0″ button_below=”Y”]Get Immediate Access![/optin_box_button] [/optin_box]


Showcasing the Negative

Negative die cuts

When you think Die Cuts, usually you would think about something laying on top of your project, or a paper piecing. But do you ever think in reverse? Today is all about showcasing what’s left over, once you use your die cuts to cut out your images – the negative die cut images. Over at Happy Little Stampers this month, the theme is Die Cuts. Now, normally I’d whip up something way cool piecing together some cool images that pop off your card. I thought it would be fun instead to pop UP my card and show a shadowed negative of the image. Best part – I still have the positive images cut out by my steel dies! That’s for another project….oh wait – I already created it HERE.

Happy Little Stampers Die Cut Challenge

Before I get into the nitty gritty of how easy it is to create this very cool card – be sure to welcome our Guest Designer for this month – Christine.

For this month’s project, I paired up with a rocking HLS sentiment from Everyday Sentiments and a few sparkling clear sequins – I have a great card that’s not only quick – serves double duty – not bad! Here’s how you can create your own:

using negative die cuts

How to Use Negative Die Cuts

  • Emboss your greeting in black first in the lower right corner of your card front – 3 13/16 x 5 1/16″. I wanted something big and bold to balance our my snowflake sky, so I chose Everyday Sentiments by HLS.
  • Arrange your snowflake dies – I used Bring on the Snowflakes by CAS-ual Fridays – , and cut out with your Die Cutting Machine. I got mine in the Holiday Collection from Stamp of Approval, but they’ll be released individually later this year.
  • Remove the dies cuts, leaving only the negative images in your card front

backgrounds for negative die cuts

  • On a second slightly smaller piece – 3 11/16 x 4 15/16″ , sponge your desired colors or use a fun colored piece of card stock. You can do anything here, washi tape, watercolors, solids, patterned papers – it’s literally endless possibilities. I sponged an Ombre look starting with Broken China-Salty Ocean-Faded Jeans-Seedless Preserves and ending in Dusty Concord.
  • Adhere your colored background piece to a black piece of card stock cut slightly larger than your card front – mine is 1/16th larger  – 4 x 5 1/4″

easy christmas cards

  • Now for the fun part – pop up your card front using fun foam, foam tape and dimensionals – I used all three with two sizes of smaller dots. Every nook and cranny was popped up – so nothing droops after shipping. You really want your card to have that full shadow effect.
  • Attach your black card stock to a folded A2 sized card (4 1/4 x 5 1/2″)
  • Add some sparkling clear sequins  by pretty pink posh – and you’re all set!

happy little stampers christmas challenge

And if you used colored card stock or sparkly paper, think of how easy and mass producible this card is!! Now it’s your turn – whip out those die cuts and get in on the action. It’s Happy Little Stampers birthday, so don’t miss out on some great prizes! Can’t wait to see what you create!

Now go get those fingers inky –

Signature

[optin_box style=”2″ alignment=”center” email_field=”email” email_default=”Enter your email address” email_order=”2″ integration_type=”aweber” double_optin=”Y” list=”3846012″ name_field=”name” name_default=”Enter your first name” name_order=”1″ name_required=”Y” opm_packages=””][optin_box_field name=”headline”]Learn more with our exclusive FREE video series:[/optin_box_field][optin_box_field name=”paragraph”]PHA+UGx1cyB5b3UnbGwgYmUgYWRkZWQgdG8gbXkgRlJFRSBDcmVhdGl2ZSBUaXBzIEUtbGV0dGVyIHdoZXJlIEkgc2hhcmUgZXhjbHVzaXZlIHByb2plY3RzLCB2aWRlb3MgJmFtcDsgdGhlIDEyIERheXMgb2YgQ2hyaXN0bWFzPC9wPgo=[/optin_box_field][optin_box_field name=”privacy”][/optin_box_field][optin_box_field name=”top_color”]undefined[/optin_box_field][optin_box_button type=”0″ button_below=”Y”]Get access now![/optin_box_button] [/optin_box]