Not so tropical Birthday

Today is Michael’s birthday!  He usually wants to be out of the country on a beach somewhere (that way the number doesn’t change in his mind…lol), but he’s stuck here in the Black Forest, Germany with me…not a bad place to be!  So this was as close as I could get him today.  I re-created one of my favorite cards from before.  Thought I’d share it with you.  Enjoy!

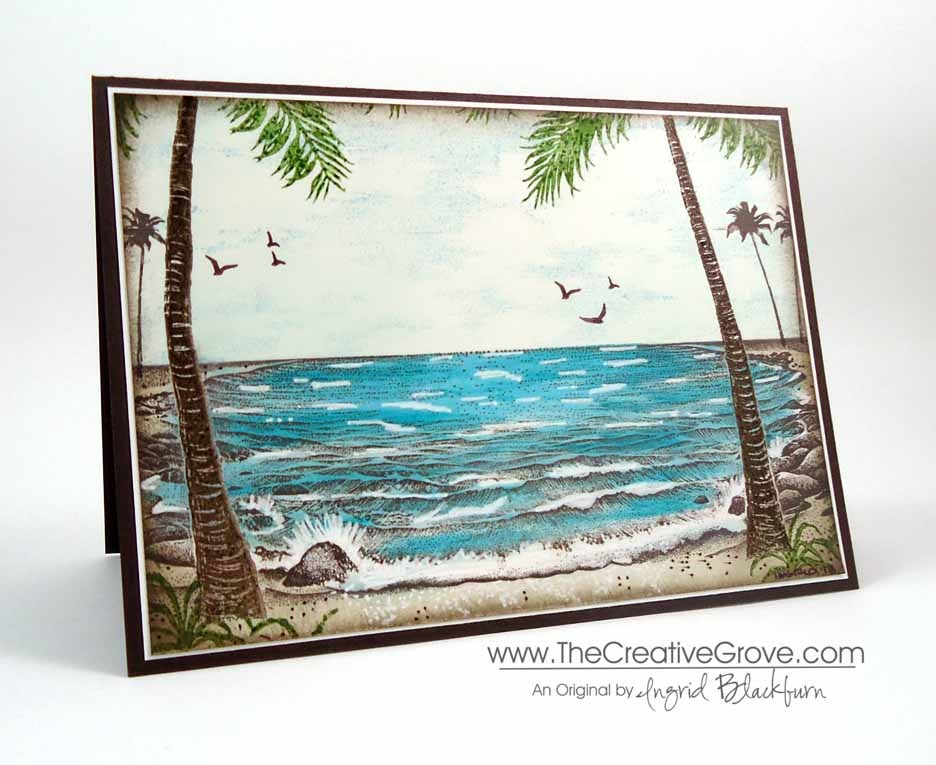
We’re headed out for some good ‘ol German fun in the forest.  I hope you all have a great day too – and GO Germany in the World Cup today! Smile

Signature-Blog

1+2=3 Stamp Series #001

Do you remember what it’s like to just start a hobby out?  You didn’t have a lot of stamps or colors did you?  I thought it might be fun to think like a first day stamper.  Back when I had a REALLY limited number of supplies – two stamp sets, a few ink pads, one package of matching colors and only my creativity to guide me.  Which let’s be honest – my creativity back then was bare minimal!

So I thought it would be fun to an ongoing series called 1+2=3 or, One stamp set + two ink pads = three looks. 

Now the official rules are going to be the following:

  • Primarily use the images from one stamp set.  Use a greeting from another set if not supplied in the set.
  • You can use a background stamp in your cards – but only one amongst the three projects. (I gave myself this leeway, since that’s what I started with!)
  • You may only use two colors of ink plus a neutral or versamark.
  • Your card stock colors must include either of your the two colors plus white, vanilla or black.
  • You can use basic accessories such as paper piercing, sponges, embossing, pearls, rhinestones, dimensionals and ribbon to accessorize your cards.

Sounds pretty easy, right?  We’ll see about that!  Here goes – I kept project one pretty simple – a one layer card.  Today I’m going to post the first project and reveal the next two over the next few days.  And of course if you’re subscribed to the Creative Tips list – you’ll be sent an extra project tomorrow (June 19th) – so be sure to sign up today!  Hope you enjoy them!

1 – Stamp – For this series I thought I’d choose a stamp set that has been available for over 20 years and is still on the market…the ever popular Stampin’ Up! set Lovely as A Tree.  This works with any large tree stamp.  Since there aren’t any greeting stamps in this set, I used one from the retired set Perfect Words.

2 – Colors – Two colors were used in all three projects: Sahara Sand and Soft Suede by Stampin Up.  For the cardstock in later projects, I only used Soft Suede along with Whisper White.

3 – Projects – while a few are a bit similar, they are vastly different.  Enjoy!

Series #001 – Project 1: One Sheet Mystical Forest:

DSC01414

  • Fold a piece of 4 1/2” x 11” piece of Whisper White card stock in half.
  • Mask off 3/4” around the border.  To see a great step by step video tutorial on how to do this, join the Creative Tips List for free – your first video will show this exact technique.  To see it – sign up to the right!

DSC01440

  • Sponge Sahara Sand around the perimeter and then a smaller soft suede.
  • Mask off mountains to the left and right, sponging in Sahara Sand.
  • Mask off a Moon.

DSC01445


  • Stamp several images of the main Pine Tree image in multi-generational Sahara Sand.  Stamp three images of alternating heights in Soft Suede in the front.
  • Add your greeting and remove your mask!

It’s a rather simple project – has a few steps, and I won’t lie – if you don’t mask it off properly, you can really mess it up…check out how you can turn two glaring mistakes that I made and learn how to avoid them!  Check out the second project here!

Signature-Blog

[optin_box style=”14″ alignment=”center” action=”http://www.aweber.com/scripts/addlead.pl” disable_name=”Y” method=”post” email_field=”email” email_default=”Enter your email address” email_order=”1″ integration_type=”custom” double_optin=”Y” name_default=”Enter your first name”][optin_box_hidden][/optin_box_hidden][optin_box_code]

[/optin_box_code][optin_box_field name=”headline”]If you enjoyed this tutorial…[/optin_box_field][optin_box_field name=”paragraph”]PHA+PHNwYW4gc3R5bGU9ImNvbG9yOiAjNjQ2MzVlOyI+TGV04oCZcyBzdGF5IGluIHRvdWNoISBNeSBvY2Nhc2lvbmFswqA8L3NwYW4+PHNwYW4gc3R5bGU9ImNvbG9yOiAjNjY2Njk5OyI+PHN0cm9uZz48ZW0+ZXhjbHVzaXZlPC9lbT48L3N0cm9uZz7CoDwvc3Bhbj48c3BhbiBzdHlsZT0iY29sb3I6ICM2NDYzNWU7Ij5DcmVhdGl2ZSBUaXBzIGUtbGV0dGVyIHdpbGwgdGVhY2ggeW91IHRvIG1ha2UgcHJvamVjdHMgdGhhdCB5b3UgbG92ZeKApjwvc3Bhbj48L3A+Cg==[/optin_box_field][optin_box_field name=”privacy”][/optin_box_field][optin_box_field name=”top_color”]undefined[/optin_box_field][optin_box_button type=”0″ button_below=”Y”]Send me exclusive tips![/optin_box_button] [/optin_box]


DSC01417

O Holy Night Masterpiece

O Holy Night 001 004

Have you ever set out to create a simple card and end up creating a little piece of art?  That’s how I feel about this project.  My goal was to just create a clean and simple card.  If you look a bit closer, you’ll see some cool techniques come together to make a little piece of artwork.  These are the kind of techniques you’ll learn in the creative cards classes taught in the online classroom.  After all, not everything can just be cut, assemble and create, right?

Creative Tips –

  • The O Holy Night stamps together are striking.  I love the mixture of fonts to create this great image.  Be careful not to mix it with too much in the background, as it will take away from the cool font look.O Holy Night 001 011
  • Night of Navy is always a great choice for a striking card.  Here you will pair it with Elegant Eggplant to create your background along with gold embossing powder.
  • The background is sponged lightly using the two colors onto a piece of Crumb Cake.  You will then use a sponge to randomly add some versamark ink and then Gold Embossing powder.  Don’t overdo the gold.  I blew and tapped off some.  It’s meant to be an added look, not overtake it.O Holy Night 001 001O Holy Night 001 002
  • The piece I made was a bit too wide, so I cut off a strip 1/2” wide, and separated it for some interest to the background.  This broke up the dominant look and allows you to focus on the stamped image instead.  Don’t be afraid to try separating your backgrounds if it’s not working for you.
  • The Night of Navy front needed a little bit, so you can add a little interest with the Festive Flurry set as pictured here, or try Gorgeous Grunge.
  • You’ll want to matte your stamped image, Night of Navy was the only real choice here, but it got lost on the Night of Navy card front, and white would have been too much.  So, I matted it onto a piece of our Vellum cardstock and tore the edge for a little texture.  The outcome was stunning. O Holy Night 001 010O Holy Night 001 013
  • To give it a little more drama, pop it up on Stamping Dimensionals along with the card front.
  • Using card stock like Crumb Cake or Brown Sugar along with rich colors like Night of Navy, sometimes look like gold as here. O Holy Night 001 005

Free Exclusive Content

Are you on the Creative Tips list?  If so, then you are getting exclusive projects, videos, tool tips, specials, discounts and things like the 12 weeks of Christmas.  So much more happens here at The Creative Grove, but not everything is on the blog.  Don’t miss out, sign up today! Click Here to get Creative Tips sent directly to you.

Brayer 102 – Advanced Creative Scenery Pre-Release savings!

Do you love to create Creative Scenery?  Then don’t miss out on the Advanced Techniques class.  Brayer 101 was a huge online hit, and we’re continuing the series by taking these creative pieces of artwork to a whole other level.  The class is slated to go live Thursday October 24th, but you can save during the Pre-release!  Check it out here.  And if you missed the 101 class, get caught up in the 101/102 bundle!  Check out the bundle here.

Signature Snowflake 001

Shop in the Online Store 24/7 – click here

O Holy Night 001 007

Stamps – O Holy Night, Festive Flurry Ink – Night of Navy, Eggplant Envy, Versamark Paper – Crumb Cake, Night of Navy, Vellum Cardstock Cool Tools – Gold Embossing Powder, Heat Tool, Sponges Finishing Touch – Stamping Dimensionals

Back home and a Mojo Monday card for you!

Christmas Messages 002 Main R 2

Welcome home – Oh, that’s me!  In case you’ve been wondering where I’ve been, I’ve spent the last 2 weeks on the road in New York.  We had a fun family wedding, spent quality time with several members of our family in upstate and Western NY, and even had fun in New Jersey too!  Of course, Michael and I had fun driving up and down the eastern coast!  No, seriously, Michael and I love getting on the road together.  We leave late at night and drive all through the night.  We can usually make it to NY in 17 hours, though we took a leisure trip this time.  We’re rather good in the car and love playing games, chatting and just seeing where the road takes us.  We love to hit Farm Stands, go to new places and visit friends or memorable places along the way if we have the time.  Thankfully both our businesses are mostly virtual and we have the freedom to do this – especially since we added 4 extra days while on the road!

After seeing the beginning of the color change all through the northeast, I thought I’d give you a fall-ish card for my Mojo Monday Challenge card today.  I actually made a killer Christmas version that looks nothing like this one, but thought I’d save it for one of my 12 weeks of Christmas cards instead – so if you’re on the Creative Tips list – you’ll see that this week – it’s so cool, that I think I’m going to use it as one of my own Christmas cards this year!  If you’d like to get my 12 weeks of Christmas projects free and more click here to subscribe today.  So far you’ve only missed one week!

Supplies –

  • Stamps – Christmas Wishes, Gorgeous Grunge
  • Ink – Chocolate Chip, Crumb Cake
  • Paper – Chocolate Chip, Tangerine Tango, Sweater Weather Designer Series Paper, Very Vanilla
  • Tools – Circle Collection Framelits, 1 1/4” Square Punch, Bone Folder
  • Finishing Touches – Chocolate Chip Grosgrain Ribbon (retired), Stamping Dimensionals

    Shop 24/7 in the Creative Store – Click Here!Christmas Messages 002 Main L

    Here is the Mojo Monday sketch and my fall version.  Enjoy the tips below!

Mojo314SketchChristmas Messages 002 Front

Creative Tips –

  • I wanted to use this great plaid from the Sweater Weather Designer Series Paper Collection, so the rest of the card kind of fell into place.
  • If you want to add a little something to brighten the card up – try the Gorgeous Grunge stamp set as I did here.  The lines (my all time favorite stamp) are stamped in Tangerine Tango and the splats are stamped in Crumb Cake stamped off to make it more of the background.Christmas Messages 002 Side
  • The greeting is from a Christmas set, but honestly – it works for Thanksgiving too!  Gotta love versatility, right?
  • I wanted a larger ribbon for the knot, so I broke out a retired spool – I miss this collection, try anything you have!
  • To make the Banner Flag, you will want to use a square punch or some paper snips.  To get the end to curl up a bit, lightly curl your DSP upward using your bone folder.  The trick is not to over-work it.  View my video on how to make banner flagsChristmas Messages 002 Height
  • To add a little interest, try popping up the card front and greeting with Stamping Dimensionals.


        I hope you all enjoyed this fun project!

    Signature Snowflake 001Christmas Messages 002 Angle

    Shop 24/7 in the Creative Store – Click Here!

    Gorgeous GrungeChristmas MessagesSweater Weather Designer Series Paper

    Evergreen Stamp Silhouette: Forest Evening Sky

    Stampin Up Evergreen Stamp Set (1)

    Have you used the Evergreen stamp set as a silhouette image yet?  The filler tree is the perfect stamp to create an Evergreen filled night sky.  Here you see a clean and simple one layer card that is quickly made, but looks great with the ease of color transition and forest underneath a starry sky. 

    One layer cards are not only cost effective, but their simplicity is quite striking.  I think you will find that the more you give one layer cards a try, the more you will make.  For me the key to a successful one layer card is lots of white space.  You want the eye to gravitate toward your focal point, not random images.  Stampin Up Evergreen Stamp Set (3)

    In this card, I was going for a forest feel underneath an early evening sky.  You know, just when the stars are starting to come out.  Can you hear the crickets?  I’d love to be in this place right now!  That’s the emotion I was going for with this simple but creative scenic card using the Evergreen stamp set.  So, now it’s your turn to give it a try!

    Supplies Needed –

    • Stamps – Evergreen (online only), Lots of Thanks
    • Ink – Night of Navy, Pear Pizzazz, Soft Sky, Marina Mist, Midnight Muse
    • Paper – Whisper White, Post-it Notes
    • Tools – Sponge, Signo White Gel Pen

    To learn how to make more creative scenery cards, be sure to check out the online Brayer Classes we have focused on this style of card.  Create amazing artistic works of art and master the techniques for those cards.  Click here to find out more information.

    Creative Tips –

    • First you will want to mask your upper and lower card areas.  Tip – I use my grid paper to line up my post it notes on the left and right to make sure I’m straight.
    • Next, start with the earth.  Here you see Pear Pizzazz as a light green color for the forest brush.  Stampin Up Evergreen Stamp Set (6)
    • When adding the color with a sponge you will want to start off your paper and lightly sponge it on in a circular motion.  This way you will have an even color rather than splotchy.  Don’t start directly on your project.  Use your grid paper or the post it note as a starting point.
    • Once you have a light coating of green, switch to soft sky.  You don’t need to worry too much about adding a lot of color to the top of your sky, as you will layer darker colors there, but have a little. 
    • Next, add a little Marina Mist.  Keep it at the top to the top half.  As the sun goes down in the sky, most of the light is at the horizon, leaving a darker sky up top.  That’s the effect you are going for here.Stampin Up Evergreen Stamp Set (5)
    • Lastly, add a little Midnight Muse ever so lightly to the uppermost part of the sky.  Be careful when bringing it down into the main portion of your sky, as it will overtake the lighter colors rather quickly and before you know it, your sky is all dark!
    • To get a solid evergreen silhouette image, you will want to stamp your Evergreen tree in Night of Navy – Stampin’ Up!’s darkest shade of blue.  Vary the height of the tree for a little contrast.
    • For a starry sky, use the Signo White Gel Pen to create different sized stars in the sky.  Group a few together and vary the height in your project.Stampin Up Evergreen Stamp Set (2)

    This project is a quick one, I think you’ll be amazed at how fast you can actually make it!  The end result is so beautiful.  Feel free to sign it like artwork too!  You created that sky.  Add a sentiment or leave it blank – it’s up to you.  I think you will love using this evergreen stamp set for a silhouette tree image, now it’s your turn!Stampin Up Evergreen Stamp Set (4)

    Signature Snowflake 001

    To shop 24/7 – click here!

    Taking a different view

    Tropical Lagoon 002 003

    For you today, I have a tweaked version of a great card.  It’s a completely different look – a more subdued, dare I say masculine look?  Today, I’m going to share with you how to take a great project and then improve upon it so that you get more from those great ideas that you have.

    I thought that you would enjoy seeing what I mean.  Here are both projects on top of each other.  Which one do you prefer?  I mean, they both are great, but yet evoke a different feel.  Be sure to tell me in the comment section which one you prefer!  I am rather curious…go do it now and then come back and read the rest!


    It’s funny, I love the sunset cards, but there’s something about the other one that mesmerizes me as well.  I can’t quite put my finger on it.  Here it is close up.  To see the other close up click here.

    The main difference between the two, other than the color, is that the foreground palm trees are embossed first to really resist the background and remain clean.  I just love that pop of Jungle Green.  The Cloud Space stamp was added in place of the sunset – that’s a FABULOUS stamp. Smile

    I made this card for a friend of my Dad’s who lost his wife to a long battle with cancer.  When I remember her, I think of how much she loved the beach and waters of the Mediterranean and Atlantic.  She would come back from vacations in Spain so brown it was unbelievable.  Laura was a real artist who painted the most amazing sceneries on canvas.  Of course by trade, she was a pharmacist, but I remember her as an artist.  Laura, this one’s is in memory of you. Smile

    Signature Snowflake 001

    To Shop 24/7 in the Creative Store – Click here!

    Stamp Sets – Stampscapes Stamps Ink – Marvy – Oriental Blue, Turquoise, Caribbean Blue, Jungle Green, Yellow, Brilliant Yellow; Adirondack Lights – Cloudy Blue, Aqua, Peach Bellini; Stampin’ Up! – Early Espresso, Crushed Curry, Tangerine Tango, Sahara Sand, Crisp Cantaloupe, Early Espresso Marker Paper –Glossy White, Early Espresso Tools – Colorbox Stylus, Brushtix Mixed Media Brushes Finishing Touch – Uni-ball Signo White Gel Pen

    Mojo Monday Gently Falling Thanks

    Gently Falling 001 004

    Do you ever just need a go to sketch?  Well this week’s Mojo Monday sketch is perfect for you then!  It’s simple, straightforward and would look awesome with Designer Series Paper or just card stock.  You really can’t go wrong. 

    Try out some bright color combinations, play with your favorite stamp sets, or just make it all one color.  Either way, you’ll have a striking card that you and the recipient will love.  Here’s the sketch and my interpretation:

                            Gently Falling 001 006Mojo310Sketch

    Creative Tips –

    • If you decide to focus on the Gently Falling stamp set like I did, you may want to keep your color palate in the season.  This is great for men or women, which is great – don’t you just love versatile cards?
    • To give the real sense of fall, rock and roll the filler image of this two step stamp set.  That way you can get that change of color look you’re striving for.  Here you see Crushed Curry, Gumball Green and Cherry Cobbler with Early Espresso as the lined image.Gently Falling 001 010
    • Follow that up with a fun embossing folder and your big shot for the background – here you see Woodgrain.  Why not – it’s a tree!
    • The Pearl Basic Jewels complete the card with the perfect finishing touch to highlight the banner.
    • Rather than keep it to Thanksgiving, you can choose any sentiment you’d like!  Here you see the Thank You from Lots of Thanks. Gently Falling 001 008
    • Tip – to make quick and simple banner flags, use punches – like the Hexagon Punch or Square Punches.  To see a quick video on how to do this, click here.
    • The card front is popped up on Stamping Dimensionals to compliment the banner and leaf popped up as well.Gently Falling 001 009
    • To extend the matte and give it a little somethin’ somethin’, add some paper piercing!  You can quickly take a project from cute, to wow by just adding some piercing.  And you’ve heard me say it before – it’s the most inexpensive way to embellish a card.  All you need is a one time purchase – Stampin’ Pierce Mat, Paper Piercing Tool, and templates like the Essentials Paper-Piercing Pack.Gently Falling 001 005

    Are you one of my VIP’s?

    If you love this card and creative tips, then be sure to sign up for my Creative Tips list!  You’ll get VIP project videos and projects, special list only sales and discounts, and stay on top of all the cool and great things not only available at Stampin’ Up!, but also here at The Creative Grove. Be in the know, first on the list!  I don’t like excess email or stuff I don’t want, so know that your email address is something sacred to me.  I would never abuse that trust!  Click here if You love creative tips and want to be one of my VIP’s!   Smile

      Signature Snowflake 001

    To Shop 24/7 in the Creative Store – Click here!

      Gently Falling 001 007

    Dog Days of Summer: Tropical Lagoon

    Stampscapes Tropical Lagoon 9.5.13  (12)_thumb[2]

    Is your creative process for a project always perfect?  I know mine sometimes is not.  Yesterday I worked on a project for my friend Trish in Australia.  What you see above is the final result.  Here’s the creative process it took me this time around.  I hope this helps some of you!

    Stampscapes-Tropical-Lagoon-9.5.13--[3]

    This time, I began with the following project. My  lagoon stamp was larger than my intended project size, so I wanted to only use part of it with still having room for a palm tree in the forefront for perspective.  It didn’t work out as I intended. 

    Stampscapes Tropical Lagoon 1 CU_thumb[3]

    My original project is at the bottom.  The grass didn’t blend with the palm tree well enough, I didn’t care for the extra grass and so much real estate at the bottom.  By accident I swiped red right over my sun, the card stock had divot’s  at the top that wouldn’t take in any ink, and the bungalows were stamped strangely.  Now, you may be saying I’m being nit-picky, but that’s a whole lot of things wrong for me, so I created a plan to fix my scene.

    I began by taking a piece of scrap paper and stamping my scene on a larger card – 3 3/4” x 9” instead.  Here you see my beginning project, my test scene and the final project all next to each other.  I think you’ll agree with me – it’s MUCH better!Stampscapes Tropical Lagoon 9.5.13  (3)_thumb[7]

    I used several colors of Marvy, Adirondack Lights, and Stampin’ Up! inks to get my desired look with a Colorbox Stylus Sponge Tool  Now I’m going to have to make one for myself!  Stampscapes Tropical Lagoon 9.5.13  (16)_thumb[2]

    Creative Tips –

    • I stamped the entire scene in Early Espresso rather than Black.
    • I stamped the lagoon and then masked the sky.  I colored in my water – Aqua Adirondack Lights, Caribbean and Turquoise Blue.  I kept the color in streaks so to leave a little light in it.
    • For the sand, I used Sahara Sand Stampin’ Up! ink.  I then masked the water and my sun.  The sky is made of Yellow, Brilliant Yellow, Crushed Curry, Peach Bellini, Crisp Cantaloupe, Tangerine Tango, Cloudy Blue and Oriental Blue.Stampscapes Tropical Lagoon 9.5.13  (18)_thumb[3]
    • The huts were stamped after the horizon masks were removed and right on the horizon line.  The roofs were colored in using a Brushtix Sponge Tip applicator and Jungle Green with Early Espresso Marker accents.
    • You can extend the dots that make up the surrounding scene with the fine tip of the Early Espresso Marker.
    • The reeds and tropical plant are stamped with Jungle Green.  It was necessary to mask the tree with a little bit from a paper towel.Stampscapes Tropical Lagoon 9.5.13  (17)_thumb[3]
    • Three of the birds were colored with the Early Espresso Marker and stamped in the sky.
    • The Palms extend off the page and I stamped the lower parts of the leaves in Jungle Green.
    • To brighten up the scene and give it some life, you can use a Uniball Signo White Gel Pen.  You may want to go over some of the natural waves from the stamp if you’ve gotten color on them like I did.  Add some dots in the sand for the foam left behind the wave that rolls onto the shore.
    • Highlight the trees, huts and birds, keeping in mind where you light source is coming from.Stampscapes Tropical Lagoon 9.5.13  (10)_thumb[3]Stampscapes Tropical Lagoon 9.5.13  (14)_thumb[3]
    • Here you see the difference between sponging the edge of the scene in Early Espresso and leaving the canvas as is.Stampscapes Tropical Lagoon 9.5.13  (13)_thumb[2]

    I love the end result – it’s by far the best Stampscapes tropical scene I’ve done.  In the end, I used 9 various stamps to create this scenery.  I hope you love it too!  It’s a fitting end to the summer.

    Online Brayer Class

    Do you want to learn how to make creative scenery cards?  Try our Brayer 101 – Introduction to Creative Scenery online class.  You’ll learn how to master this technique using a brayer to create unbelievable scenes that will leave you feeling like an artist.  Find out more here.

    Signature-Snowflake-001_thumb1

    To Shop 24/7 in the Creative Store – Click here!

    Stamp Sets – Stampscapes Stamps Ink – Marvy – Oriental Blue, Turquoise, Caribbean Blue, Jungle Green, Yellow, Brilliant Yellow; Adirondack Lights – Cloudy Blue, Aqua, Peach Bellini; Stampin’ Up! – Early Espresso, Crushed Curry, Tangerine Tango, Sahara Sand, Crisp Cantaloupe, Early Espresso Marker Paper –Glossy White, Early Espresso Tools – Colorbox Stylus, Brushtix Mixed Media Brushes Finishing Touch – Uni-ball Signo White Gel Pen