Moonlit Meadow

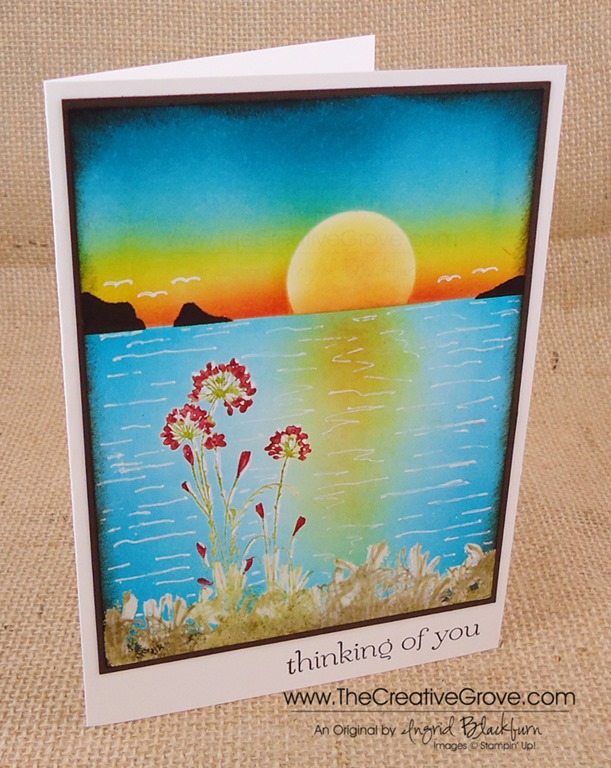
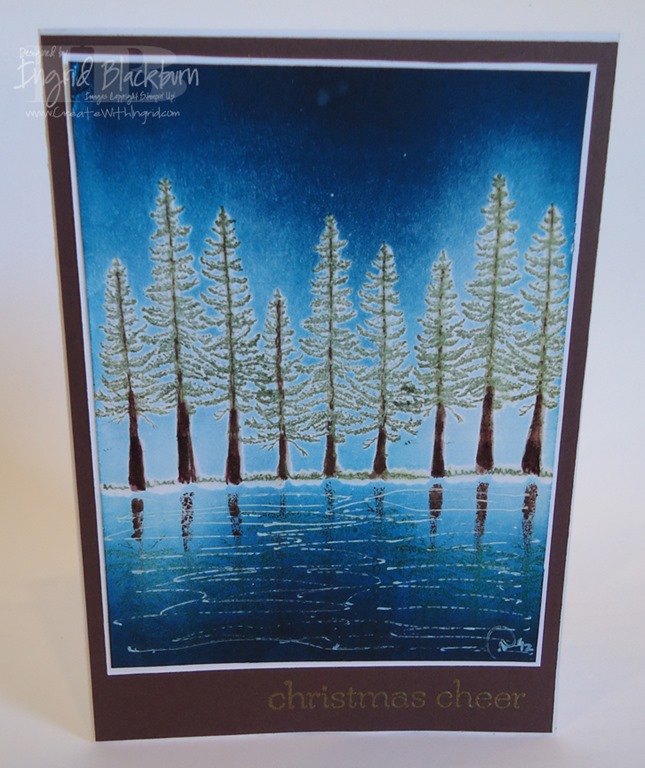
This past week you’ve seen several projects made with the classic stamp set Lovely as a Tree by Stampin’ Up!.  And if you are on the Creative Tips List, you even got an exclusive project too!  I thought I’d continue for one more just to round out the week.  This project came about because I wanted to use the color Perfect Plum in a creative scene.  So, the obvious choice was a moonlit evening.  Enjoy the tips and I hope you enjoyed this week of Lovely as a Tree projects here at The Creative Grove!

Miss the 1+2=3 series featuring Lovely as a Tree this week?  See Part 1 here!

DSC01424

Creative Tips –

  • Start off by embossing your scene in SU Early Espresso powder.
  • Use a mask for the ground made out of copy paper, and a moon post it punched with a 1” circle punch.

DSC01437

  • Brayer or sponge your sky using various shades of blue.  I used Adirondack Lights Cloud Blue, Stampin’ Up! Soft Sky, Marvy Salvia Blue, SU Island Indigo and SU Not Quite Navy.
  • Keep your horizon light, not white, but definitely lighter in color.  It helps to give that moonlit glow.

DSC01438

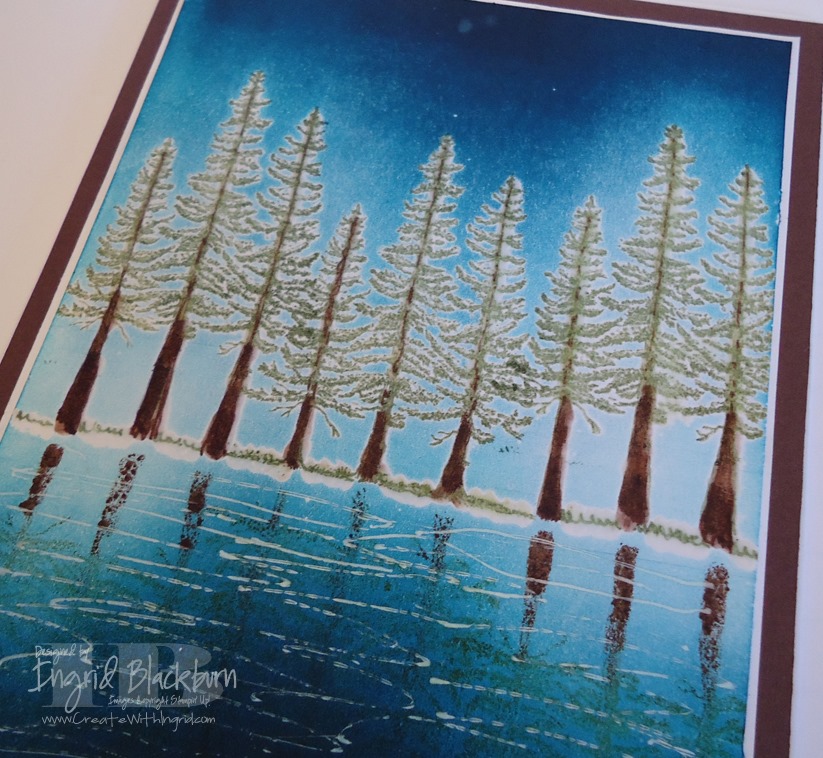
  • Brayer and/or Sponge your ground.  You’ll want to come from the sides to keep the area where the moon is reflecting light.  I used Adirondack Cloud Blue, SU Smoky Slate and SU Perfect plum.

I had some issues, and went a little too dark on the bottom left corner.  I tried to remove some which didn’t work and ended up pulling up some of my paper.  It’s just been a week of mishaps on all my projects!  So, I did something I don’t usually do, I added a few scraps to over it up.  To get the perfect angle, you’ll want to stack your pieces and cut them together.  The pearls finished the strips, and the banner greeting was the perfect final touch.  You know, it didn’t turn out that bad!

DSC01428

I hope you’ve enjoyed unofficial Lovely as a Tree week!  Have fun stamping this weekend. Smile

Signature-Blog

[optin_box style=”14″ alignment=”center” action=”http://www.aweber.com/scripts/addlead.pl” disable_name=”Y” method=”post” email_field=”email” email_default=”Enter your email address” email_order=”1″ integration_type=”custom” double_optin=”Y” name_default=”Enter your first name”][optin_box_hidden][/optin_box_hidden][optin_box_code]

[/optin_box_code][optin_box_field name=”headline”]If you enjoyed this tutorial…[/optin_box_field][optin_box_field name=”paragraph”]PHA+PHNwYW4gc3R5bGU9ImNvbG9yOiAjNjQ2MzVlOyI+TGV04oCZcyBzdGF5IGluIHRvdWNoISBNeSBvY2Nhc2lvbmFswqA8L3NwYW4+PHNwYW4gc3R5bGU9ImNvbG9yOiAjNjY2Njk5OyI+PHN0cm9uZz48ZW0+ZXhjbHVzaXZlPC9lbT48L3N0cm9uZz7CoDwvc3Bhbj48c3BhbiBzdHlsZT0iY29sb3I6ICM2NDYzNWU7Ij5DcmVhdGl2ZSBUaXBzIGUtbGV0dGVyIHdpbGwgdGVhY2ggeW91IHRvIG1ha2UgcHJvamVjdHMgdGhhdCB5b3UgbG92ZeKApjwvc3Bhbj48L3A+Cg==[/optin_box_field][optin_box_field name=”privacy”][/optin_box_field][optin_box_field name=”top_color”]undefined[/optin_box_field][optin_box_button type=”0″ button_below=”Y”]Send me exclusive tips![/optin_box_button] [/optin_box]

Warmth and Wonder: Just out of the woods

Warmth & Wonder Christmas Brayer Card 008

Today, I wanted to make a simple Creative Scene using advanced Brayer techniques and the Holiday Hostess Set Warmth and Wonder.  I have to confess, I slept in today.  Usually I start Mojo Monday at 5 am, that’s what time the sketch goes up!  So as I began to wake up and saw the sketch, I knew this would take me a while.  I’ve been dying to make this card, and today’s sketch was perfect for it!

Many of you have wondered how to make amazing scenes like this.  They look so simple, but actually aren’t.  They involve many different techniques and steps, but every person can make this card – regardless of your stamping ability.  In our classroom, we have a few Brayer classes that teach you step by step with precise videos to help bring the inner artist out in each of you.  The advanced class is in pre-release, save $10 until 10/24 here.  Similar Brayer Cards:

      Evergreen 003 005Plant Hope 002 Side

I needed a custom size card and envelope for this card.  I didn’t want the creative scene to be too small.  So I started out by deciding how big my scene should be and built my card around that.  With the Envelope Punch Board I can make any size envelope I need, so I didn’t have to worry about that!  What a stress relief!  Click here for a quick video on how to make a custom sized envelope.  Here’s the Mojo Monday sketch and my project.

            Warmth & Wonder Christmas Brayer Card 011Mojo316Sketch

Creative Tips –

  • Create the scene using Early Espresso, Always Artichoke, Soft Sky and Marina Mist, embossing powders, masks, a brayer and some sponges.  You will want to pop it up on dimensionals to help set it apart from the rest of the card.Warmth & Wonder Christmas Brayer Card 013
  • Sponging the various pieces of the card tied it together.  Sponging the creative scene draws the reader into it.
  • The background was sanded using the Stampin’ Sanding System in a random fashion. 
  • The circle was cut out with the Circle Collections Framelits – it’s the 3rd largest.Warmth & Wonder Christmas Brayer Card 014
  • To get the diagonal stripe on the vellum, use the Stylish Stripes Embossing Folder.
  • The ribbon is Soft Sky 1/2” Seam Binding Ribbon Warmth & Wonder Christmas Brayer Card 020
  • The little banner flags are made with paper from the Winter Frost Designer Series Paper Stack and the hexagon punch.  View a video to see how to make banner flags here
  • It was hard to figure out how to incorporate a greeting.  You don’t want to take away from the scene too much, so a simple banner with a greeting from this very set brought out to the circle worked well.Warmth & Wonder Christmas Brayer Card 007
  • Here is the card height so you can see the height of the various elements.
    Warmth & Wonder Christmas Brayer Card 010
    If you’d like to learn how to use your brayer along with many other tools to create little works of art like this one, check out all the classes we have.  We even have a bundle here at a huge savings!
    Have a creative day!
    Signature Snowflake 001

Shop 24/7 in the Creative Online Store – click here

Stampscapes Creative Scene

Stampscapes 001 001

Today is my brother’s birthday, and I wanted to make him something special.  Matt and I love the mountains, we spent most of our down time in the summers in the outdoors together.  So, for him today I broke out my Stampscapes scene building stamps and created this lakeside evening scene.  Stampscapes stamps can be used to build scenes with seemless blending images. 

Creative Tips –

  • I stamped out my scene first layering several lakeside tree and rock stamps. 
  • To keep the scene matte in nature, I used our Ultrasmooth White cardstock.
  • My first two I actually colored over the trees with my Always Artichoke and Garden Green markers, but I didn’t like the result.  The rest of the scene, I continued to use my Basic Black ink pad.  Stampscapes 001 003
  • For a little focal point at the bottom edge, I stamped the boulders at various angles and a few of the trees on the edge.  I really needed a bigger tree, but didn’t have one.  I wouldn’t use the stamp I used in this one for that again – it’s too small.
  • I added a few of the small reeds and used the grass filler for some texture at the bottom. 
  • Next I filled in the empty space using my small water texture stamp.  I think I went a bit overboard, but it still works.  Remember, when you want to add one more – stop!
  • Once the scene was built I could start coloring.  I used a Colorbox stylus to apply my Stampin’ Up! Classic Inks.
  • I began layering a base of Soft Sky in the sky and near the rocks in the water.  Next I used some Pool Party in the lake followed by Tempting Turquoise.
  • For a little added color I added Baja Breeze and then Marina Mist to the both the lake and the sky.  My water was pretty much how I wanted it so I moved on to the sky.  Stampscapes 001 006
  • I tried to keep a few spots off the horizon going upward more white in nature for some contrast.
  • To brighten the scene up I added some Pacific Point across and in the middle of the night sky followed by some Not Quite Navy.
    • I wanted to have some shadows in the water, so I used the side of the stylus and some Not Quite Navy to the edge of the boulders and the edge of the card. 
    • The boulders were filled in with Basic Grey and some Early Espresso was added to the edge of the center bottom for a little earth.
    • Midnight Muse gave a finishing touch around the perimeter of the card followed by Basic Grey.
    • I stamped the cloud space in Midnight Muse once the card had been completed.Stampscapes 001 005
    • For some highlighting and detailing, I used a Signo White Gel Pen.  I went over the edges in the water along the rocks after with a paper towel to dull the look a little.
    • To help pop the card, I matted it on a 1/16” border of Whisper White and then on a larger piece of Basic Black
    • The greeting uses the Four You stamp set.  I used a embossing buddy to ensure that I would not have little silver straggler powder on the Basic Black cardstock before embossing the greeting in Silver Embossing Powder.

I love the result.  The Stampin’ Up! inks give just the right depth of color.  Next, I’m going to try some brayering with these scenes.  I can’t wait!Stampscapes 001 002

    Learn a new technique in the Online Brayer Class

    This class is still available at the introductory price – it’s going up next week!  Creative Scenery classes using a brayer have by far been my biggest hit with stampers.  The Brayer has stumped many crafters over the years, well actually more.  Learn how to create gorgeous gradual transitions with 100+ minutes of step by step detailed video instruction teaching you how to master this technique.  The end result – You will feel like an artist.  Best of all, you will look at your stamps in a whole new way, and try things you never would have thought to do before.  Find out more here

      Signature-Snowflake-001_thumb1

    To Shop 24/7 in the Creative Store – Click here!

    Stampscapes 001 004

    To view the details or see close ups of any products used in the above project, just click on the green link to view it in my store 24/7.

    Stamp Sets – Four You (130538c, 130535w), Stampscapes Stamps Ink – Stampin’ Write Markers –Always Artichoke, Garden Green, Classic Ink Pads – Basic Black, Soft Sky, Pool Party, Tempting Turquoise, Marina Mist, Pacific Point, Midnight Muse, Early Espresso, Basic Gray, Retired – Not Quite Navy, Baja Breeze Paper –Whisper White, Basic Black, Versamark Tools – Colorbox Stylus Finishing Touch – Silver Embossing Powder, Signo White Gel Pen

Beautifully Baroque Wedding Card

Beautifully Baroque Wedding Card 002 Main L

I needed an elegant wedding card this week for a family member.  The new Beautifully Baroque Embossing Folder was just perfect for such an occasion.  Paired with our rich Elegant Eggplant – the bride’s color, and our gorgeous Shimmery White card stock, this card definitely hits the mark. 

Creative Tips –

  • I created a beautiful shimmery Baroque paper using the Bisque Pottery Technique and the Illuminate Glimmer Watermark Ink Pad.Beautifully Baroque Wedding Card 002 CU
  • Use the brayer to color the top portion of your Embossing Folder with the Illuminate Pad, place your Elegant Eggplant cardstock on the lower piece of the folder, close and emboss.  The result is a gorgeous shimmery result that looks like velvet. 
  • To pair the rich embossed piece, I used our Shimmery White card stock.  It’s a wedding after all!
  • The greeting is embossed in Silver and I added a few Pearl Basic Jewels at the top for some added elegant finishing touches.Beautifully Baroque Wedding Card 002 Bow
  • I normally don’t do bows – they’re big and bulky, but with this being a wedding card, my go to knot isn’t going to cut it – don’t think I didn’t try…lol!  It would be cute, no – tying the knot?  Michael would have questioned it, so I went with the bow.  To get it exactly where I wanted it, I attached a piece of Ribbon first, anchored my cardstock onto the card and then used a separate piece to tie the knot.  You can also completely tie it separately and attach it with a Glue Dot.  That didn’t work for me this time, so I tied it.Beautifully Baroque Wedding Card 002 Side

The end result is a gorgeous rich textured card.  This card is 5”x7”, and since we’re sending a check along as we can’t attend this one, I wanted to send a special card.  I’m actually quite sad we can’t go to this one. Sad smile

Free DSP_edited-1

We’re celebrating this summer!!  This month – buy any three Designer Series Papers and get one free!  Take advantage of  this awesome special!

Signature Snowflake 001

To Shop 24/7 in the Creative Store – Click here!

Beautifully Baroque Wedding Card 002 Angle

To view the details or see close ups of any products used in the above project, just click on the green link to view it in my store 24/7.  

Stamp Sets – Sweet Essentials (126457c, 132085w) Ink – Illuminate Glimmer Watermark, Versamark Paper – Whisper White, Elegant Eggplant, Shimmery White Cool Tools – Beautifully Baroque TIEF, Brayer Finishing Touch – Pearl Basic Jewels, 5/8” Organza Ribbon 

Untitled-12Beautifully Baroque Embossing Folder TIEFBrayerIlluminate Ink Pad

Evergreen Snowy Hillside

Evergreen 002 Main

I was feeling in an Evergreen tree mood this morning.  I wanted to create a hilly snow scene since we’re having another scorching hot day here in Florida today.  Sometimes you just want to feel the cold!  I hope you like my little piece of mountain heaven.

Did you know that there are six holiday stamp sets that you won’t find in our physical catalog, but rather online only.  Be sure to check out stamps that are available only online too! Check out our exclusive online stamps here 

Creative Tips –

  • I stamped the large Evergreen solid image in various heights using a torn mask for my hillside.  First I stamped in Versamark ink and then I alternated between Wild Wasabi and Pear Pizazz. 
  • Once I had my skyline done I wanted two larger trees up close that I could decorate.  I tore another mask and stamped two Wild Wasabi Trees.Evergreen 002 Side
  • To give my trees a glossy look and protect them from the brayer, I embossed all my trees in Clear Embossing powder.
  • I used the skyline mask and brayered over my trees in Soft Sky and Marina Mist. 
  • To accentuate the ridge, I used the reverse mask to sponge a light edge for the snow. Evergreen 002 Trees
  • To create the snow drifts, I used the same mask, but alternated it’s direction.
  • For my tree decorations, I used Pearl Basic Jewels.Evergreen 002 Banner
  • I used my new Hexagon Punch for the perfect banner end with my greeting.  My greeting is also stamped in Versamark and Cherry Cobbler.  This way it really pops when embossed with Clear Embossing Powder.

It’s a simple little card, but cute.  I love the wintery feel of it and I could easily mass produce these for the holidays!

Signature Snowflake 001

To Shop 24/7 in the Creative Store – Click here!

Evergreen 002 Angle

Stamp Sets – Evergreen (127973), Greetings of the Season (128033) Paper – Whisper White (107330), Crumb Cake (120953) Ink – Wild Wasabi (126959), Pear Pizazz (131180), Soft Sky (131181), Marina Mist (126962), Versamark (102283) Cool Tools – New Heat Tool (129053), Clear Embossing Powder (109130), Brayer (102395) The Perfect Finish –Stampin’ Dimensionals (104430), Pearl Basic Jewels (119247)

Evergreen 127973LGreetings of the Season 128033L

Starry Brayered Sky

Plant Hope 002 Main

Have you ever had a card that you just wanted to re-do?  I made this card for my father for Christmas last year and I’ve been dying to re-do it for myself, but with a few changes.  I hope you like it’s evolution.

This card was originally my first creative scenery brayered creation after taking amazing classes on the art of brayering.  Since then, I’ve played…taught…played…taught…and played some more.  What I’ve learned is that your card is only as limited as your imagination, and with the help of pinterest and you tube – I’ve learned how to be quite imaginative!  

Plant Hope 002 Front

Creative Tips –

  • I wanted to change up the colors a bit and add a starry sky.  I kept my tree line in the center so that I could get enough sky and lake at the same time.
  • Once I added my tree images and embossed them in Always Artichoke and Chocolate Chip, I used a base of Soft Sky around the bottom of my trees.  I first masked off my lake shore line and added the light Soft Sky color.   My trees have better coverage this time around because I have the new ink pads.  Last year I was still using the canvas covered ones, not the awesome foam pads.  Notice the difference!Plant Hope 002 Trees
  • Then from the top I added Tempting Turquoise, Marina Mist and Midnight Muse.  I kept the Midnight Muse to the top 1 1/2 inches.
  • For that really dark night sky I added Elegant Eggplant.  Adding that over the blue gives just the right Indigo color for a night sky without making it too dark.Plant Hope 002 Side
  • For the lake I brayered Tempting Turquoise, island Indigo and just a hint of Midnight Muse at the very edge.  You can see this is much lighter than my original.
  • I added a little earth with my Chocolate Chip marker so the shore line wasn’t too thin.  This time when I embossed my shoreline I masked the bottom so that my VersaMarker wasn’t too over zealous.  That way I avoided all the white from the first one.
  • Plant Hope 002 Water
  • I added the reflection of the tree line in Midnight Muse so that it would look realistic versus the color as in the first one.
  • I kept my water simple – not over done this time.  I also added a little Midnight Muse for shadows in the movement.  I drew a little at the water line as well, which gave it a more realistic look.  Plant Hope 002 Stars
  • For stars, I used my white gel pen and made them different diameters.  I wanted to create a north star and another not quite as large, so I went over it with a qtip and some white pigment ink.

I love the way the night sky turned out.  This card is a huge improvement over the original.  I still love both, but the night sky adds some mystery and intrigue that the original one didn’t have.  Of course the colors are a bit different too, but both are lovely!  Which one do you love?

Signature Snowflake 001

To Shop 24/7 in the Creative Store – Click here!

Plant Hope 002 Angle

Stamp Sets – Plant Hope (retired), Sweet Essentials (128315) Paper – Whisper White (100730), Chocolate Chip (102128) Ink – New Card – Soft Sky, Tempting Turquoise, Marina Mist, Midnight Muse, Elegant Eggplant, Always Artichoke, Chocolate Chip Marker; Original Card – Midnight Muse (126860), Marina Mist (126962), Not Quite Navy (126971), Tempting Turquoise (126952), Versamark (102283), Early Espresso Stampin’ Write Marker (119680) Cool Tools –Brayer (102395), Stamp-a-Majig (101049), Heat Tool (129053), The Perfect Finish – Clear Embossing Powder (109130), Gold Embossing Powder (109129), Silver Embossing Powder

Wetland Reeds and Sunshine

Wetlands 004 Main

The sun shines 6.9 out of 7 days here in Florida – there’s  a reason it’s called sunny Florida.  So I wanted to do a sunny card that reflects the summer feel and what better than the reeds stamp from the Wetlands set.  When I decided to make this card I decided on a particular view – I thought what would a field of wheat look like if I was laying on the ground.  And here is the end result!Wetlands 004 Front

Creative Tips –

  • A one layer card would keep the simplicity of the scene in the forefront.  To create the white space, I masked off the top 1 1/4” and bottom 1” of my card.  I stamped my reed (wheat) in Versamark and then the Crushed Curry Classic Ink several times across my card.  Wetlands 004 CU
  • I embossed them with Clear Embossing Powder and used the Crushed Curry Stampin’ Write Marker and VersaMarker with Clear Embossing Powder to fill in the base of the image.
  • Soft Sky Classic Ink formed my base for the sky.  I used a brayer to apply a good base across from the top and base, and then again from the left and right.  Wetlands 004 Side
  • Using 1/2” on my brayer, I applied some Pacific Point to the top of my sky.
  • For a little more depth, I sponged a tiny bit of Midnight Muse at the very edge of the upper sky.
  • The greeting is stamped in Pacific Point using the new Four You set.

This card reminds me of the mid-west.  It just makes me happy and I see field of wheat and grass in the late summer.  I hope you like it too! 

Be sure to check back in the beginning of July for my online brayer classes and technique videos.  You won’t wan to miss these step by step how to videos that will help you to master this amazing and artistic technique. 


Signature-Snowflake-001_thumb1

To Shop 24/7 in the Creative Store – Click here!

Wetlands 004 Angle

Stamp Sets – Wetlands (126697c, 126695w), Four You (130538c, 130535w) Ink – Soft Sky (131181), Pacific Point (126951), Crushed Curry (131173), Midnight Muse (126860), Crushed Curry Stampin’ Write Marker (131264), Versamark (102283) Paper –Whisper White (100730) Cool Tools – Brayer(102395),Stampin’ Sponges (101610), Clear Embossing Powder (109130)

Untitled-12Four You

Wetlands One Layer Card

Wetlands 003 009

It’s been a while since I’ve made a One Layer Card and the Wetlands stamp set is the perfect set for this.  Here is a creative scenery that’s quick, easy, cost effective and just beautiful for anyone receiving this in the mail.  So get out your brayers and sponges today, and follow along with the tutorial.

Creative Tips –

  • I created a mask for the top and bottom using two sheets of printer paper.  I have to admit, my first try at this was foiled because I only used one sheet and the ink bled through to my project.  That’s one of those argh moments!Wetlands 003 Side
  • I brayered my sky and water with Soft Sky and then added a touch of Island Indigo at the top.  My Island Indigo got a little too strong about 1/2” in so I went over it with more Soft Sky to blend it out.  You can usually blend out mistakes with a little more ink in a lighter color.
  • I tossed my top mask (the blue one) and flipped my bottom mask around.  I sponged in my Sahara Sand in a circular motion to create my land.
  • For the horizon, I used a straight edge piece of printer paper and sponged on a little Island Indigo.Wetlands 003 CU
  • I stamped my birds in Early Espresso, any lighter color would not stand out enough.  I tried Basic Gray and even that wasn’t dark enough.  To test out my colors, I stamped my birds on my scrap brayered piece of printer paper that I tossed.
  • Keeping my bottom mask in place I stamped the reeds in Wild Wasabi.  I’ve tried this in lighter shades of green before and they too aren’t dark enough.
  • Brayer cards with scenery work great if you have a focal frame at the bottom of your card, as if you were standing right there looking out at your scene.Wetlands 003 Front
  • Once I had my reeds where I wanted them, I colored my reed stamp in using my Wild Wasabi marker, but only colored the grass portion.  I stamped this over my images to make them a bit fuller and bring my focal frame a little closer to the middle.
  • Normally I would use my white gel pen for some highlights, but I wanted to keep this card light and airy and uncomplicated – so I decided to leave it out.

I love this card – best part – it only cost 1/2 a sheet of Whisper White.  So if you’re stamping on a budget and have to make a lot of cards – next time try some one layer cards!

Learn how to master the techniques behind this card 

Two comprehensive classes leave you feeling like an artist ready to create any scene possible with brayers and sponges.  Detailed step by step video instruction, and much more.  Check it out in the classroom here: Find out more here

Signature-Snowflake-001_thumb1

Wetlands 003 Angle

Stamp Sets – Wetlands (126697c, 126695w) Ink – Soft Sky (131181), Island Indigo (126986), Sahara Sand (126976), Wild Wasabi (126959), Wild Wasabi Stampin’ Write Marker (131264) Paper –Whisper White (100730) Cool Tools – Brayer (102395),Stampin’ Sponges (101610)

Untitled-12