Quick and Easy Masked Tag

DSC01313

Sometimes you just need a really super quick thank you card.  Today I thought I’d share a fun, quick and super easy way to add a custom background to your project.  Create your own stencil from whatever background you’d like, here you see a tag made from the Chalk Talk Framelit set by Stampin’ Up!, use a sponge to mask a background and complete your card!

DSC01318

To see this project as part of the Creative Tips video series, be sure to join the Creative Tips list!

Creative Tips –

  • Create your mask out of copy paper.
  • Sponge lightly with Wild Honey Distress ink DSC01316
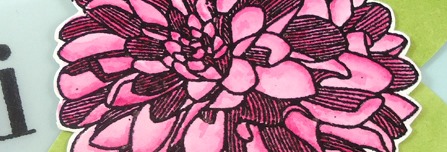
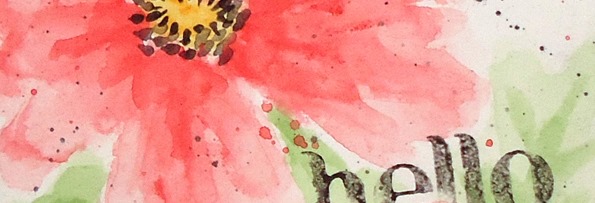
  • Stamp two step stamping images using Cherry Cobbler and Old Olive
  • Stamp greeting from Lots of Thanks by Stampin’ Up! in Memento Tuxedo Black
  • Spritz black ink from a dye based black marker and color spritzer by Ranger DSC01317
  • Pop up panel on dimensionals and add pearls.
  • Complete card – final dimension is 4 1/4 x 5 1/2 DSC01322

To see even more tips and exactly how I did all the steps above, subscribe to the Creative Tips list and stay in the know!


Are you interested in learning more?  Try one of our classes out.  Click here to find one that interests you!

Signature Snowflake 001

Quick Clean and Simple One Layer Card

DSC00051

Here’s a quick little card that I think you’ll love.  The best part, you can interchange the sentiment for whatever you need.  I just love this stamp – you inspire me, from the retired Stampin’ Up! stamp set Perfect Words.  I love the sentiment, but more so, the font.  I love cool clean fonts. 

DSC00060

Chances are, you probably already have a tree of some sort in your stash, be it an oak tree, evergreen or even palm tree!  Here I used Single Pine from the Nature Sheet I by Stampscapes.  I just love this tree!  I stamped my pine tree in Stampin Up Garden Green ink, and used an Early Espresso Stampin’ Write Marker for the trunk.  I stamped the sentiment in Early Espresso as well.

DSC00054

It’s a quick and simple card, yet it captivates you.  Don’t you just love One Layer Cards?!!  Now go make your own quick, simple masterpiece.

Signature Snowflake 001

Take and online class here

Get creative tips and videos sent directly to you, subscribe here for free!

One Layer Simplicity

Blooming In Kindness 01-2014 Main R

Ever just need a card in a pinch?  Well, that’s what today’s card is all about.  It’s a quick one layer card that not only looks elegant, but you can literally put together in under one minute!  Now that’s quick.

Blooming in Kindness 01-2014 Set

Just cut a piece of 8 1/2 x 11” piece of Whisper White cardstock in half, grab the Blooming in Kindness Stamp Set along with your Crisp Cantaloupe and Early Espresso Ink Pad and Marker and you’re all set.  Here’s the finished result.  I tried it with two different sayings in various spots.

Blooming in Kindness 01-2014 Main

Enjoy!

Signature Snowflake 001

To shop in 24/7 in the online store – click here

A Quick Thank You

Gently Falling 004 005

Sometimes you just need a super quick, but super cute card, right?  Well here it is.  Although I have it dressed up in Fall colors, This design would work with any color combination and any image.  So here are a few quick tips to not only save you time, but help you get those Thank You’s in the mail today.  I know I am sending one to all those who ordered this month!

Be sure to check back tomorrow to see a video on how I made this custom sized envelope.  Read the creative tips below to see why I chose a custom sized card.

Gently Falling 004 002

Supplies:

Creative Tips –

    • Stamp your leaves beginning with the Crushed Curry in the center.  Then stamp  the other two.
    • I chose a custom size because the leaves needed the full 5.25″ width and there was too much white at the top and bottom.  With the ease of making custom envelopes with the Envelope Punch Board, I thought, why not make a custom sized card?!
    • The Whisper White measures 5.25” x 3”.
    • The Crumb Cake matte measures 5 7/16” x 3 3/16”
    • The Cherry Cobbler measures 6” x 3.75” folded, 6″ x 7.5″ unfoldedGently Falling 004 004
    • Stamp your greeting in Early Espresso over the stamped images.
    • Wrap Linen Thread in a criss cross pattern on the front of the Whisper White and secure with adhesive.  Attach to the Crumb cake.Gently Falling 004 007
    • Add Pearl Basic Jewels to the front of your card.
    • Pop up the stamped piece on Stamping Dimensionals for a little character to the card.

Gently Falling 004 006

This card is quick, easy and it’s shape and size is perfect to send a note.  Because it is a custom size, you will need a custom envelope.  I’m going to show you exactly how and why I chose to make the size that I did.   So see you tomorrow!

Free Exclusive Content

Are you on the Creative Tips list?  If so, then you are getting exclusive projects, videos, tool tips, specials, discounts and things like the 12 weeks of Christmas.  So much more happens here at The Creative Grove, but not everything is on the blog.  If you aren’t getting all the extra perks, don’t miss out! Click Here to get Creative Tips sent directly to you.

Signature Snowflake 001

Click here to Shop 24/7 in my Online Store

Gently Falling 004 003

Merry Little Christmas Chalk Talk Card

Chalk Talk 004 Main R

Need a super quick, simple and fun Christmas card?  Well you’ve found it!  Today’s card takes a page from the Clean and Simple rule book.  This card is colorful, packs a punch and is quite trendy!  The Chalkboard look is fun, and the stamp set Merry Little Christmas really works for this look.  Read on for all the details!

What do you think?  It’s a fun little card, right?!!  Simple, but fun.  If you love this card and are looking for great ideas to say thanks, be sure to try out the newest Class of the Month in the classroom – Thanks.  It’s on Pre-sale for 22 more hours, then will go back up to the full price, so save 20% while you can!  Click here for class detailsChalk Talk 004 Side

Creative Tips –

  • Since the black chalk board look is so striking against the Crumb Cake, the color Cherry Cobbler is the perfect compliment to bring the card together. 
  • The cute papers from the Paper Stack Season of Style really helps this particular look.  Don’t you just love the candy cane feel to the paper?Chalk Talk 004 Angle
  • Something else this card looks like is a package.  That’s one of the great ways to use the Chalk Talk Framelits
  • To give a little interest to the great amount of white space, stamp off in Crumb Cake with the splats from Gorgeous Grunge three times, once up top and once in each corner.  Chalk Talk 004 Texture
  • Tip – don’t over stamp this, it will ruin the random effect – trust me on that!  It will look forced rather than just that little interest that you were going for.
  • Your Cherry Cobbler is 2’” x 4.25” and the Basic Black is 2.25” x 4.25”
  • Cut the tag out with the Chalk Talk Framelits and stamp the greeting from Merry Little Christmas in Whisper White Craft Ink.  Draw and outline around the edge with a White Watercolor Pencil.Chalk Talk 004 CU
  • To give it that chalk board look, drop an Embossing Buddy on the tag in several places to look like chalk residue.
  • Wrap your ribbon around and tie a flat knot.  Bring your tag through to make sure of the placement on the card. 
  • Attach the Basic Black to your Crumb Cake base.Chalk Talk 004 Tag
  • Tip – Use Snail on the left side of your tag and two dimensionals on the right.  This will help give it the randomly attached look.
  • Add Pearl Basic Jewels in multiple sizes for a punched up look, it looks great without them too!Chalk Talk 004 Main L

Just in – the Clearance Rack has been updated!  Be sure to check it out along with the one day sale specials. 

Signature Snowflake 001 

Supplies:

Back home and a Mojo Monday card for you!

Christmas Messages 002 Main R 2

Welcome home – Oh, that’s me!  In case you’ve been wondering where I’ve been, I’ve spent the last 2 weeks on the road in New York.  We had a fun family wedding, spent quality time with several members of our family in upstate and Western NY, and even had fun in New Jersey too!  Of course, Michael and I had fun driving up and down the eastern coast!  No, seriously, Michael and I love getting on the road together.  We leave late at night and drive all through the night.  We can usually make it to NY in 17 hours, though we took a leisure trip this time.  We’re rather good in the car and love playing games, chatting and just seeing where the road takes us.  We love to hit Farm Stands, go to new places and visit friends or memorable places along the way if we have the time.  Thankfully both our businesses are mostly virtual and we have the freedom to do this – especially since we added 4 extra days while on the road!

After seeing the beginning of the color change all through the northeast, I thought I’d give you a fall-ish card for my Mojo Monday Challenge card today.  I actually made a killer Christmas version that looks nothing like this one, but thought I’d save it for one of my 12 weeks of Christmas cards instead – so if you’re on the Creative Tips list – you’ll see that this week – it’s so cool, that I think I’m going to use it as one of my own Christmas cards this year!  If you’d like to get my 12 weeks of Christmas projects free and more click here to subscribe today.  So far you’ve only missed one week!

Supplies –

  • Stamps – Christmas Wishes, Gorgeous Grunge
  • Ink – Chocolate Chip, Crumb Cake
  • Paper – Chocolate Chip, Tangerine Tango, Sweater Weather Designer Series Paper, Very Vanilla
  • Tools – Circle Collection Framelits, 1 1/4” Square Punch, Bone Folder
  • Finishing Touches – Chocolate Chip Grosgrain Ribbon (retired), Stamping Dimensionals

    Shop 24/7 in the Creative Store – Click Here!Christmas Messages 002 Main L

    Here is the Mojo Monday sketch and my fall version.  Enjoy the tips below!

Mojo314SketchChristmas Messages 002 Front

Creative Tips –

  • I wanted to use this great plaid from the Sweater Weather Designer Series Paper Collection, so the rest of the card kind of fell into place.
  • If you want to add a little something to brighten the card up – try the Gorgeous Grunge stamp set as I did here.  The lines (my all time favorite stamp) are stamped in Tangerine Tango and the splats are stamped in Crumb Cake stamped off to make it more of the background.Christmas Messages 002 Side
  • The greeting is from a Christmas set, but honestly – it works for Thanksgiving too!  Gotta love versatility, right?
  • I wanted a larger ribbon for the knot, so I broke out a retired spool – I miss this collection, try anything you have!
  • To make the Banner Flag, you will want to use a square punch or some paper snips.  To get the end to curl up a bit, lightly curl your DSP upward using your bone folder.  The trick is not to over-work it.  View my video on how to make banner flagsChristmas Messages 002 Height
  • To add a little interest, try popping up the card front and greeting with Stamping Dimensionals.


        I hope you all enjoyed this fun project!

    Signature Snowflake 001Christmas Messages 002 Angle

    Shop 24/7 in the Creative Store – Click Here!

    Gorgeous GrungeChristmas MessagesSweater Weather Designer Series Paper

    One Layer Card–Joyful Christmas

    What do you do if you have a small budget but want cute and quick Christmas Cards to make?  Make one layer cards!  I’ve been wanting to get to know all the awesome readers that subscribe to my Creative Tips list – over there on the right —>.  So I asked them to tell me what things they struggle with creatively, if any?

    Jackie M wrote:

    I want to make my Christmas cards this year, but to be honest, I need a ton.  And budget is definitely an issue for me.  I would love to try a one layer card, but really struggle with design and making then special.  Considering I want to make more than 100, I don’t want to get too intricate with them. 

    I have a solution to your problem Jackie! Here is a quick and easy one layer card that not only is cost effective (just a 1/2 sheet of Very Vanilla cardstock – after shipping and tax that’s just $.13!), but classic and modern in design.  Give this one a try.  I have two versions – a completely stripped down one for those who don’t have too many supplies, and one punched up.

    037

    Creative Tips –

    • Stamp your clear acrylic block in Raspberry Ripple (yes the block, not stamp), stamp off and lightly mist with water.  I used the Stampin’ Spritzers – you get two for $2.95, and they give off just the perfect light stream. 
    • Stamp your block onto your folded card, keeping the same amount of space top, left and right.
    • Stamp the Poinsettia from Joyful Christmas directly on top of the block in the same shade – Raspberry Ripple.
    • To keep with the monochromatic theme – you can stamp your sentiment in the same color.  Here I used one of the greetings from Joy to the World Stamp Set.  The Joyful Christmas Set also has a great saying!038

    You can also kick this card up a notch for a different vibe as well.  Here you see the same card, but for the Poinsettia Flower and greeting, use Versamark and embossing powder.  Here you see Pewter Embossing Powder.  It’s a nice touch that’s in between black and silver.  044

    Even though the card is rather simple, it looks awesome in person.  It’s quick, cost-effective and great when you need something on the simpler side.  Plus, sometimes we need quick Christmas cards or want to send something handmade – but we know the person isn’t going to appreciate it, so why not made a variety?041

    And if you think this is too much on the simple side, try flipping the flower image for something else and throw a greeting like Thanks or Happy Birthday on there.  It’s a great card for any occasion!

    Are you part of The Creative Grove community?  Get tips, special projects and exclusive videos from time to time.  Subscribe in the box at the top right or click right here!  Be the first to know about specials, discounts and more!

    Signature Snowflake 001

    039

    Shop 24/7 – click here!

    Stamps – Joyful Christmas, Joy to the World Ink – Cherry Cobbler, Versamark Paper – Very Vanilla Cool Tools – Heat Gun Finishing Touch – Pewter Embossing Powder

    Gently Falling One Layer Card

    Gently Falling 2 001

    Don’t you just love one layer cards sometimes?  I was inspired this morning by a simple photo of some fall leaves.  I thought, I not create that same feeling on a simple and classic one layer card! 

    Sometimes you just need a go to quick card for someone without getting all the papers out, you know? Here’s how you can achieve this exact result.

    Creative Tips –

    • Bold images are great for cards like this.  Pick something that will really pop.  I chose the largest leaf from the Gently Falling stamp set.  Does anyone know what kind of leaf this is?  Let me know if the comment section below!Gently Falling 2 006
    • To keep with the falling leaves in fall theme, you can choose a trio of classic colors like Crushed Curry, Cherry Cobbler and Wild Wasabi.  For the outline, the color Early Espresso with tie it all together.
    • The colors are a bit brighter until you put the Early Espresso on it.  Then it mutes it right down.Gently Falling 2 005
    • To tie it all together, stamp your greeting in Early Espresso.
    • That’s it!  You’re done – wasn’t that fast?

    And for those of you who think I knock it out of the park on the first turn, I thought I’d show you how many I had to go through before I got it just right!!  Do you appreciate this?  Let me know in the comment section, and I’ll include more of this kind of stuff in the future.  Consider it my photo form of bloopers – I’m just human too, right?

    Gently Falling 2 008

    Do you want to want more one layer cards?  Clean and Simple cards?  Brayer cards?  Let me know – I’m always curious what my readers want to see!  Let me know below.  Have a great day! SmileGently Falling 2 002

    Are you one of my VIP’s?

    If you love this card and creative tips, then be sure to sign up for my Creative Tips list!  You’ll get VIP project videos and projects, special list only sales and discounts, and stay on top of all the cool and great things not only available at Stampin’ Up!, but also here at The Creative Grove. Be in the know, first on the list!  I don’t like excess email or stuff I don’t want, so know that your email address is something sacred to me.  I would never abuse that trust!  Click here if You love creative tips and want to be one of my VIP’s! Smile

    Signature Snowflake 001

    To shop 24/7 for any of the above projectclick here

    Gently Falling 2 004

    Stamp Sets – Gently Falling Ink – Crushed Curry, Wild Wasabi, Cherry Cobbler, Early Espresso Paper – Whisper White